Hitachi monitoring: VSP G/F/E/N, HCP, HNAS, HUS-VM, HUS, AMS
In case of usage of Virtual Appliance
The CLI is included in the same CD from where you got the SNM UI. If you dont have the CD you should ask HDS for the SNM CD (usually distributed as an ISO image).
- Use local account lpar2rrd for hosting of STOR2RRD on the virtual appliance
- Use /home/stor2rrd/stor2rrd as the product home
- Use lpar2rrd account on storage as it is configured in /home/stor2rrd/stor2rrd/etc/stor2rrd.cfg (STORAGE_USER)
The CLI is included in the same CD from where you got the SNM UI. If you dont have the CD you should ask HDS for the SNM CD (usually distributed as an ISO image).
Install HUS HSNM2 CLI
-
Allow access from the STOR2RRD host to the both HUS storage controllers on port 2000 (28355 when using secure communication).
Test if port is open:$ perl /home/stor2rrd/stor2rrd/bin/conntest.pl 192.168.1.1 2000 Connection to "192.168.1.1" on port "2000" is ok
- HUS HSNM2 CLI apparently needs libstdc++ package. Assure that it is installed.
Install it if it is not listed:$ rpm -qa|grep libstdc++ libstdc++-4.8.3-9.el7.x86_64
# yum install libstdc++     # (RedHat, prp. Debian/Ubuntu )
# apt-get install libstdc++ # (Debian/Ubuntu )
- Get HUS HSNM2 CLI package for your operating system and install it under root:
# mkdir /usr/stonavm/
# cd /usr/stonavm/
# tar xf /tmp/HSNM2-2810-A-CLI-P01.tar
# chown stor2rrd /usr/stonavm   # This must be owned by stor2rrd (lpar2rrd on the virtual appliance) !!!!
- Set environment in your actual shell (just copy&paste to the cmd line)
LIBPATH=/usr/stonavm/lib:$LIBPATH
SHLIB_PATH=/usr/stonavm/lib:$SHLIB_PATH
LD_LIBRARY_PATH=/usr/stonavm/lib:$LD_LIBRARY_PATH
STONAVM_HOME=/usr/stonavm
STONAVM_ACT=on
STONAVM_RSP_PASS=on
PATH=$PATH:/usr/stonavm
export  LIBPATH SHLIB_PATH LD_LIBRARY_PATH STONAVM_HOME STONAVM_ACT STONAVM_RSP_PASS PATH
- Register the storage systems to be monitored (adjust IPs in below examples)
- Automatically
# auunitaddauto -ip 192.168.1.1 192.168.1.2
- Manuallly
# auunitadd -unit HUS110 -LAN -ctl0 192.168.1.1 -ctl1 192.168.1.2
-
Using secure communication (port 28355 on storage):
# auunitadd -unit HUS110 -LAN -ctl0 192.168.1.1 -ctl1 192.168.1.2 -communicationtype secure
- Automatically
-
Create user stor2rrd (lpar2rrd on the Appliance) on the storage with role Storage Administrator (View Only)
-
Register user access for the storage
# auaccountenv -set -uid stor2rrd -authentication
-
Test connectivity
# auunitref
# auunitinfo -unit HUS110
STOR2RRD storage configuration
- All actions below under stor2rrd user (lpar2rrd on Virtual Appliance)
-
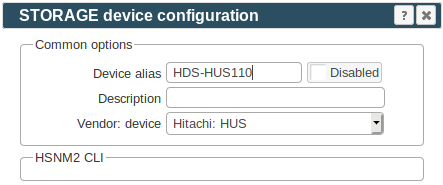
Add storage into configuration from the UI:
Settings icon ➡ Storage ➡ New ➡ Vendor:device ➡ Hitachi HUS
-
Make sure you have enough of disk space on the filesystem where is STOR2RRD installed
Roughly you might count 2 - 30 GB per a storage (it depends on number of volumes, 30GB for 5000 volumes)$ df -g /home # AIX $ df -h /home # Linux
-
Test storage connectivity, either from the UI or from the command line:
$ cd /home/stor2rrd/stor2rrd
$ ./bin/config_check.sh
  =========================
  STORAGE: HUS110: HUS
  =========================
  /usr/stonavm/auunitinfo -unit HUS110
  connection ok
- Schedule to run storage agent from stor2rrd crontab (lpar2rrd on Virtual Appliance, it might already exist there)
Add if it does not exist as above
$ crontab -l | grep load_husperf.sh
$
Assure there is already an entry with the UI creation running once an hour in crontab$ crontab -e # Hitachi HUS && AMS 2000 storage agent 0,5,10,15,20,25,30,35,40,45,50,55 * * * * /home/stor2rrd/stor2rrd/load_husperf.sh > /home/stor2rrd/stor2rrd/load_husperf.out 2>&1
$ crontab -e

# STOR2RRD UI (just ONE entry of load.sh must be there)
5 * * * * /home/stor2rrd/stor2rrd/load.sh > /home/stor2rrd/stor2rrd/load.out 2>&1
-
Let run the storage agent for 15 - 20 minutes to get data, then:
$ cd /home/stor2rrd/stor2rrd
$ ./load.sh
- Go to the web UI: http://<your web server>/stor2rrd/
Use Ctrl-F5 to refresh the web browser cache.
In case of usage of Virtual Appliance
Note that Virtual Storage Machines (VSM) feature is not supported by the tool.
Either use direct storage REST API instead of CCI, which is not however available on older systems like the VSP G1000 or VSP G200/400 which have no REST API support.
Therefore its implemented Hitachi Configuration Manager support to enable REST API access even for these storage devices.
Configuration is easy, create an account on Hitachi Configuration Manager and put its hostname and user credentials into STOR2RRD configuration.
You have to define also device id of the storage.
Hitachi Configuration Manager is apparently free for Hitachi customers.
- Use local account lpar2rrd for hosting of STOR2RRD on the virtual appliance
- Use /home/stor2rrd/stor2rrd as the product home
Hitachi VSP G/F/E/N, HUS-VM monitoring setups
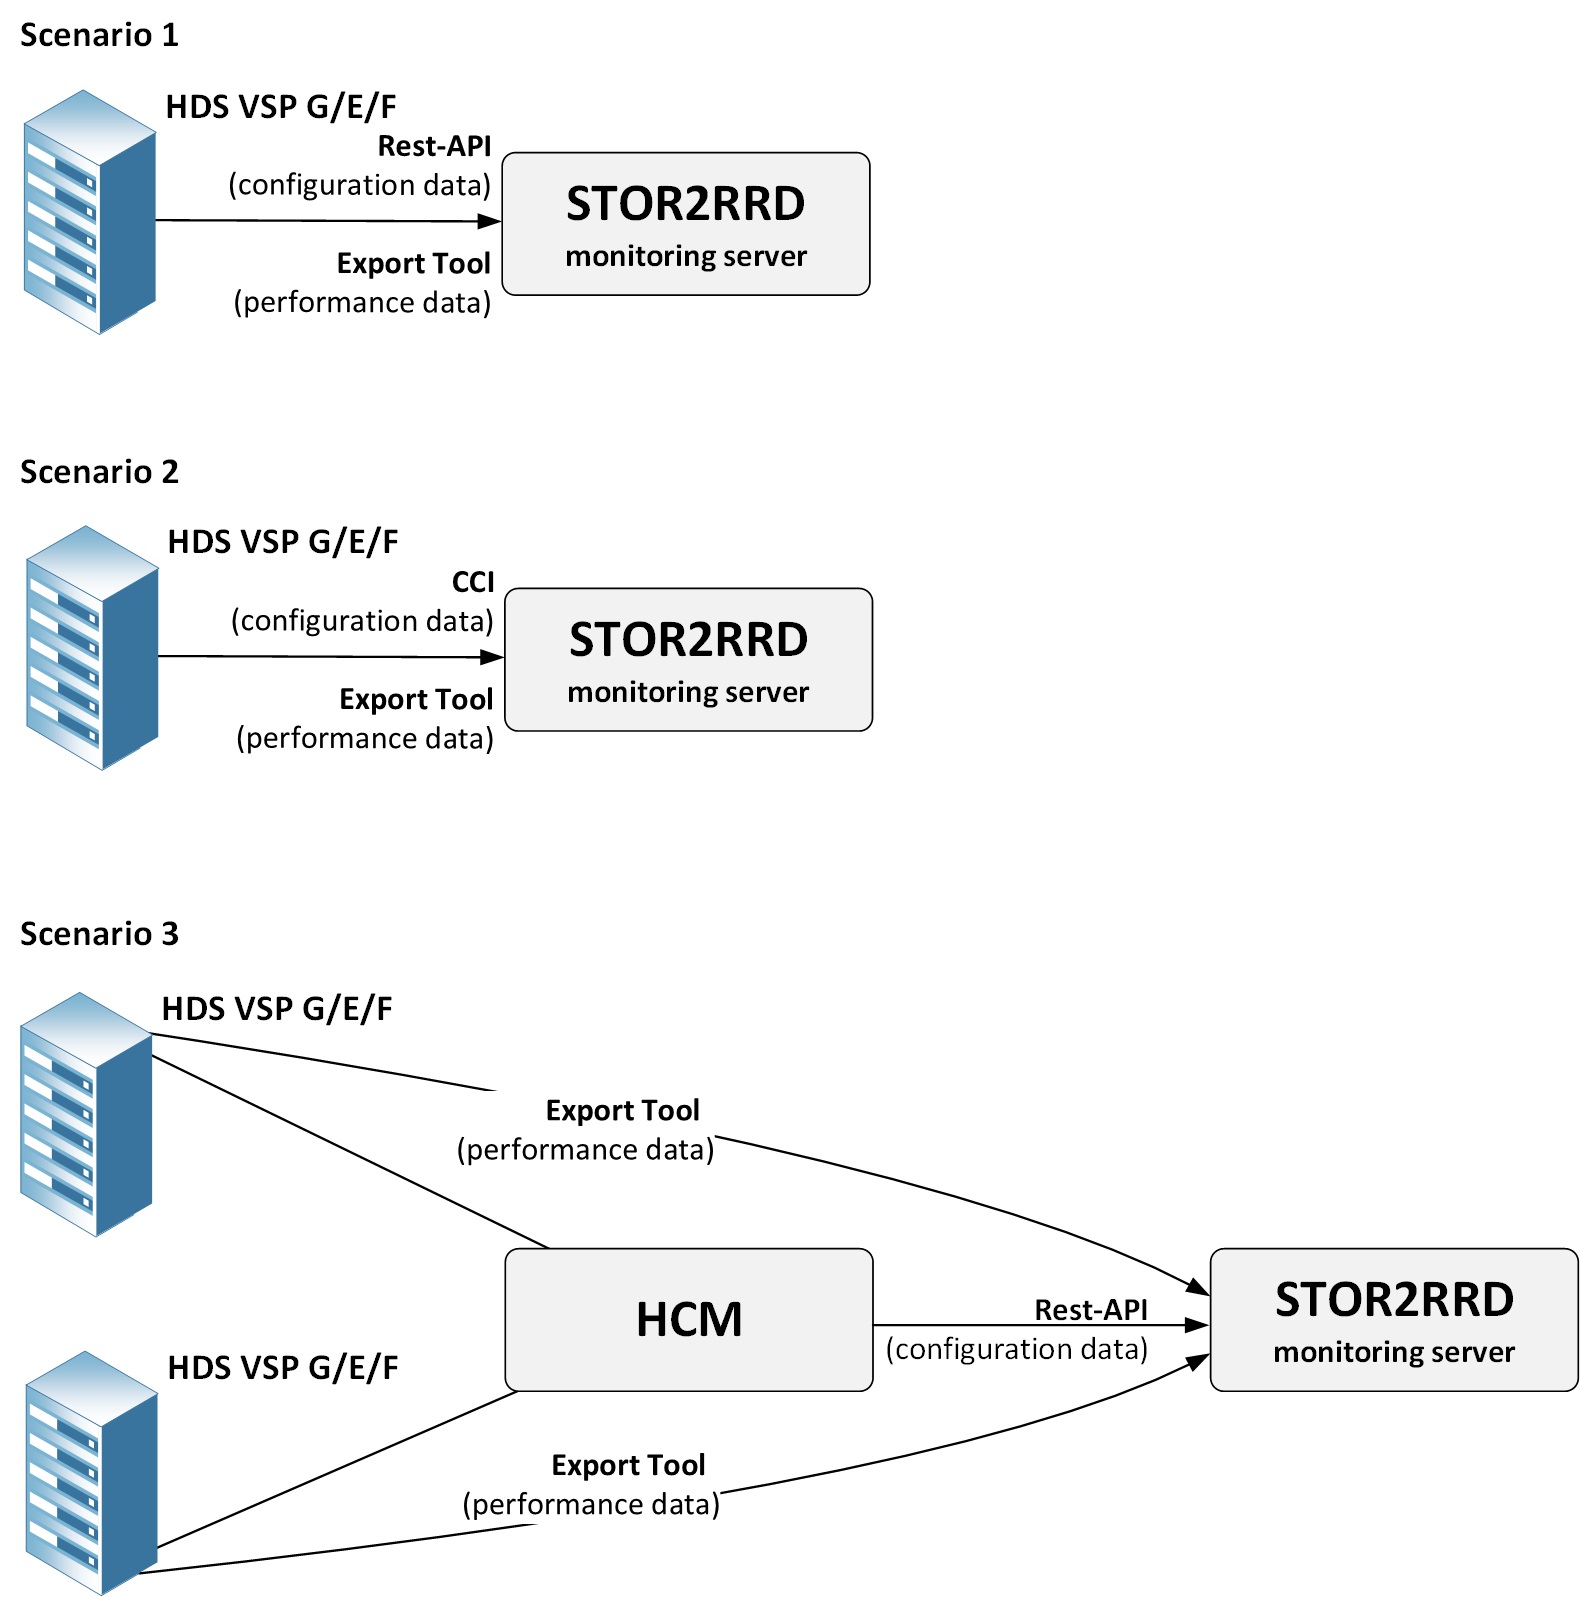
- REST API, Export Tool: use it on new models which support it, it has much easier setup
- CCI, SNMP, Export Tool: it works on all models
- Hitachi Configuration Manager REST API / Export Tool
 |
1. Hitachi VSPG REST API, Export Tool
Supported modelsPrerequisites
-
Allow communication from STOR2RRD host to all Hitachi VSPG storage SVP IP and nodes on TCP port 1099.
There mus be open even some other ports for Hitach Export Tool like: 51100, 51101 or 51099 depends on the version of the Export Tool.
Nodes IP: enable TCP port 443.
At least VSP 5500 has not available Nodes, then use SVP IP instead and allow also TCP port 443.
New storage devices do not have SVP, put Node1 IP/hostname into SVP field.
$ perl /home/stor2rrd/stor2rrd/bin/conntest.pl 192.168.1.1 1099
  Connection to "192.168.1.3" on port "1099" is ok
$ perl /home/stor2rrd/stor2rrd/bin/conntest.pl 192.168.1.1 443
  Connection to "192.168.1.3" on port "443" is ok
- Storage configuration:
Create user stor2rrd on the storage, read only access
For newer models (like Hitachi VSP One Block), the user role Storage Administrator (Performance Management) is required. Read more.
Do not use shell special characters like #!?|$*[]\{}`"'& in the password, use ;:.+-%@ instead.
You can also follow this docu to fully prepare storage for monitoring
Installation of Hitachi Export Tool
-
It is typically located on a CD that comes packaged with the Service Processor on the HDS USP Array. The Export Tool can also be obtained by contacting HDS support.
(CD location: /ToolsPack/ExportTool)
You can also download it from Hitachi web site
Hitachi produces a new Export Tool for each release of the firmware. So unless you make sure all of the storage are running on the same firmware version then you will need to obtain the appropriate version of the Export Tool to meet the firmware version you are running at the site.
Find our firmware release of your storage (like 83-01-28/00).
Export Tool version must match the SVP firmware version.
Install each version of the Export Tool into separate directory named as firmware of your storage (just 6 numbers like in this example firmware 83-01-28) under root user:
# mkdir /opt/hds
# mkdir /opt/hds/83-01-28
# cd /opt/hds/83-01-28
# tar xvf export-tool.tar
# chmod 755 runUnix.sh runUnix.bat # note one of these files exists only
# chown -R stor2rrd /opt/hds
# chown -R lpar2rrd /opt/hds  # do this on the Virtual Appliance where is all under "lpar2rrd" user
In this case you do not need to install older Export Tool, just make a symlink.
# cd /opt/hds/
# ls
  83-01-28
# ln -s 83-01-28 73-03-57
Test Export Tool 2
$ cd /opt/hds/<firmware level> # example /opt/hds/88-03-23
$ bash ./runUnix.sh show interval -ip <ip controller> -login <user> <password>
  Interval : 5 min
  show interval command success
Directory /opt/hds is optional, it is configurable in /home/stor2rrd/stor2rrd/etc/stor2rrd.cfg : VSP_CLIDIR=/opt/hds
The HDS Performance Monitor License must exist for each array and monitoring must be enabled.
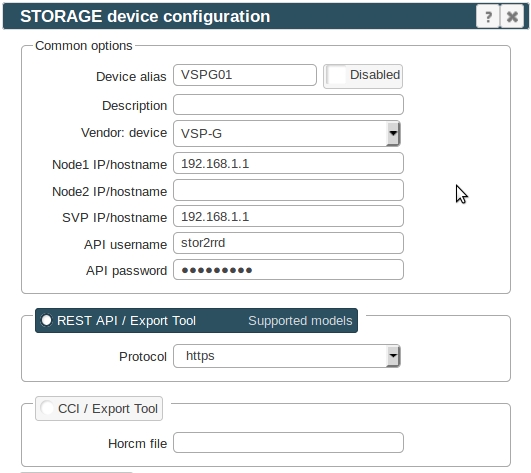
Storage configuration example
Java 11 is required by the Export Tool for new VSPG 5500 boxes.
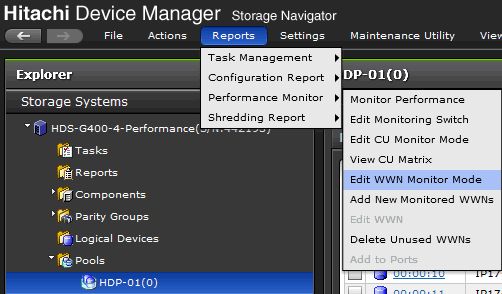
Allow monitoring of CU and WWN
-
Note this configuration option do not have to be in place on all modes or firmwares, you might ignore it if you do not find it on your storage.
- CU


- WWN
Note that monitoring apparently cannot be enabled when WWNs per Port exceeds the maximum of 32.
In this case you will not have direct per host data but host data will be aggregated from attached volumes (it might mislead when volumes have attached more hosts).
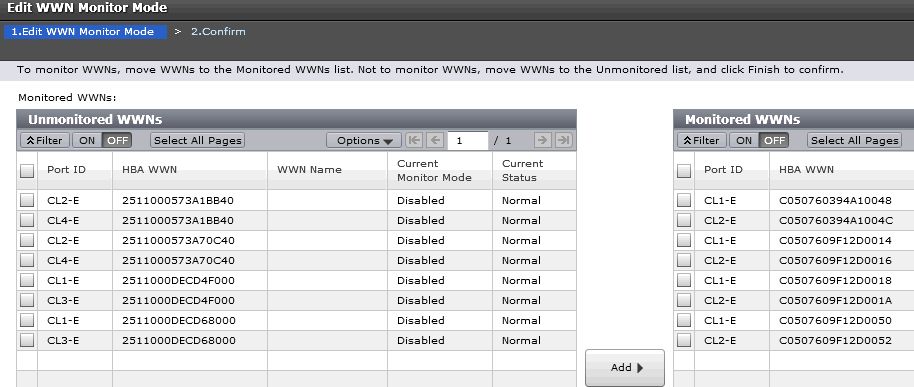
When you still do not have data then re-enable of monitoring might help.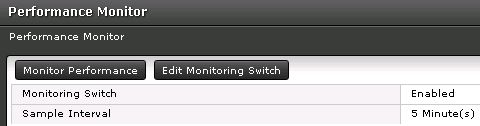
STOR2RRD storage configuration
-
Configure Export Tool installation directory in /home/stor2rrd/stor2rrd/etc/stor2rrd.cfg when is in different pathen then /opt/hds
VSP_CLIDIR=/opt/hds
- Add storage into configuration from the UI:
Settings icon ➡ Storage ➡ New ➡ Vendor:device ➡ Hitachi VSP-G ➡ REST API
When your storage model has only SVP, then use just SVP IP/hostname for SVP field and same for Node1
New storage devices do not have SVP, put Node1 IP/hostname into SVP field.
- All actions below under stor2rrd user on STOR2RRD server (lpar2rrd on Virtual Appliance)
-
Assure you have enough of disk space on the filesystem where is STOR2RRD installed
Roughly you might count 2 - 30 GB per a storage (it depends on number of volumes, 30GB for 5000 volumes)$ df -g /home # AIX $ df -h /home # Linux
- Schedule to run storage agent from stor2rrd crontab (lpar2rrd on Virtual Appliance, it might already exist there)
Add if it does not exist as above
$ crontab -l | grep load_vspgperf.sh
$
Assure there is already an entry with the UI creation running once an hour in crontab$ crontab -e # Hitachi VSP-G 0,5,10,15,20,25,30,35,40,45,50,55 * * * * /home/stor2rrd/stor2rrd/load_vspgperf.sh > /home/stor2rrd/stor2rrd/load_vspgperf.out 2>&1
$ crontab -e

# STOR2RRD UI (just ONE entry of load.sh must be there)
5 * * * * /home/stor2rrd/stor2rrd/load.sh > /home/stor2rrd/stor2rrd/load.out 2>&1
-
Let run the storage agent for 15 - 20 minutes to get data, then:
$ cd /home/stor2rrd/stor2rrd
$ ./load.sh
- Go to the web UI: http://<your web server>/stor2rrd/
Use Ctrl-F5 to refresh the web browser cache.
2. Hitachi VSPG CCI, SNMP, Export Tool
The program uses 3 Hitachi APIs. You have to install and configure all of them.- Command Control Interface (CCI)
- Hitachi Export tool
- SNMP API to get Health status
Note that Virtual Storage Machines (VSM) feature is not supported by the tool.
Storage configuration
-
Follow this docu to prepare your storage for monitoring.
Installation of Hitachi CCI
-
Allow communication from STOR2RRD host to all Hitachi VSPG storage SVP IP on TCP ports 1099, 51100
Note new firmwares might use 51101 or 51099 ports instead of 51100.
New storage devices do not have SVP, put Node1 IP/hostname into SVP field.
Test open ports for TCP protocols to SVP IP:Allow communication from STOR2RRD host to all storage node IP on UDP 31001$ perl /home/stor2rrd/stor2rrd/bin/conntest.pl 192.168.1.1 1099 Connection to "192.168.1.3" on port "1099" is ok $ perl /home/stor2rrd/stor2rrd/bin/conntest.pl 192.168.1.1 51100 Connection to "192.168.1.3" on port "51100" is ok
How to test UDP
-
Create user stor2rrd on the storage, read only access
Do not use shell special characters like #!?|$*[]\{}`"'& in the password, use ;:.+-%@ instead.
- Obtain CCI installation package from your Hitachi representatives.
-
Install it from .iso image under root account
Mount ISO image:
- AIX command:
# loopmount -i /HS042_77.iso -o "-V cdrfs -o ro" -m /mnt
- Linux (Virtual Appliance) command:
Assure you have installed 32 bits libraries, install them if do not# mount -o loop,ro HS042_77.iso /mnt
# yum -y install glibc.i686
- AIX command:
-
Create target directory:
# mkdir /etc/HORCM
# cd /mnt
# ./RMinstsh
-
Install from CD
# mkdir /opt
# cpio -idmu < /dev/XXXX    # where XXXX = I/O device with install media
# ln -s /opt/HORCM /HORCM
- Execute the CCI installation command:
# /HORCM/horcminstall.sh
-
Verify installation of the proper version using the raidqry command:
# raidqry -h
  Model: RAID-Manager/HP-UX
  Ver&Rev: 01-29-03/05
  Usage: raidqry [options]
-
Assure that everything is executable and writeable by stor2rrd user
Use lpar2rrd user on the Virtual Appliance.
This is a must! Under root identification execute this:# touch /HORCM/etc/USE_OLD_IOCT # chown stor2rrd /HORCM # chown -R stor2rrd /HORCM/* /HORCM/.uds # chown -R lpar2rrd /HORCM/* /HORCM/.uds # do this on the Virtual Appliance where is all under "lpar2rrd" user # chmod 755 /HORCM /HORCM/usr/bin /HORCM/usr/bin/* /HORCM/log* /HORCM/etc/horcmgr /HORCM/etc/*conf /HORCM/.uds/
-
Install it from .iso image under root account
Configuration of CCI
- CCI communication with storage can be done either via LAN (it is something described below) or via command device (SAN attached volume from the storage).
When you have many storage in place 40+ then use rather command device as LAN communication might not be reliable enough. CCI command device configuration procedure
- Each storage must have its own config file /etc/horcmXX.conf
- Check if local ports 10001 and 10002 are not used (nothing is listening there)
# netstat -an|grep -i listen| egrep "11001|11002"
- storage with controllers IP 192.168.1.1 and 192.168.1.2, conf file /etc/horcm1.conf will use local port 11001 (UDP)
Use storage node IP. SVP IP must be used in etc/storage-list.cfg further.# vi /etc/horcm1.conf HORCM_MON # ip_address service poll(10ms) timeout(10ms) localhost 11001 1000 3000 HORCM_CMD # dev_name dev_name dev_name \\.\IPCMD-192.168.1.1-31001 \\.\IPCMD-192.168.1.2-31001
- storage with IP 192.168.1.10 and 192.168.1.11, conf file /etc/horcm2.conf
change localhost port to 11002 (from 11001 which is used above)# vi /etc/horcm2.conf HORCM_MON # ip_address service poll(10ms) timeout(10ms) localhost 11002 1000 3000 HORCM_CMD # dev_name dev_name dev_name \\.\IPCMD-192.168.1.10-31001 \\.\IPCMD-192.168.1.11-31001
- Start it under stor2rrd account (definitely not under root!). Use lpar2rrd account on the Virtual Appliance
This starts HORM instance 1 (/etc/horcm1.conf)# su - stor2rrd $ /HORCM/usr/bin/horcmstart.sh 1
- Start HORM instance 1 & 2 (/etc/horcm1.conf & /etc/horcm2.conf)
# su - stor2rrd $ /HORCM/usr/bin/horcmstart.sh 1 2
- Check if they are running
$ ps -ef | grep horcm
  stor2rrd 19660912 1 0 Feb 26 - 0:03 horcmd_02
  stor2rrd 27590770 1 0 Feb 26 - 0:09 horcmd_01
- Place it into operating system start/stop scripts
# su - stor2rrd -c "/HORCM/usr/bin/horcmstart.sh 1 2"
# su - stor2rrd -c "/HORCM/usr/bin/horcmshutdown.sh 1 2"
-
When HORCM does not want to start then
- Assure that filesystem permission are fine for /HORCM (owned by stor2rrd user)
-
Check if connection to storage IP nodes is allowed: how to test UDP
Installation of Hitachi Export Tool
-
It is typically located on a CD that comes packaged with the Service Processor on the HDS USP Array. The Export Tool can also be obtained by contacting HDS support.
(CD location: /ToolsPack/ExportTool)
Hitachi produces a new Export Tool for each release of the firmware. So unless you make sure all of the storage are running on the same firmware version then you will need to obtain the appropriate version of the Export Tool to meet the firmware version you are running at the site.
Find our firmware release of your storage (83-01-28/00) identified by /etc/horcm1.conf (-I1):
Export Tool version must match the SVP firmware version.
Under stor2rrd account!
# su - stor2rrd
$ raidcom -login stor2rrd <password> -I1
$ raidqry -l -I1
  No  Group    Hostname     HORCM_ver   Uid   Serial#   Micro_ver     Cache(MB)
   1    ---   localhost   01-35-03-08     0   471234    83-01-28/00      320000
$ raidcom -logout -I1
# mkdir /opt/hds
# mkdir /opt/hds/83-01-28
# cd /opt/hds/83-01-28
# tar xvf export-tool.tar
# chmod 755 runUnix.sh runUnix.bat # note one of these files exists only
# chown -R stor2rrd /opt/hds
# chown -R lpar2rrd /opt/hds  # do this on the Virtual Appliance where is all under "lpar2rrd" user
In this case you do not need to install older Export Tool, just make a symlink.
# cd /opt/hds/
# ls
  83-01-28
# ln -s 83-01-28 73-03-57
Test Export Tool 2
$ cd /opt/hds/<firmware level> # example /opt/hds/88-03-23
$ bash ./runUnix.sh show interval -ip <ip controller> -login <user> <password>
  Interval : 5 min
  show interval command success
Directory /opt/hds is optional, it is configurable in /home/stor2rrd/stor2rrd/etc/stor2rrd.cfg : VSP_CLIDIR=/opt/hds
The HDS Performance Monitor License must exist for each array and monitoring must be enabled.
Storage configuration example
Allow monitoring of CU and WWN
-
Note this configuration option do not have to be in place on all modes or firmwares, you might ignore it if you do not find it on your storage.
- CU
- WWN
Note that monitoring apparently cannot be enabled when WWNs per Port exceeds the maximum of 32.
In this case you will not have direct per host data but host data will be aggregated from attached volumes (it might mislead when volumes have attached more hosts).
When you still do not have data then re-enable of monitoring might help.
Health status
-
Only the way to get health status from older storage models is SNMP protocol.
- AIX
# rpm -Uvh net-snmp net-snmp-utils net-snmp-perl
- Linux
Follow this to get installed SNMP support in the tool on RHEL8 and CentOS8.
Note you might need to allow optional repositories on RHEL to yum can find it# umask 0022 # yum install net-snmp # yum install net-snmp-utils # yum install net-snmp-perl
Use rhel-7-for-power-le-optional-rpms for Linux on Power etc ...# subscription-manager repos --list ... # subscription-manager repos --enable rhel-7-server-optional-rpms
- Linux Debian/Ubuntu
Assure that this line is commented out in /etc/snmp/snmp.conf% umask 0022 % apt-get install snmp libsnmp-perl snmp-mibs-downloader
#mibs :
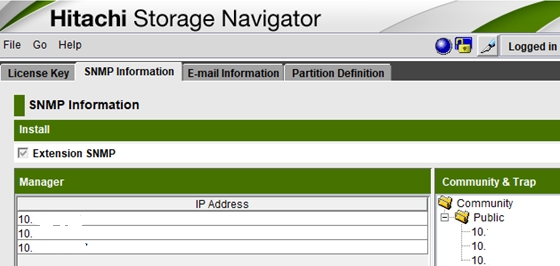
If apt-get does not find snmp-mibs-downloader package then enable contrib and non-free repositories. - Allow SNMP on the storage, below example uses SNMP v1
- Configure community string, example has "Public" set, note the first letter is uppercase
- Permit STOR2RRD IP/hostname
Install snmpwalk
Skip that in case you are on our Virtual ApplianceStorage configuration - VSP-G
Allow SNMP on the storage, configure protocol (SNMP version), community string and permit STOR2RRD IP/hostname.  |
Storage configuration - HUS-VM
 |
Network communication
Allow comunication between STOR2RRD server and the storage on CNTL IP and port 161 UDPYou can test network visibility through this test:
perl /home/stor2rrd/stor2rrd/bin/conntest_udp.pl vspg_CNTL_host.example.com 161
  UDP connection to "vspg_CNTL_host.example.com" on port "161" is ok
STOR2RRD storage configuration
-
Configure Export Tool installation directory in /home/stor2rrd/stor2rrd/etc/stor2rrd.cfg when is in different pathen then /opt/hds
VSP_CLIDIR=/opt/hds
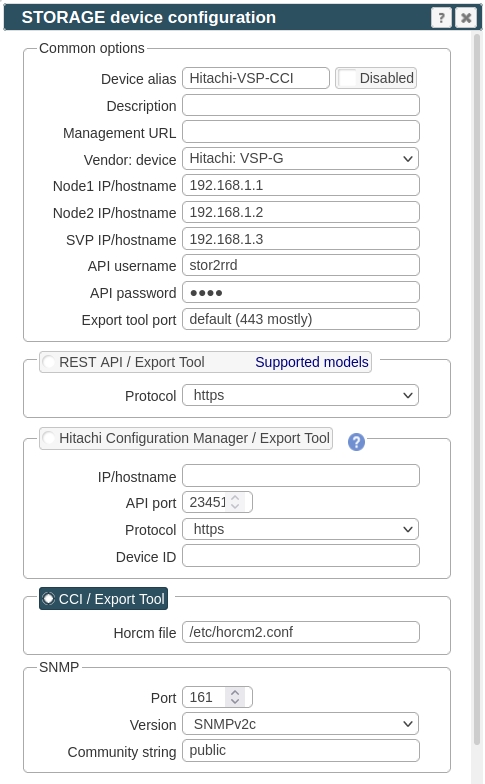
- Add storage into configuration from the UI:
Settings icon ➡ Storage ➡ New ➡ Vendor:device ➡ Hitachi VSP-G ➡ CCI
New storage devices do not have SVP, put Node1 IP/hostname into SVP field.
- All actions below under stor2rrd user on STOR2RRD server (lpar2rrd on Virtual Appliance)
-
Assure you have enough of disk space on the filesystem where is STOR2RRD installed
Roughly you might count 2 - 30 GB per a storage (it depends on number of volumes, 30GB for 5000 volumes)$ df -g /home # AIX $ df -h /home # Linux
- Schedule to run storage agent from stor2rrd crontab (lpar2rrd on Virtual Appliance, it might already exist there)
Add if it does not exist as above
$ crontab -l | grep load_vspgperf.sh
$
Assure there is already an entry with the UI creation running once an hour in crontab$ crontab -e # Hitachi VSP-G 0,5,10,15,20,25,30,35,40,45,50,55 * * * * /home/stor2rrd/stor2rrd/load_vspgperf.sh > /home/stor2rrd/stor2rrd/load_vspgperf.out 2>&1
$ crontab -e

# STOR2RRD UI (just ONE entry of load.sh must be there)
5 * * * * /home/stor2rrd/stor2rrd/load.sh > /home/stor2rrd/stor2rrd/load.out 2>&1
-
Let run the storage agent for 15 - 20 minutes to get data, then:
$ cd /home/stor2rrd/stor2rrd
$ ./load.sh
- Go to the web UI: http://<your web server>/stor2rrd/
Use Ctrl-F5 to refresh the web browser cache.
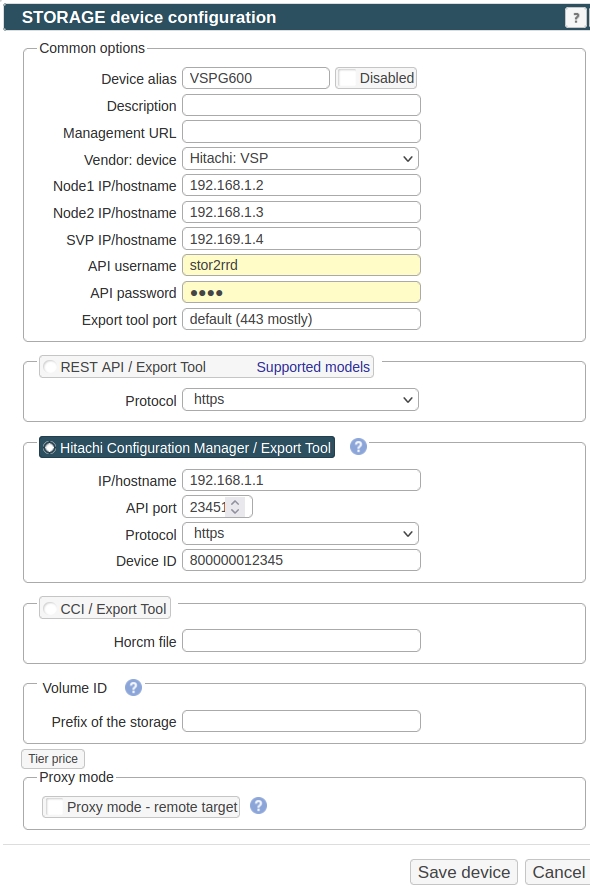
3. Hitachi Configuration Manager, Export Tool
Hitachi Configuration Manager can be used as a replacement of Hitachi CCI, its configuration is much easier than CCI.Either use direct storage REST API instead of CCI, which is not however available on older systems like the VSP G1000 or VSP G200/400 which have no REST API support.
Therefore its implemented Hitachi Configuration Manager support to enable REST API access even for these storage devices.
Configuration is easy, create an account on Hitachi Configuration Manager and put its hostname and user credentials into STOR2RRD configuration.
You have to define also device id of the storage.
Hitachi Configuration Manager is apparently free for Hitachi customers.
Prerequisities
- Open port are 23450 (HTTP) or 23451 (HTTPS) from STOR2RRD server
- It uses same user account which is used for Export Tool already created on the back-end storage
Configuration
Follow above chapters for setting up Export Tool and the storage- Installation of Hitachi Export Tool
- Allow monitoring of CU and WWN
STOR2RRD storage configuration
- All actions below under stor2rrd user (lpar2rrd on Virtual Appliance)
-
Configure Export Tool installation directory in /home/stor2rrd/stor2rrd/etc/stor2rrd.cfg
VSP_CLIDIR=/opt/hds
-
Add storage into configuration from the UI:
Settings icon ➡ Storage ➡ New ➡ Vendor:device ➡ Hitachi VSP-G
-
Read this for setting up of health status monitoring via SNMP.
-
Make sure you have enough of disk space on the filesystem where is STOR2RRD installed
Roughly you might count 2 - 30 GB per a storage (it depends on number of volumes, 30GB for 5000 volumes)$ df -g /home # AIX $ df -h /home # Linux
-
Test storage connectivity, either from the UI or from the command line:
$ cd /home/stor2rrd/stor2rrd
$ ./bin/config_check.sh
  =========================
  STORAGE: VSPG-600 : VSPG
  =========================
  connection ok
- Schedule to run storage agent from stor2rrd crontab (lpar2rrd on Virtual Appliance, it might already exist there)
Add if it does not exist as above
$ crontab -l | grep load_vspgperf.sh
$
Assure there is already an entry with the UI creation running once an hour in crontab$ crontab -e # Hitachi VSP-G 0,5,10,15,20,25,30,35,40,45,50,55 * * * * /home/stor2rrd/stor2rrd/load_vspgperf.sh > /home/stor2rrd/stor2rrd/load_vspgperf.out 2>&1
$ crontab -e

# STOR2RRD UI (just ONE entry of load.sh must be there)
5 * * * * /home/stor2rrd/stor2rrd/load.sh > /home/stor2rrd/stor2rrd/load.out 2>&1
-
Let run the storage agent for 15 - 20 minutes to get data, then:
$ cd /home/stor2rrd/stor2rrd
$ ./load.sh
- Go to the web UI: http://<your web server>/stor2rrd/
Use Ctrl-F5 to refresh the web browser cache.
In case of usage of Virtual Appliance
There is apparently two HW different HNAS products.
- Use local account lpar2rrd for hosting of STOR2RRD on the virtual appliance
- Use /home/stor2rrd/stor2rrd as the product home
There is apparently two HW different HNAS products.
- Block storage system with a separate NAS head in front ➡ use EVS IP in connection details
- Unfied system which is a blockstorage with an integrated NAS head ➡ connect it to one of the nodes.
Install Prerequisites (skip that in case of Virtual Appliance)
- AIX
# rpm -Uvh net-snmp net-snmp-utils net-snmp-perl
- Linux
Note you might need to allow optional repositories on RHEL to yum can find it# umask 0022 # yum install net-snmp # yum install net-snmp-utils # yum install net-snmp-perl
Use rhel-7-for-power-le-optional-rpms for Linux on Power etc ...# subscription-manager repos --list ... # subscription-manager repos --enable rhel-7-server-optional-rpms
- Linux Debian/Ubuntu
Assure that this line is commented out in /etc/snmp/snmp.conf% umask 0022 % apt-get install snmp libsnmp-perl snmp-mibs-downloader
#mibs :
If apt-get does not find snmp-mibs-downloader package then enable contrib and non-free repositories.
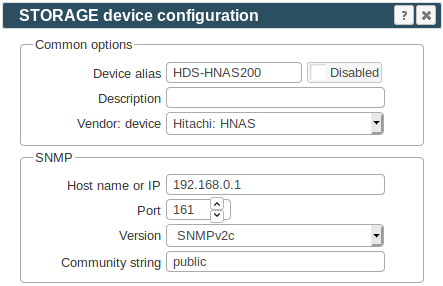
Enable SNMP v2c or v3 protocol on the storage
- SNMP v2c
Hitachi docu, follow section "Configuring SNMP access"
Navigate to: Home ➡ Server ➡ Settings ➡ SNMP Access Configuration
Select SNMP v2c, leave port 161, add stor2rrd server as alllowed host and set community string
Note: do not use SNMP v1, it does not work
- SNMP v3
Hitachi docu, follow section "Configuring SNMPv3 access"
Use the CLI command snmp-protocol to configure SNMPv3.
When SNMPv3 is enabled the SNMP agent will not respond to SNMPv1 or SNMPv2c requests.$ ssh supervisor@<EVS hostname/IP> HNAS1:$ snmp-protocol -v v3 HNAS1:$ snmp-protocol Protocol: SNMPv3Add users with the snmpv3-user-add command.HNAS1:$ snmpv3-user-add stor2rrd Please enter the authentication password: ******** Please re-enter the authentication password: ******** Please enter the privacy password: ******** Please re-enter the privacy password: ********
Enable enhanced stats
- It must be anabled otherwise Pool and Disk stats will not work
Use HNAS CLI (ssh) to enable it under supervisor user:$ ssh supervisor@<EVS hostname/IP> HNAS1:$ enhanced-perf-stats Enhanced stats gathering: disabled HNAS1:$ enhanced-perf-stats -enable
Allow network access
-
Allow access from the STOR2RRD host to the storage (EVS IP) on port 161 UDP .
Test if port is open:$ perl /home/stor2rrd/stor2rrd/bin/conntest_udp.pl 192.168.1.1 161 Connection to "192.168.1.1" on port "161" is ok
STOR2RRD storage configuration
- All actions below under stor2rrd user (lpar2rrd on Virtual Appliance)
-
Add storage into configuration from the UI: Settings icon ➡ Storage ➡ New ➡ Vendor:device ➡ Hitachi HNAS
-
Assure you have enough of disk space on the filesystem where is STOR2RRD installed
Roughly you might count 2 - 30 GB per a storage (it depends on number of volumes, 30GB for 5000 volumes)$ df -g /home # AIX $ df -h /home # Linux
-
Test storage connectivity, either from the UI or from the command line:
$ cd /home/stor2rrd/stor2rrd $ ./bin/config_check.sh ========================= STORAGE: HNAS-alias02: HNAS ========================= UDP connection to "192.168.177.7" on port "161" is ok san_verify.pl: snmpwalk -v 2c -c public 192.168.1.1 .1.3.6.1.4.1.11096.6.1.1 SNMP version : 2c (default) Port : 161 (default) Timeout : 5 seconds Community : public Storage name : hnas01.example.com STATE : CONNECTED! connection ok
- Schedule to run storage agent from stor2rrd crontab (lpar2rrd on Virtual Appliance, it might already exist there)
Add if it does not exist as above
$ crontab -l | grep load_hnasperf.sh $
Assure there is already an entry with the UI creation running once an hour in crontab$ crontab -e # Hitachi HNAS 0,5,10,15,20,25,30,35,40,45,50,55 * * * * /home/stor2rrd/stor2rrd/load_hnasperf.sh > /home/stor2rrd/stor2rrd/load_hnasperf.out 2>&1
$ crontab -e # STOR2RRD UI (just ONE entry of load.sh must be there) 5 * * * * /home/stor2rrd/stor2rrd/load.sh > /home/stor2rrd/stor2rrd/load.out 2>&1
-
Let run the storage agent for 15 - 20 minutes to get data, then:
$ cd /home/stor2rrd/stor2rrd $ ./load.sh
- Go to the web UI: http://<your web server>/stor2rrd/
Use Ctrl-F5 to refresh the web browser cache.
In case of usage of Virtual Appliance
Event logs and health status is obtained via SNMP.
- Use local account lpar2rrd for hosting of STOR2RRD on the virtual appliance
- Use /home/stor2rrd/stor2rrd as the product home
Event logs and health status is obtained via SNMP.
Storage connectivity
-
Allow access from the STOR2RRD host to the Hitachi HCP storage on port 161 (UDP) and 9090 (API)
$ perl /home/stor2rrd/stor2rrd/bin/conntest_udp.pl 192.168.1.1 161 Connection to "192.168.1.1" on port "161" is ok $ perl /home/stor2rrd/stor2rrd/bin/conntest_udp.pl 192.168.1.1 9090 Connection to "192.168.1.1" on port "9090" is ok
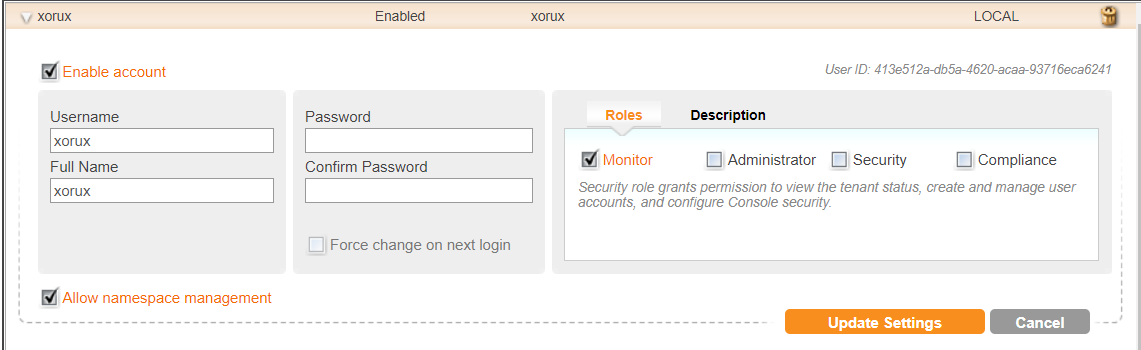
- Storage users
1. Create global user (preferably stor2rrd) for access to the storage with Monitor role.
2. Create additional user in each monitored Tenant with Monitor role.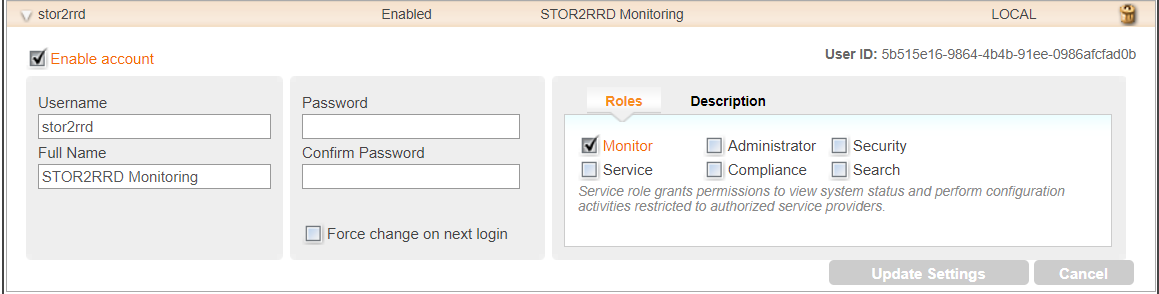
-
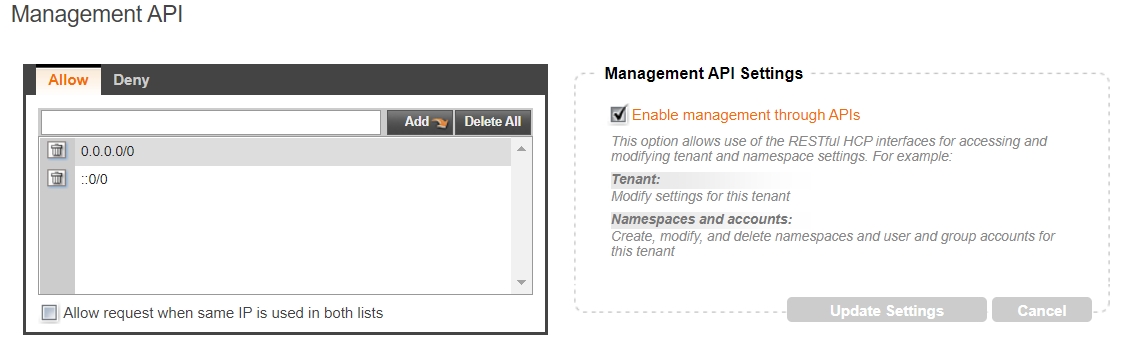
Allow Management API access from STOR2RRD hosts/network/globaly for storage and each tenant
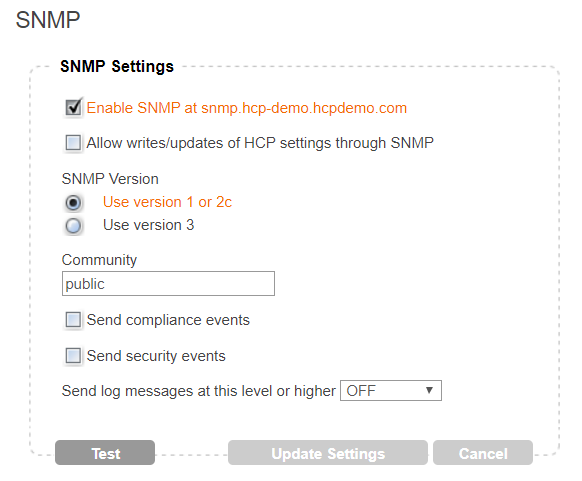
- Enable SNMP:
STOR2RRD storage configuration
-
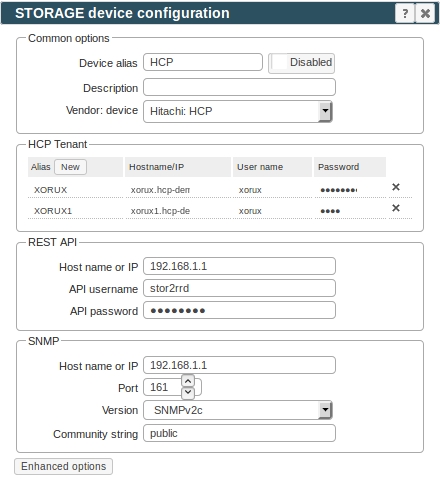
Add storage into configuration from the UI:
Settings icon ➡ Storage ➡ New ➡ Vendor:device ➡ Hitachi : HCP
-
Assure you have enough of disk space on the filesystem where is STOR2RRD installed
Roughly you might count 2 - 30 GB per a storage (it depends on number of volumes, 30GB for 5000 volumes)$ df -g /home # AIX $ df -h /home # Linux
- Schedule to run storage agent from stor2rrd crontab (lpar2rrd on Virtual Appliance, it might already exist there)
Add if it does not exist as above
$ crontab -l | grep load_hcpperf.sh $
Assure there is already an entry with the UI creation running once an hour in crontab$ crontab -e # Hitachi HCP 0,5,10,15,20,25,30,35,40,45,50,55 * * * * /home/stor2rrd/stor2rrd/load_hcpperf.sh > /home/stor2rrd/stor2rrd/load_hcpperf.out 2>&1
$ crontab -e

# STOR2RRD UI (just ONE entry of load.sh must be there)
5 * * * * /home/stor2rrd/stor2rrd/load.sh > /home/stor2rrd/stor2rrd/load.out 2>&1
-
Let run the storage agent for 15 - 20 minutes to get data, then:
$ cd /home/stor2rrd/stor2rrd
$ ./load.sh
- Go to the web UI: http://<your web server>/stor2rrd/
Use Ctrl-F5 to refresh the web browser cache.