Installation
To install STOR2RRD follow all tabs from the left to the right.Skip Prerequisites, Web and STOR2RRD tabs in case of configuring Virtual Appliance, Docker or a Container
Consider usage of our brand new full-stack infrastructure monitoring tool XorMon as STOR2RRD replacement.
It brings a new level of infrastructure monitoring by relying on a modern technology stack.
In particular, reporting, exporting, alerting and presentation capabilities are unique on the market.
It already supports majority of monitored devices and features what STOR2RRD does, check for unsuported yet ones.
STOR2RRD installation (all under stor2rrd user)
-
Download the latest STOR2RRD server
Upgrade your already running STOR2RRD instance.
- Product installation
su - stor2rrd
tar xvf stor2rrd-7.XX.tar
cd stor2rrd-7.XX
./install.sh
- Make sure all Perl modules are in place
cd /home/stor2rrd/stor2rrd
. etc/stor2rrd.cfg; $PERL bin/perl_modules_check.pl
If there is missing "LWP::Protocol::https" then check this docu to fix it
- AIX:
-
If any problem in above cmd which prints missing modelues then adjust following variables in /home/stor2rrd/stor2rrd/etc/stor2rrd.cfg
- If it cannot find RRDp.pm then search it and place its path at the end of PERL5LIB
find /opt -name RRDp.pm 2>/dev/null
  /opt/freeware/lib/perl5/5.34/vendor_perl/RRDp.pm
  /opt/freeware/lib64/perl5/5.34/vendor_perl/RRDp.pm
- This is how should look like some parameters in etc/stor2rrd.cfg, adjust PERL5LIB if RRDp.pm is in different location
  PERL=/usr/bin/perl
  PERL5LIB=/home/stor2rrd/stor2rrd/bin:/home/stor2rrd/stor2rrd/lib:/opt/freeware/lib64/perl5/5.34/vendor_perl:/opt/freeware/lib/perl5/5.34/vendor_perl
  RRDTOOL=/opt/freeware/bin/rrdtool
Adjust above PERL5LIB path based on which Perl you have in /opt/freeware/bin/perl, above example is for "5.34", you see it in the paths:/opt/freeware/bin/perl -v| head -2 This is perl 5, version 34, subversion 1 (v5.34.1) built for ppc-aix-thread-multi-64all
Especially PERL must be set to /usr/bin/perl
- If it cannot find RRDp.pm then search it and place its path at the end of PERL5LIB
- Enable Apache authorisation
su - stor2rrd
umask 022
cd /home/stor2rrd/stor2rrd
cp html/.htaccess www
cp html/.htaccess stor2rrd-cgi
- Schedule to run STOR2RRD from stor2rrd crontab (lpar2rrd on Virtual Appliance)
You might need to add stor2rrd user (lpar2rrd for Virtual Appliance) into /var/adm/cron/cron.allow (/etc/cron.allow on Linuxes) under root user when crontab cmd fails.crontab -e # STOR2RRD UI (just ONE entry of load.sh must be there) 5 * * * * /home/stor2rrd/stor2rrd/load.sh > /home/stor2rrd/stor2rrd/load.out 2>&1
# echo "stor2rrd" >> /var/adm/cron/cron.allow
- Go to the web UI: http://<your web server>/stor2rrd/
Troubleshooting
- AIX:
-
In some cases is necessary to set LIBPATH, do not do it unless you see such error during load.sh
Can't load '/usr/opt/perl5/lib/site_perl/5.28.1/aix-thread-multi/auto/XML/Parser/Expat/Expat.so' for module XML::Parser::Expat: Could not load module /usr/opt/perl5/lib/site_perl/5.28.1/aix-thread-multi/auto/XML/Parser/Expat/Expat.so
In this case:cd /home/stor2rd/stor2rrd umask 022 echo "export LIBPATH=/opt/freeware/lib" >> etc/.magic
-
In some cases is necessary to set LIBPATH, do not do it unless you see such error during load.sh
-
If you have any problems with the UI then check:
(note that the path to Apache logs might be different, search apache logs in /var)tail /var/log/httpd/error_log # Apache error log tail /var/log/httpd/access_log # Apache access log tail /var/tmp/stor2rrd-realt-error.log # STOR2RRD CGI-BIN log tail /var/tmp/systemd-private*/tmp/stor2rrd-realt-error.log # STOR2RRD CGI-BIN log when Linux has enabled private temp
- Test of CGI-BIN setup
umask 022
cd /home/stor2rrd/stor2rrd/
cp bin/stor-test-healthcheck-cgi.sh stor2rrd-cgi/
go to the web browser: http://<your web server>/stor2rrd/test.html
You should see your Apache, STOR2RRD, and Operating System variables, if not, then check Apache logs for connected errors
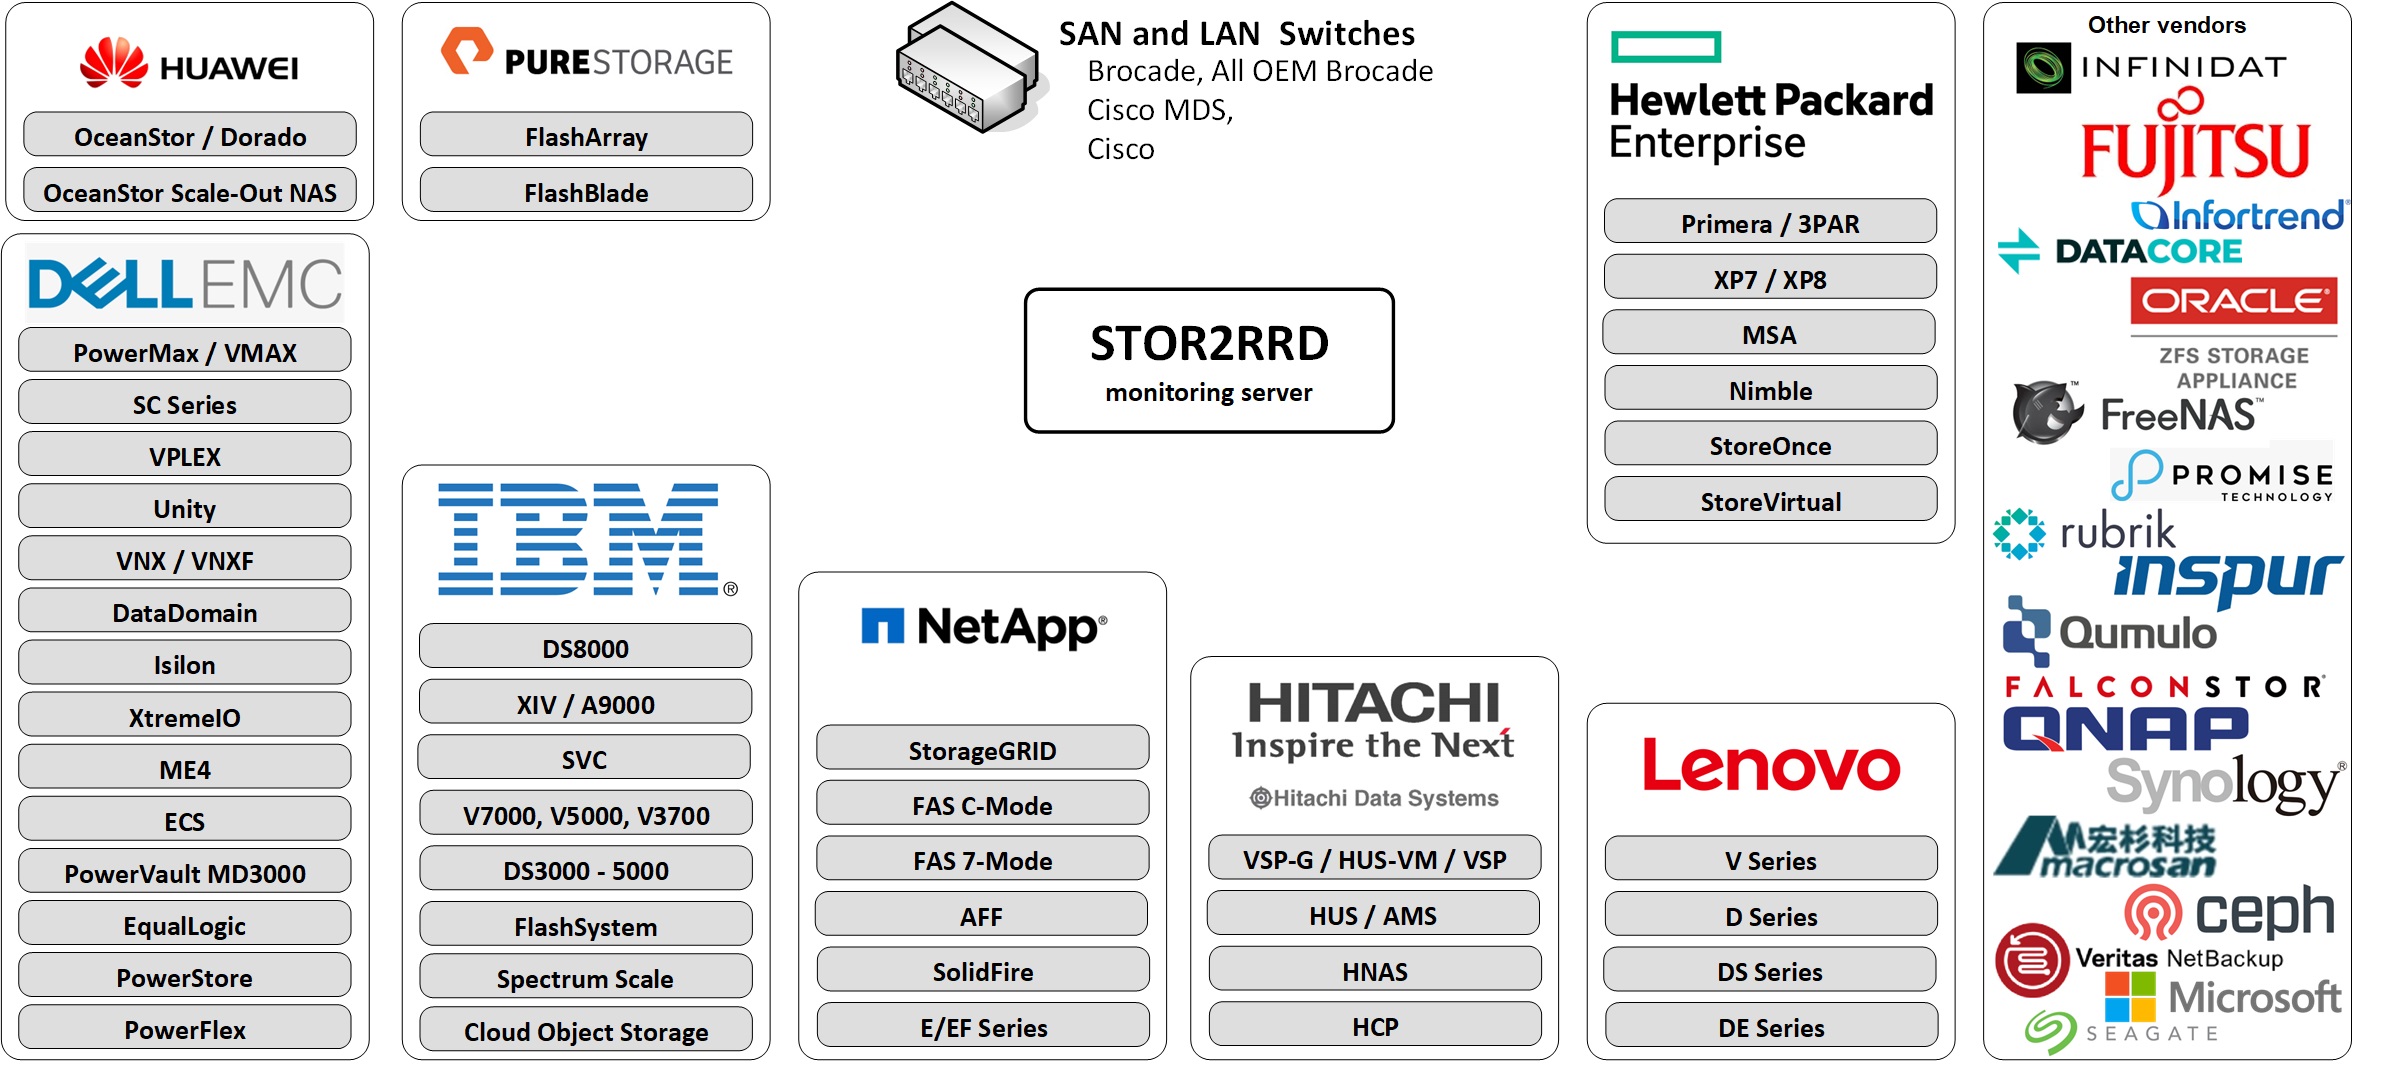
All supported storage with feature matrix.
Have not you found your storage supported?
Vote for it to give us visibility of that.
Storage access summary
| Vendor | Storage type | User role | Interface | Used ports | 3rd party SW |
|---|---|---|---|---|---|
| Dell EMC² | Celerra | nasadmin | CLI | 22 | |
| CLARiiON CX4 | operator | Navisphere CLI | 443, 6389 | Navisphere CLI | |
| Data Domain | user | CLI | 22 | ||
| ECS | System Monitor | REST API | 4443 | ||
| ME4/ME5 via SMI-S | monitor | REST API SMI-S |
80, 5988 (443, 5989) |
||
| ME4/ME5 via WBI | monitor | REST API | 443 | ||
| Metro node | read only | CLI REST API |
22, 443 | ||
| PowerFlex | monitor role | REST API | 443 | ||
| PowerMax | performance monitor | REST API | 8443 | ||
| PowerScale / Isilon | read only | REST API | 8080 | ||
| PowerStore | operator | REST API | 443 | ||
| Unity | operator | UEM CLI | 443 | Unisphere UEM CLI | |
| VMAX | performance monitor | REST API | 8443 | ||
| VNX block | operator | Navisphere CLI | 443, 6389 | Navisphere CLI | |
| VNX file | operator | CLI | 22 | ||
| VNXe | operator | REST API | 443 | VNXe UEM CLI | |
| VPLEX | vplexuser | CLI REST API |
22, 443 | ||
| XtremIO | read only | REST API | 443 |
| Vendor | Storage type | User role | Interface | Used ports | 3rd party SW |
|---|---|---|---|---|---|
| IBM | Cloud Object Storage | read | API | 443 | |
| DS8000 | monitor | DScli | 1750, 1751 | IBM DScli | |
| SVC,Storwize | Monitor | SVC CLI | 22 | ||
| Storage Virtualize | Monitor | SVC CLI | 22 | ||
| FlashSystem 9XXX, 7XXX, 5XXX | Monitor | SVC CLI | 22 | ||
| FlashSystem V9000,9100,V840 | Monitor | SVC CLI | 22 | ||
| FlashSystem 900,840 | RestrictedAdmin | SVC CLI | 22 | ||
| XIV,A9000 | readonly | SMI-S | 5989 | ||
| DS3000,4000,5000 | monitor | SMcli | 2463 | IBM SMcli | |
| Storage Scale (GPFS) | monitor | API | 443 | ||
| Elastic Storage Server (ESS) | monitor | API | 443 |
| Vendor | Storage type | User role | Interface | Used ports | 3rd party SW |
|---|---|---|---|---|---|
| NetApp | C-mode (AFF A/C-Series) | monitor | NetApp CLI NetApp API |
22, 80, 443 | |
| C-mode (AFF A/C-Series): REST API | readonly | REST API | 443 | ||
| 7-mode | monitor | NetApp CLI NetApp API |
22, 80, 443 | ||
| E/EF-series | monitor | REST API | 8443 | ||
| E/EF-series | monitor | SMcli | 2463 | SANtricity SM | |
| SolidFire | Reporting | REST API | 443 | ||
| StorageGRID | monitor | REST API | 443 |
| Vendor | Storage type | User role | Interface | Used ports | 3rd party SW |
|---|---|---|---|---|---|
| Hitachi | VSP-G/F/E/H VSP 5000 VSP One Block VSP HUS-VM |
read only | CCI/Export Tool/SNMP | TCP: 1099, 51099 - 51101 UDP: 31001 UDP: 161 |
CCI Export Tool |
| VSP-G/F/E/H VSP 5000 VSP One Block VSP HUS-VM |
read only | REST API/Export Tool | TCP: 1099, 51099 - 51101 |
Export Tool | |
| HUS, AMS | read | HSNM2 CLI | 2000, 28355 | HSNM2 CLI | |
| HNAS | read | SNMP v2c, v3 |
UDP:161 | ||
| HCP | Monitor | REST API, SNMP | TCP:443, UDP:161 |
| Vendor | Storage type | User role | Interface | Used ports | 3rd party SW |
|---|---|---|---|---|---|
| HPE | Primera | browse | 3PAR CLI via ssh |
22 | |
| Primera | browse | 3PAR CLI | 5783 | 3PAR CLI | |
| Primera | browse | WSAPI (REST API) | 8080 | ||
| 3PAR | browse | 3PAR CLI via ssh |
22 | ||
| 3PAR | browse | 3PAR CLI | 5783 | 3PAR CLI | |
| 3PAR | browse | WSAPI (REST API) | 8080 | ||
| Alletra 9000 | browse | 3PAR CLI via ssh |
22 | ||
| Alletra 9000 | browse | 3PAR CLI | 5783 | 3PAR CLI | |
| Alletra 9000 | browse | WSAPI (REST API) | 8080 | ||
| XP7 | read only | CCI, Export Tool SNMP |
TCP: 1099, 51099 - 51101 UDP: 31001 UDP: 161 |
CCI Export Tool |
|
| MSA: via WBI | monitor | REST API | 443 | ||
| MSA: via SMI-S | monitor | REST API SMI-S |
80, 5988 (443, 5989) |
||
| Alletra 6000 | guest | CLI | 22 | ||
| Nimble | guest | CLI | 22 | ||
| StoreOnce | user | REST API | 443 | ||
| StoreVirtual | view_only | CLI | 16022 |
| Vendor | Storage type | User role | Interface | Used ports | 3rd party SW |
|---|---|---|---|---|---|
| Lenovo | Storage V Series | Monitor | CLI | 22 | |
| Storage S Series: WBI | monitor | REST API | 443 | ||
| Storage S Series: SMI-S | monitor | REST API SMI-S |
80, 5988 (443, 5989) |
||
| DS Series: WBI | monitor | REST API | 443 | ||
| ThinkSystem DS Series | monitor | REST API SMI-S |
80, 5988 (443, 5989) |
||
| ThinkSystem DE Series | monitor | REST API | 8443 | ||
| ThinkSystem DE Series | monitor | SMcli | 2463 | Lenovo SMcli | |
| DM Series: REST API | monitor | REST API | 443 | ||
| ThinkSystem DM Series | monitor | Lenovo CLI Lenovo API |
22, 80, 443 | ||
| DG Series: REST API | monitor | REST API | 443 | ||
| ThinkSystem DG Series | monitor | Lenovo CLI Lenovo API |
22, 80, 443 |
| Vendor | Storage type | User role | Interface | Used ports | 3rd party SW |
|---|---|---|---|---|---|
| Dell | MD3000 | monitor | SMcli | 2463 | Dell SMcli |
| SC series (Compellent) |
Reporter | REST API | 3033 | Enterprise Manager or DSM Data Collector |
| Vendor | Storage type | User role | Interface | Used ports | 3rd party SW |
|---|---|---|---|---|---|
| Amazon FSx | NetApp | vsadmin-readonly | REST API | 443 | |
| Ceph | Ceph | Prometheus API | 9283 | ||
| Cohesity | DataProtect | Viewer | REST API | 443 | |
| DataCore | SANsymphony | View | REST API | 80 (443) | DataCore REST API package |
| DDN | EXAScaler | Read only | REST API | 443 | |
| Dot Hill | AssuredSAN via WBI | monitor | REST API | 443 | |
| AssuredSAN via SMI-S | monitor | REST API SMI-S |
80, 5988 (443, 5989) |
||
| FalconStor | FreeStor | viewer | REST API | 443 | |
| Fujitsu | ETERNUS | monitor | CLI | 22 | |
| Huawei | OceanStor | read-only | REST API | 8088 | |
| Dorado | read-only | REST API | 8088 | ||
| Pacific | read-only | REST API | 8088 | ||
| Scale-Out NAS | read-only | REST API | 8088 | ||
| OceanProtect Backup Storage | read-only | REST API | 8088 | ||
| OceanStor A series | read-only | REST API | 8088 | ||
| OceanDisk | read-only | REST API | 8088 | ||
| OceanProtect | read-only | REST API | 8088 | ||
| Infinidat | InfiniBox | read_only | REST API | 443 | |
| InfiniGuard | read_only | REST API | 443 | ||
| Infortrend | EonStor | read-only | SNMP v2c, v3 |
UDP:161 | |
| Inspur | Inspur | Monitor | SVC CLI | 22 | |
| iXsystems | FreeNAS | root | REST API | 443 | |
| TrueNAS | root | REST API | 443 | ||
| MacroSAN | Ceph | admin | SSH, FTP | 20,21,22 | |
| Oracle | Oracle ZFS | read, create | REST API | 215 | |
| Promise | VTrak | read | SNMP v2c, v3 |
UDP:161 | |
| Pure Storage | FlashArray | read-only | REST API | 443 | |
| FlashBlade | read-only | REST API | 443 | ||
| QNAP | QNAP | regular OS user | SSH | 22 | |
| Quantum | StorNext via WBI | monitor | REST API | 443 | |
| StorNext via SMI-S | monitor | REST API SMI-S |
80, 5988 (443, 5989) |
||
| Qumulo | Qumulo | Users | REST API | 8000 | |
| RAIDIX | RAIDIX 5.x | regular OS user | SSH | 22 | |
| Rubrik | CDM | ReadOnlyAdminRole | REST API | 443 | |
| Seagate | Exos X via WBI | monitor | REST API | 443 | |
| Exos X via SMI-S | monitor | REST API SMI-S |
80, 5988 (443, 5989) |
||
| Synology | Synology | read | SNMP v2c, v3 |
UDP:161 | |
| YADRO | TATLIN | restricted | monitor | 22 | |
| Veritas | NetBackup | restricted | REST API | 1556 |
| Vendor | Type | User role | Interface | Used ports | 3rd party SW |
|---|---|---|---|---|---|
| Brocade | SAN switch | read-only | SNMP v1,2,3 | 161 UDP | |
| Brocade | Network Advisor | operator read only |
REST API | 443 | |
| Brocade | SANnav | read only | REST API, Kafka | in:443, out:8081,9093 | Kafka |
| QLogic | SAN switch | read-only | SNMP v1,2,3 | 161 UDP | |
| Cisco | MDS and Nexus | read-only | SNMP v1,2,3 | 161 UDP | |
| LAN | LAN switch | read-only | SNMP v1,2,3 | 161 UDP |
 |
SAN switch access summary
| Vendor | Storage type | User role | Interface | Used ports | Note |
|---|---|---|---|---|---|
| Brocade | SAN switch | read-only | SNMP v1,2,3 | 161 UDP | |
| Brocade | SAN switch | read-only | REST API | 443 TCP | Supported only in XorMon |
| QLogic | SAN switch | read-only | SNMP v1,2,3 | 161 UDP | |
| Cisco | MDS and Nexus | read-only | SNMP v1,2 | 161 UDP |
In case of usage of Virtual Appliance
- Use local account stor2rrd for hosting of STOR2RRD on the virtual appliance
- Use /home/stor2rrd/stor2rrd as the product home
Only in case of usage Brocade/QLogic Virtual Fabric you have to do special access configuration.
Cisco VSAN support works automatically.
SAN monitoring features
Brocade note: SNMP v2 is not supported in FOS v9.0.1a but is not blocked. SNMP v2 is blocked beginning with FOS v9.1.0.
Perl SNMP v3 compatibility Auth & Priv support matrix
Install Prerequisites (skip that in case of Virtual Appliance)
- AIX
# rpm -Uvh net-snmp net-snmp-utils net-snmp-perl
- Linux
Follow this to get installed SNMP support in the tool on RHEL8 and CentOS8.
Note you might need to allow optional repositories on RHEL to yum can find it# umask 0022 # yum install net-snmp # yum install net-snmp-utils # yum install net-snmp-perl
Use rhel-7-for-power-le-optional-rpms for Linux on Power etc ...# subscription-manager repos --list ... # subscription-manager repos --enable rhel-7-server-optional-rpms
- Linux Debian/Ubuntu
Assure that this line is commented out in /etc/snmp/snmp.conf% umask 0022 % apt-get install snmp libsnmp-perl snmp-mibs-downloader
#mibs :
If apt-get does not find snmp-mibs-downloader package then enable contrib and non-free repositories.
Configure access to switches
- Assure you have enough of disk space, count about 16MB per each physical port in your switches
- Allow SNMP communication from STOR2RRD server to all SAN switches on port 161, UDP
$ perl /home/stor2rrd/stor2rrd/bin/conntest_udp.pl 192.168.1.1 161
  UDP connection to "192.168.1.1" on port "161" is ok
- Brocade note: SNMPv2 is not supported in FOS v9.0.1a but is not blocked. SNMPv2 will be blocked beginning with FOS v9.1.0.
- Brocade SNMPv3 setup
Test SNMP communication
-
replace switch_IP for your one in below examples
- Make sure there is SNMP allowed on the SAN switch with public read only role (Community 4)
-
Brocade/QLogic:
Change community string to whatever you need via "snmpConfig --set snmpv1"
# ssh <Switch_IP> -l admin SAN:admin> snmpconfig --show snmpv1 ... Community 4: public (ro) ...
-
Cisco:
When there is other community string than public then use it in test snmpwalk cmds above
# ssh <Switch_IP> -l admin switch# show snmp community Community Access --------- ------ private rw public ro
and use that community string in switch cfg.
-
Brocade/QLogic:
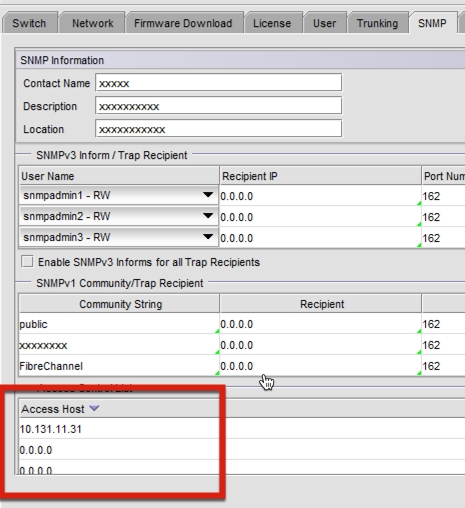
- Make sure that Access Host list contains STOR2RRD host:
SAN:admin> snmpconfig --show accessControl
-
Make sure you have enabled all listed MIBs below:
SAN:admin> snmpconfig --show mibCapability FE-MIB: YES SW-MIB: YES FA-MIB: YES FICON-MIB: YES HA-MIB: YES FCIP-MIB: YES ISCSI-MIB: YES IF-MIB: YES BD-MIB: YES BROCADE-MAPS-MIB: YES
Enable all missing MIBs each by each::SAN:admin> snmpconfig --enable mibCapability -mib_name FICON-MIB
-
set SNMP GET security level to 0
SAN:admin> snmpconfig --show seclevel SAN:admin> snmpconfig --set seclevel Select SNMP GET Security Level (0 = No security, 1 = Authentication only, 2 = Authentication and Privacy, 3 = No Access): (0..3) [3] 0
- Do you have some other switch which works fine, is there any configuration difference?
# export PATH=$PATH:/opt/freeware/bin
# snmpwalk -v 2c -c public  <Switch_IP> 1.3.6.1.2.1.1.5
  SNMPv2-MIB::sysName.0 = STRING: SAN_switch_name
When the command fails, times out or return whatever like this:
Timeout: No Response from <Switch_IP>
Brocade/QLogic Virtual Fabric support
-
You have to use create new user, assign virtual fabrics and configure SNMP v3 access
- Configure new user on the switch and assign virtual fabrics (as admin):
Parameter -r user assigns role "user" to the new user.
userconfig --add stor2rrd -r user -l 1,128
userconfig --change stor2rrd -r user -l 1,128 -h 128
userconfig --show stor2rrd
Parameter -l 1,128 defines virtual fabrics visible for this user.
Parameter -h 128 defines home virtual fabrics.
Example above allows virtual fabrics 1 and 128 for user stor2rrd.
- Add the new user to SNMP v3 configuration
Rename one of the preconfigured SNMP users "snmpuserX"
Configre Auth and Priv protocols as needed
Changes are indicated by '<==='
In case using 'Priv Protocol' use preferably AES128 if you are not sure that your Operating System supports higher AES in snmp-perl module
Note that snmpwalk might work, just problem could be snmp-perl module only as it has different support matrix
Check SNMP v3 configuration:snmpconfig --set snmpv3 SNMP Informs Enabled (true, t, false, f): [false] SNMPV3 Password Encryption Enabled (true, t, false, f): [false] SNMPv3 user configuration(snmp user not configured in FOS user database will have default VF context and admin role as the default): User (rw): [snmpadmin1] Auth Protocol [MD5(1)/SHA(2)/noAuth(3)]: (1..3) [3] Priv Protocol [DES(1)/noPriv(2)/AES128(3)/AES256(4)]): (2..2) [2] User (rw): [snmpadmin2] Auth Protocol [MD5(1)/SHA(2)/noAuth(3)]: (1..3) [3] Priv Protocol [DES(1)/noPriv(2)/AES128(3)/AES256(4)]): (2..2) [2] User (rw): [snmpadmin3] Auth Protocol [MD5(1)/SHA(2)/noAuth(3)]: (1..3) [3] Priv Protocol [DES(1)/noPriv(2)/AES128(3)/AES256(4)]): (2..2) [2] User (ro): [snmpuser1] stor2rrd <=== Auth Protocol [MD5(1)/SHA(2)/noAuth(3)]: (1..3) [3] 2 <=== New Auth Passwd: <=== Verify Auth Passwd: <=== Priv Protocol [DES(1)/noPriv(2)/AES128(3)/AES256(4)]): (1..4) [2] 3 <=== New Priv Passwd: <=== Verify Priv Passwd: <=== User (ro): [snmpuser2] Auth Protocol [MD5(1)/SHA(2)/noAuth(3)]: (1..3) [3] Priv Protocol [DES(1)/noPriv(2)/AES128(3)/AES256(4)]): (2..2) [2] User (ro): [snmpuser3] Auth Protocol [MD5(1)/SHA(2)/noAuth(3)]: (1..3) [3] Priv Protocol [DES(1)/noPriv(2)/AES128(3)/AES256(4)]): (2..2) [2] SNMPv3 trap/inform recipient configuration: Trap Recipient's IP address : [0.0.0.0] Trap Recipient's IP address : [0.0.0.0] Trap Recipient's IP address : [0.0.0.0] Trap Recipient's IP address : [0.0.0.0] Trap Recipient's IP address : [0.0.0.0] Trap Recipient's IP address : [0.0.0.0] Committing configuration.....done.
snmpconfig --show snmpv3
- Test access
You should see ports configured for your specific VF (Virtual Fabric)The user is not configured properly if you get one of the following errors:snmpwalk -v 3 -u stor2rrd -n VF:<your_virtual_fabric_ID> <Switch_IP> 1.3.6.1.2.1.1.5 SNMPv2-MIB::sysName.0 = STRING: SAN_switch_name snmpwalk -v 3 -u stor2rrd -n VF:<your_virtual_fabric_ID> -l authPriv -A <Auth_Passwd> -X <Priv_Passwd> -a SHA -x AES <Switch_IP> 1.3.6.1.2.1.1.5 SNMPv2-MIB::sysName.0 = STRING: SAN_switch_name
Error in packet.
Reason: noAccess
snmpwalk: Unknown user name
STOR2RRD configuration
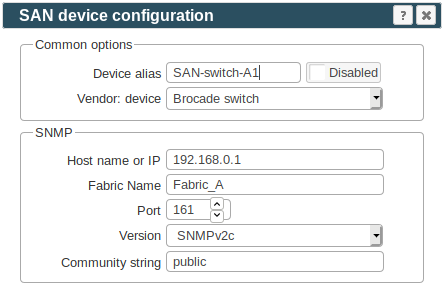
- Add switches into configuration from the UI:
Settings icon ➡ SAN switches ➡ New ➡ Vendor:device ...
-
Check switch connectivity either from the UI via Connection Test or from the cmd line:
$ cd /home/stor2rrd/stor2rrd
$ ./bin/config_check.sh <Switch IP/hostname>
  =========================
  SWITCH: Switch_IP1
  =========================
  Type         : BRCD
  DestHost     : Switch_host
  Version SNMP : 1
  Community    : public
  Switch name  : Switch_host
  STATE        : CONNECTED!
- Schedule to run SAN agent from stor2rrd crontab (lpar2rrd on Virtual Appliance, it might already exist there)
Add if it does not exist as above
$ crontab -l | grep load_sanperf.sh
$
Assure there is already an entry with the UI creation running once an hour in crontab$ crontab -e # SAN agent 0,5,10,15,20,25,30,35,40,45,50,55 * * * * /home/stor2rrd/stor2rrd/load_sanperf.sh >/home/stor2rrd/stor2rrd/logs/load_sanperf.out 2>&1
$ crontab -e

# STOR2RRD UI (just ONE entry of load.sh must be there)
5 * * * * /home/stor2rrd/stor2rrd/load.sh > /home/stor2rrd/stor2rrd/load.out 2>&1
- Let it run for 15 - 20 minutes, then re-build the UI by:
$ cd /home/stor2rrd/stor2rrd
$ ./load.sh html
- Go to the web UI: http://<your web server>/stor2rrd/
Use Ctrl-F5 to refresh the web browser cache.
SAN troubleshooting
 |
Brocade Network Advisor is supported as data source for your Brocade switches.
It replaces SNMP monitoring (it might even run simultaneously with older SNMP implementation).
In compare to SNMP monitoring when must be queried every SAN switch independenly.
BNA acts as single data source for all data.
It provides all data like through SNMP with further enhancements about:
- CPU, memory and response time of switches (if BNA is licensed for collection of that)
- Zone configuration
Access summary
| User role | Interface | Used ports | operator read only | REST API | 443 TCP |
|---|
In case of usage of Virtual Appliance
- Use local account stor2rrd for hosting of STOR2RRD on the virtual appliance
- Use /home/stor2rrd/stor2rrd as the product home
Configure access to BNA
-
Allow access though the network from the STOR2RRD host to the BNA on ports 443 (HTTPS).
Connection test:$ perl /home/stor2rrd/stor2rrd/bin/conntest.pl 192.168.1.1 443 Connection to "192.168.1.1" on port "443" is ok
- Create user stor2rrd on all your BNA's under operator_ro role.
If read only operator role does not exist, it can be easily created by removing rw roles from default operator role
- Define All Fabrics, All Hosts in Responsibility Area for user stor2rrd in BNA.
BNA configuration
- Add BNA into configuration from the UI:
Settings icon ➡ SAN switches ➡ New ➡ Vendor:device ➡ BNA
Note: do not use "!" character in password string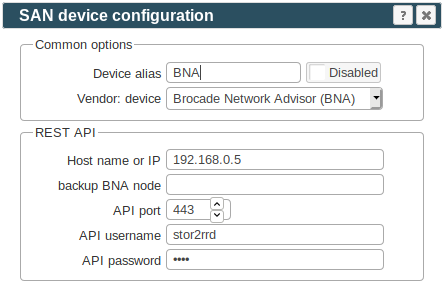
-
Check BNA connectivity either from the UI via "Connection Test" or from cmd line like here:
$ cd /home/stor2rrd/stor2rrd
$ ./bin/config_check.sh <BNA IP/hostname>
  =========================
  BNA: 10.22.11.53
  =========================
  Connection to "192.168.1.1" on port "443" is ok API connection:
   LOGIN             : ok
   API request       : ok
   LOGOUT            : ok
   Switches found    : 2

   SAN switch        : brocade01
   operationalStatus : HEALTHY
   state             : ONLINE
   statusReason      : Switch Status is HEALTHY.

   SAN switch        : brocade02
   operationalStatus : HEALTHY
   state             : ONLINE
   statusReason      : Switch Status is HEALTHY.

   API connection OK
- Schedule BNA agent to run from stor2rrd crontab (lpar2rrd on Virtual Appliance) to collect data every 10 minutes
Assure there is already an entry with the UI creation running once an hour in crontab$ crontab -e # BNA agent 0,10,20,30,40,50 * * * * /home/stor2rrd/stor2rrd/load_bnaperf.sh >/home/stor2rrd/stor2rrd/logs/load_bnaperf.out 2>&1
$ crontab -e

# STOR2RRD UI (just ONE entry of load.sh must be there)
5 * * * * /home/stor2rrd/stor2rrd/load.sh > /home/stor2rrd/stor2rrd/load.out 2>&1
- Let it run for 15 - 20 minutes, then re-build the UI by:
$ cd /home/stor2rrd/stor2rrd
$ ./load.sh html
- Go to the web UI: http://<your web server>/stor2rrd/
Use Ctrl-F5 to refresh the web browser cache.
Troubleshooting
-
Assure you use BNA 14.x+, BNA v12.x are not supported.
-
On AIX you get error during config_check.sh
$ ./bin/config_check.sh
  ===============
  BNA: 10.22.11.53
  ===============
  Connection to "10.22.11.53" on port "4433" is ok
  API connection:
  Tue Oct 31 17:08:20 2017: Request error: 500 SSL negotiation failed:
  Tue Oct 31 17:08:20 2017: POST url     : https://10.22.11.53:4433/rest/login
  Tue Oct 31 17:08:20 2017:                LOGIN failed!
Upgrade to STOR2RRD v2.20.
-
When connection to BNA is ok, but not any switches or data is visible
- Assure you have defined All Fabrics,All Hosts in Responsibility Area for user stor2rrd in BNA
- Can you log on to the BNA UI as stor2rrd? Do you see all switches?
- Follow this to see examples
- CPU and memory data is not presented.
- BNA stops providing performance statistics for ports
 |
Feature matrix
Product uses SNMP v1,2c,3 read-only access (port 161 UDP) to get data from LAN switches.
Only Cisco and Huawei switches are tested so far.
Generally all network devices having SNMP MIBs compatible with Cisco should work.
Perl SNMP v3 compatibility Auth & Priv support matrix
Prerequisites
Skip that in case you are on our Virtual Appliance- AIX
# rpm -Uvh net-snmp net-snmp-utils net-snmp-perl
- Linux
Note you might need to allow optional repositories on RHEL to yum can find it# umask 0022 # yum install net-snmp # yum install net-snmp-utils # yum install net-snmp-perl
Use rhel-7-for-power-le-optional-rpms for Linux on Power etc ...# subscription-manager repos --list ... # subscription-manager repos --enable rhel-7-server-optional-rpms
- Linux Debian/Ubuntu
Assure that this line is commented out in /etc/snmp/snmp.conf% umask 0022 % apt-get install snmp libsnmp-perl snmp-mibs-downloader
#mibs :
If apt-get does not find snmp-mibs-downloader package then enable contrib and non-free repositories.
Configure access to switches
Since now use stor2rrd user only (not root). In case of Virtual Appliance use lpar2rrd user account- Enable SNMP communication from STOR2RRD server to all LAN switches on port 161, UDP
$ perl /home/stor2rrd/stor2rrd/bin/conntest_udp.pl 192.168.1.1 161
  UDP connection to "192.168.1.1" on port "161" is ok
- Test SNMP communication (replace 192.168.1.1 by your one)
$ export PATH=$PATH:/opt/freeware/bin
$ snmpwalk -v 2c -c public 192.168.1.1 1.3.6.1.2.1.1.5
  SNMPv2-MIB::sysName.0 = STRING: cisco01
- To monitor VLAN must be enabled on the switch this:
$ interface vlan { vlan-id | vlan-range} - Assure you have enough of disk space, count about 2MB per each physical port in your switches
Configure LAN switches
- Add switches into configuration from the UI:
Settings icon ➡ LAN switches ➡ New ➡ Vendor:device ...
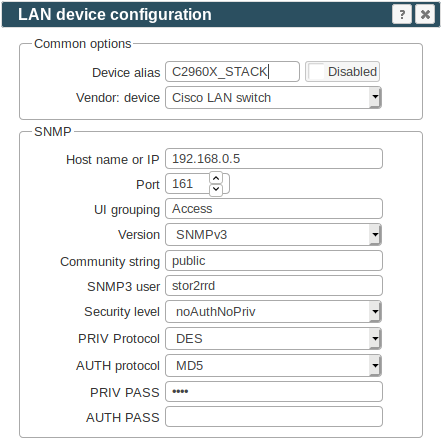
-
Check switch connectivity
If you run above script without any parameter then it checks all configured switches.
$ cd /home/stor2rrd/stor2rrd
$ ./bin/config_check.sh 192.168.1.1
  =========================
  SWITCH: 192.168.1.1
  =========================
  Type         : Cisco
  DestHost     : 192.168.1.1
  Version SNMP : 2c
  Community    : public
  SNMP port    : not defined! Used SNMP default port "161"!
  Switch name  : cisco01
  STATE        : CONNECTED!
- Schedule to run LAN agent from stor2rrd crontab (lpar2rrd on Virtual Appliance, it might already exist there)
Add if it does not exist as above
$ crontab -l | grep load_lanperf.sh
$
Assure there is already an entry with the UI creation running once an hour in crontab$ crontab -e # LAN agent 0,5,10,15,20,25,30,35,40,45,50,55 * * * * /home/stor2rrd/stor2rrd/load_lanperf.sh >/home/stor2rrd/stor2rrd/logs/load_lanperf.out 2>&1
$ crontab -e

# STOR2RRD UI (just ONE entry of load.sh must be there)
5 * * * * /home/stor2rrd/stor2rrd/load.sh > /home/stor2rrd/stor2rrd/load.out 2>&1
- Let it run for 15 - 20 minutes, then re-build the UI by:
$ cd /home/stor2rrd/stor2rrd
$ ./load.sh html
- Go to the web UI: http://<your web server>/stor2rrd/
Use Ctrl-F5 to refresh the web browser cache.
Table of Contents
- Prerequisites
- SANnav Northbound Streaming
- Install Python3 and modules
- SANnav configuration in STOR2RRD
- (Optional) Kafka deployment in docker containers
 |
Prerequisites
- SANnav 2.2.0.2+ configured to stream performance data to a Kafka cluster
- Ability to install additional software packages to STOR2RRD host
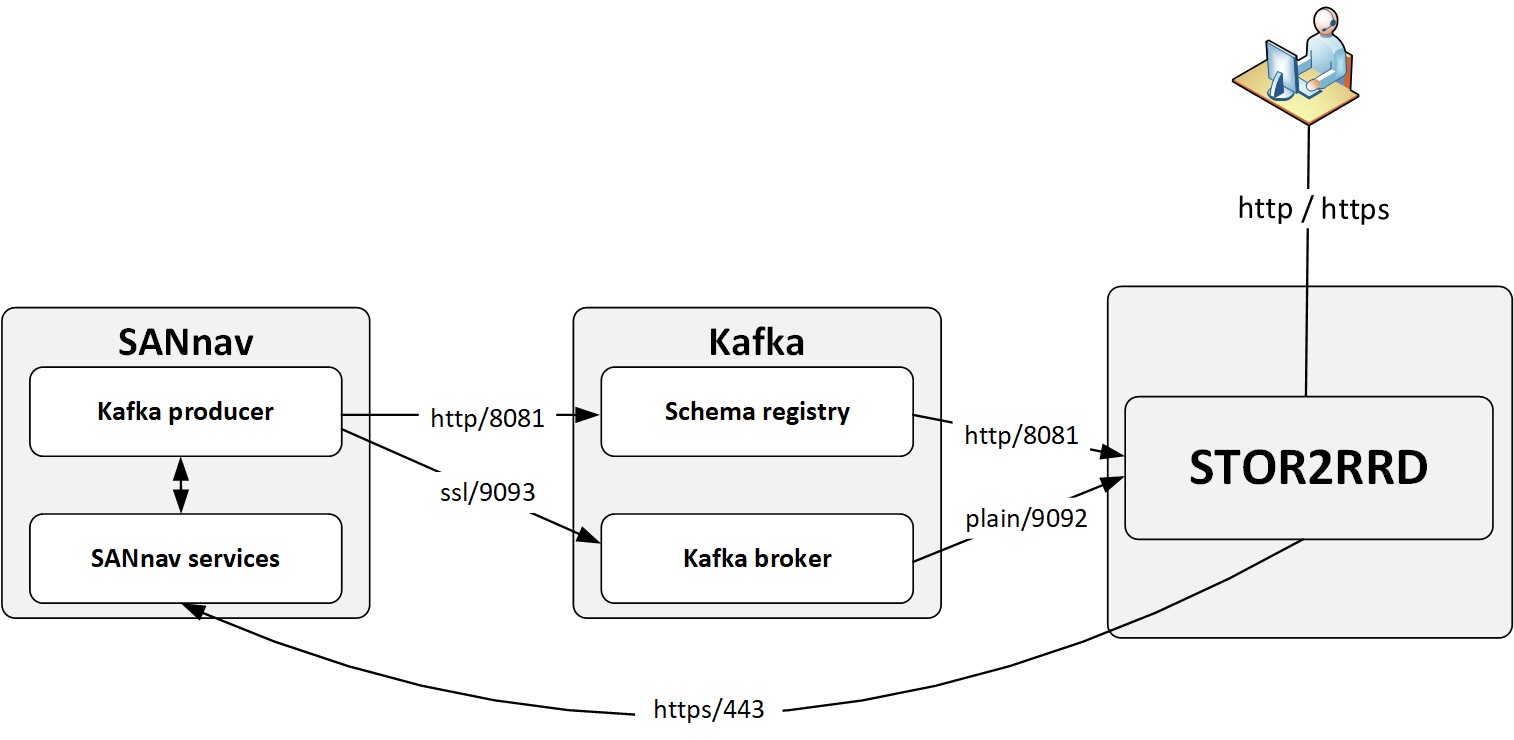
- Network connectivity:
- SANnav ➡ Kafka Registry:8081 TCP
- SANnav ➡ Kafka Broker:9093 TCP
- STOR2RRD ➡ Kafka Registry:8081 TCP
- STOR2RRD ➡ Kafka Broker:9092 TCP
-
STOR2RRD ➡ SANnav:443 TCP
test from STOR2RRD$ perl /home/stor2rrd/stor2rrd/bin/conntest.pl <Kafka Registry> 8081 Connection to <Kafka Registry> on port "8081" is ok $ perl /home/stor2rrd/stor2rrd/bin/conntest.pl <Kafka Broker> 9092 Connection to <Kafka Broker> on port "9092" is ok $ perl /home/stor2rrd/stor2rrd/bin/conntest.pl <SANnav> 443 Connection to <SANnav> on port "443" is ok
SANnav Northbound Streaming
STOR2RRD collects data from SANnav using the Northbound Streaming feature.
Northbound Streaming provides support to securely stream performance and flow metrics from the switch to an external Kafka cluster (the northbound server).
Kafka cluster with schema registry must be configured in the customer's environment.
SANnav must be configured to stream data to the Kafka cluster.
SANnav NorthBound streaming is configured using SANnav REST API.
SANnav REST API documantation is available on https://support.broadcom.com/
Search for: "sannav rest api"
- You must have the Northbound Streaming privilege with read/write permission and the All Fabrics area of responsibility (AOR). Refer to the Brocade SANnav Management Portal User Guide for details.
- Historic data collection must be enabled on the SANnav server (it is enabled by default).
- The switch must be discovered with proper SNMPv3 credentials.
- For a northbound server environment with HTTPS access for the schema registry, the northbound Kafka cluster must be configured with the same public certificate as the northbound server.
- Only one northbound server is supported.
- Streaming is only through a secure channel (TLS).
- IPv6 is not supported. SANnav-to-northbound-server communication uses IPv4.
Install Python3 and modules
CentOS, Rockylinux, OracleVM- In case you are on the Virtual Appliance and have no access to the Internet repos then use this procedure
- Install Python3 packages as root
[root@xorux]# yum install python3 python3-pip python3-devel python3-requests gcc
-
Import Confluent repository as root
[root@xorux]# rpm --import https://packages.confluent.io/rpm/7.7/archive.key

[root@xorux]# cat > /etc/yum.repos.d/confluent.repo << EOF
cat > /etc/yum.repos.d/confluent.repo << EOF
[Confluent]
name=Confluent repository
baseurl=https://packages.confluent.io/rpm/7.7
gpgcheck=1
gpgkey=https://packages.confluent.io/rpm/7.7/archive.key
enabled=1

[Confluent-Clients]
name=Confluent Clients repository
baseurl=https://packages.confluent.io/clients/rpm/centos/$releasever/$basearch
gpgcheck=1
gpgkey=https://packages.confluent.io/clients/rpm/archive.key
enabled=1
EOF
-
Install librdkafka as root
[root@xorux]# yum clean all && yum install librdkafka-devel
-
install kafkian module as stor2rrd
(lpar2rrd in case of Virtual Appliance)[stor2rrd@xorux]$ pip3 install --user kafkian==0.13.0 confluent-kafka==2.4.0
When it ends with this error:/tmp/pip-build-ka_v989g/confluent-kafka/src/confluent_kafka/src/confluent_kafka.c:1633:17: note: use option -std=c99 or -std=gnu99 to compile your code error: command 'gcc' failed with exit status 1Then use this cmd instead of above one:[stor2rrd@xorux]$ CFLAGS=-std=c99 pip3 install --user kafkian==0.13.0 confluent-kafka==2.4.0
zypper install python3-pip python3-devel python3-requests
zypper install librdkafka-devel
Ubuntu / Debian
apt install python3-pip
apt install python3-requests
apt install python3-dev
apt install librdkafka-dev
SANnav configuration in STOR2RRD
Note: SANnav can only be monitored from one STOR2RRD instance at a time
-
Create SANnav user for STOR2RRD
- Login to SANnav GUI
Navigate to User Management
SANnav ➡ Security ➡ SANnav User ManagementCreate new user with Operator role
-
Add storage to configuration in STOR2RRD GUI
Settings icon ➡ SAN ➡ New ➡ Vendor:device ➡ SANnav-
REST API: SANnav IP address, port and STOR2RRD user credentials
-
KAFKA: Kafka NB server IP address and ports - this should be the IP address of your STOR2RRD host
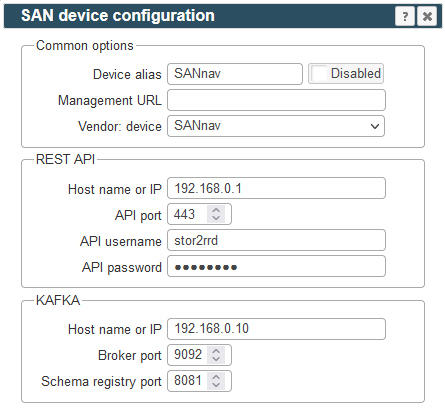
-
-
Schedule the storage agent in stor2rrd crontab (lpar2rrd on Virtual Appliance)
Check if there is no entry for SANnav yet
$ crontab -l | grep load_sannavperf.sh
$
Add an entry if it doesn't exist$ crontab -e # SANnav 0,5,10,15,20,25,30,35,40,45,50,55 * * * * /home/stor2rrd/stor2rrd/load_sannavperf.sh > /home/stor2rrd/stor2rrd/logs/load_sannavperf.out 2>&1
-
Ensure there is an entry to build STOR2RRD UI every hour in the ctontab
$ crontab -e

# STOR2RRD UI (just ONE entry of load.sh must be there)
5 * * * * /home/stor2rrd/stor2rrd/load.sh > /home/stor2rrd/stor2rrd/load.out 2>&1
-
Let SANnav agent run for 15 - 20 minutes to collect data, then:
$ cd /home/stor2rrd/stor2rrd
$ ./load.sh
-
Go to STOR2RRD web UI: http://<your web server>/stor2rrd/
Use Ctrl-F5 to refresh the web browser cache.
