STOR2RRD proxy setup
This feature is available only in the Enterprise edition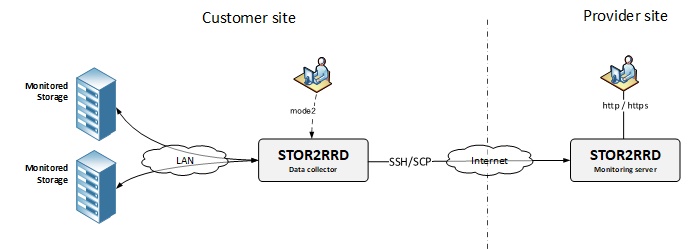 |
You can run STOR2RRD data collector on a Customer site to collect data and transfer it to Provider site where customer's storage and SAN data is saved and presented.
Setup
- Install STOR2RRD on the Provider site.
- Install STOR2RRD on the Customer site and configure it in data collection mode only.
-
Allow ssh/scp communication from the Customer site to the Provider site
Exchange ssh keys to allow password less communication between Customer and Provider sites for stor2rrd user.
Connections are always initiated from the Customer site.
Provider/Central site
-
Install standard STOR2RRD product as per installation manual without installing storage access
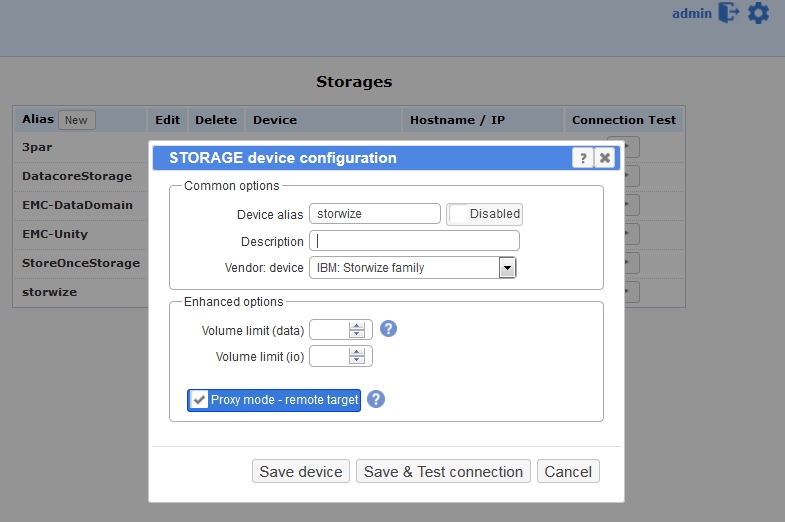
- Storage
Configure storage in the UI: Settings ➡ Storage ➡ New ➡ use same storage alias as on the Customer site ➡
➡ Enhanced options ➡ Proxy mode : on (at first select storage type, then check the proxy button)
Nothing else is necessary, no IP, usernames etc, no connection test, just storage definition
- SAN switches
2 possibilities:- Define switch with the same alias
- set IP/Hostname, again same as on the remote site, then fill in all other necessary data in the form, but they will be ignored
- set "Proxy mode : on"
-
or put this variable without defining anything on the central site:
cd /home/stor2rrd/stor2rrd
umask 022
echo "export PROXY_CENTRAL=1" >> etc/.magic
- Define switch with the same alias
- Schedulle to run STOR2RRD from stor2rrd crontab
2 jobs must be there, standard load.sh and new one for regular load of Customer site data load_data.sh
$ crontab -l

# STOR2RRD
0 * * * * /home/stor2rrd/stor2rrd/load.sh > /home/stor2rrd/stor2rrd/load.out 2>&1

# Load data from storage proxy agent
3,13,23,33,43,53 * * * * /home/stor2rrd/stor2rrd/load_data.sh > /home/stor2rrd/stor2rrd/load_data.out 2>&1
-
Wait for the first data transfer from the Customer site, then run this to build up the UI
$ /home/stor2rrd/stor2rrd/load.sh
Customer/Remote site
-
Allow ssh communication to the Provider site based on ssh-keys and test that it is working as per bellow
$ ssh host-provider -p 22 -l stor2rrd "date"
  Fri Apr 20 14:42:28 CEST 2018
- Install standard STOR2RRD product as per installation manual
Follow tabs Prerequisites & Web & STOR2RRD
-
Place this into etc/.magic under stor2rrd account (lpar2rrd on the Virtual Appliance)
This instance can run in 2 modes, read this.
- mode 1: it does not locally save nor present data from its monitored devices
$ cd /home/stor2rrd/stor2rrd
$ umask 022
$ echo "DO_NOT_SAVE_DATA=1" >> etc/.magic
$ echo "export DO_NOT_SAVE_DATA" >> etc/.magic
- mode 2: it locally saves and presents data from its monitored devices
$ cd /home/stor2rrd/stor2rrd
$ umask 022
$ echo "DO_NOT_SAVE_DATA=2" >> etc/.magic
$ echo "export DO_NOT_SAVE_DATA" >> etc/.magic
- mode 1: it does not locally save nor present data from its monitored devices
- Storage
Configure storage as per installation manual, follow STORAGE tab
Keep same alias names as on the Provider site
- SAN switches
Configure SAN switches as per installation manual
-
Schedule STOR2RRD storage agents in stor2rrd (lpar2rrd on the appliance) crontab, as per manual
$ crontab -l
# IBM Storwize/SVC
0,5,10,15,20,25,30,35,40,45,50,55 * * * * /home/stor2rrd/stor2rrd/load_svcperf.sh > /home/stor2rrd/stor2rrd/load_svcperf.out

# IBM DS8000
0,5,10,15,20,25,30,35,40,45,50,55 * * * * /home/stor2rrd/stor2rrd/load_ds8perf.sh > /home/stor2rrd/stor2rrd/load_ds8perf.out

# SAN switches
* * * * * /home/stor2rrd/stor2rrd/load_sanperf.sh >/home/stor2rrd/stor2rrd/logs/load_sanperf.out 2>&1

....
-
Mode 1: do not place load.sh into stor2rrd crontab
Keep there just storage agents. Remove or comment out this line if it is already in crontab
- Mode 2: put load.sh into crontab
03,23,43 * * * * /home/stor2rrd/stor2rrd/load.sh > /home/stor2rrd/stor2rrd/logs/load.out 2>&1
-
Mode 1: do not place load.sh into stor2rrd crontab
-
Test communication between sites:
$ cd /home/stor2rrd/stor2rrd; ./bin/offsite.sh <remote host> <remote port> <remote user> <remote path> --test $ cd /home/stor2rrd/stor2rrd; ./bin/offsite.sh host-provider 22 stor2rrd /home/stor2rrd/stor2rrd --test Working for: /tmp/stor2rrd-test.tar ssh -p 7005 stor2rrd@host-provider " if [ ! -d /home/stor2rrd/stor2rrd/data/storage-test ]; then mkdir /home/stor2rrd/stor2rrd/data/storage-test; fi" scp -P 7005 /tmp/stor2rrd-test.tar stor2rrd@host-provider:/home/stor2rrd/stor2rrd/data/storage-test " ssh -p 7005 stor2rrd@host-provider "cd /home/stor2rrd/stor2rrd/data/; ls -l /home/stor2rrd/stor2rrd/data/storage-test/stor2rrd-test.tar; rm -fr storage-test" -rw-rw-r-- 1 stor2rrd stor2rrd 0 Jan 8 13:29 /home/stor2rrd/stor2rrd/data/storage-test/stor2rrd-test.tar Communication looks good! -
Schedule data transfer to the Provider site
$ crontab -e
# Data transfer
# 0,10,20,30,40,50 * * * * cd /home/stor2rrd/stor2rrd; ./bin/offsite.sh <remote host> <remote port> <remote user> <remote path> 1>/home/stor2rrd/stor2rrd/logs/offsite.log  2>/home/stor2rrd/stor2rrd/logs/offsite-error.log
0,10,20,30,40,50 * * * * cd /home/stor2rrd/stor2rrd; ./bin/offsite.sh host-provider 22 stor2rrd /home/stor2rrd/stor2rrd 1>/home/stor2rrd/stor2rrd/logs/offsite.log  2>/home/stor2rrd/stor2rrd/logs/offsite-error.log