Fujitsu ETERNUS DX/AF monitoring
In case of usage of Virtual Appliance- Use local account lpar2rrd for hosting of STOR2RRD on the virtual appliance
- Use /home/stor2rrd/stor2rrd as the product home
The product uses Fujitsu ETERNUS CLI interface natively provided by the storage to get all necessary data (ssh access).
Supported are Fujitsu ETERNUS DX S3 and all newers models.
Monitoring of Fujitsu ETERNUS Unified file data is not implemented yet.
Storage connectivity
- All actions below under stor2rrd user (lpar2rrd on Virtual Appliance)
-
Allow access from the STOR2RRD host to the Fujitsu ETERNUS storage both MNT interfaces on port 22 through your network.
$ perl /home/stor2rrd/stor2rrd/bin/conntest.pl 192.168.1.1 22
  Connection to "192.168.1.1" on port "22" is ok
- Create ssh-keys on STOR2RRD host under stor2rrd user if do not exist yet.
It should already exist on the Virtual Appliance, skip it there.
$ ls -l ~/.ssh/id_rsa.pub
$ ssh-keygen -t rsa -N ""
  Generating public/private rsa key pair.
  Enter file in which to save the key (/home/stor2rrd/.ssh/id_rsa):
  ...
$ ls -l ~/.ssh/id_rsa.pub
  -rw-r--r-- 1 stor2rrd stor2rrd 382 Jun  1 12:47 /home/stor2rrd/.ssh/id_rsa.pub
New storage devices might require stronger key, use this one instead of above 'RSA'$ ssh-keygen -t ecdsa -b 521 -N ""
-
Convert ssh-keys into IETF format.
Storage import utility expects ssh-keys in IETF format.
Keys in usual *.pub format will be accepted but access will not work!$ ssh-keygen -e -f ~/.ssh/id_rsa.pub > id_rsa.pub.ietf $ ls -l id_rsa.pub.ietf -rw-r--r-- 1 stor2rrd stor2rrd 507 Jan 8 08:43 id_rsa.pub.ietf
You might need to add this into your SSH cfg in case ssh connection to the storage does not workvi ~/.ssh/config Host * HostKeyAlgorithms=+ssh-rsa -
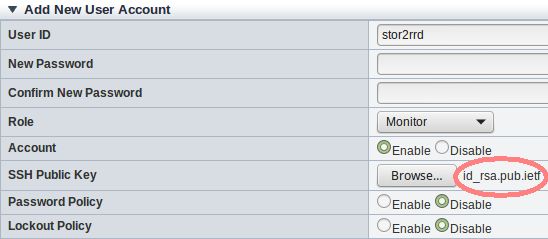
Create user stor2rrd on the storage with monitor role and authorized via ssh-key.
System ➡ User Setting ➡ Setup User Account ➡ Add

-
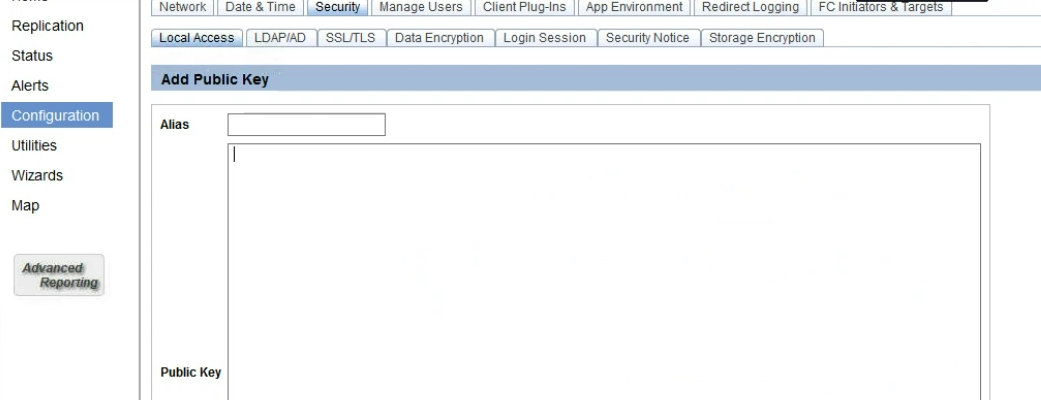
Newer storage firmwares use this path for ssh key insertion:
Configuration ➡ System ➡ Security ➡ Local Access ➡ select a user ➡ add ssh key

-
Assure that performance monitoring collection is enabled on the storage and historical collection is set to 300 secs.
It must be set to 300 seconds to work correctly!
System ➡ Utility ➡ Start/Stop Perfmon ➡ Select 300 ➡ Apply
Note: this setting is reset (disabled) after each storage reboot at least with firmware release we have tested it.
It means that you have to enable performance monitoring and set interval after each storage reboot.
STOR2RRD storage configuration
- All actions below under stor2rrd user (lpar2rrd on Virtual Appliance)
-
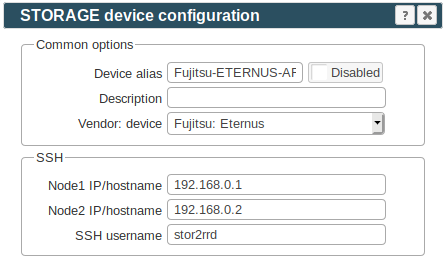
Add storage into configuration from the UI:
Settings icon ➡ Storage ➡ New ➡ Vendor:device ➡ Fujitsu ETERNUS

-
Make sure you have enough of disk space on the filesystem where is STOR2RRD installed
Roughly you might count 2 - 30 GB per a storage (it depends on number of volumes, 30GB for 5000 volumes)$ df -g /home # AIX $ df -h /home # Linux
-
Test storage connectivity, either from the UI or from the command line:
$ cd /home/stor2rrd/stor2rrd
$ ./bin/config_check.sh eternus-alias01
  =====================
  STORAGE: eternus-alias01 : ETERNUS
  =====================
  connection ok
- Schedule to run storage agent from stor2rrd crontab (lpar2rrd on Virtual Appliance, it might already exist there)
Add if it does not exist as above
$ crontab -l | grep load_eternusperf.sh
$
Assure there is already an entry with the UI creation running once an hour in crontab$ crontab -e # Fujitsu ETERNUS 0,5,10,15,20,25,30,35,40,45,50,55 * * * * /home/stor2rrd/stor2rrd/load_eternusperf.sh > /home/stor2rrd/stor2rrd/load_eternusperf.out 2>&1
$ crontab -e

# STOR2RRD UI (just ONE entry of load.sh must be there)
5 * * * * /home/stor2rrd/stor2rrd/load.sh > /home/stor2rrd/stor2rrd/load.out 2>&1
-
Let run the storage agent for 15 - 20 minutes to get data, then:
$ cd /home/stor2rrd/stor2rrd
$ ./load.sh
- Go to the web UI: http://<your web server>/stor2rrd/
Use Ctrl-F5 to refresh the web browser cache.