IBM monitoring: FlashSystem Storwize SVC DS8000 XIV A9000 GPFS Storage Scale
- Storwize
SVC
Storage
Virtualize - FlashSystem
9xxx
7xxx
5xxx
Cxxx
V840
840/900 - DS8000
DS6800 - XIV
A9000
Storage
Accelerate - DS3000
DS4000
DS5000
DSC3700 - Spectrum
Scale
(GPFS)
ESS - Cloud
Object
Storage - Storage
Defender - Storage
Protect
(TSM)
This is supported only in our new generation product XorMon
It will be ported to STO2RRD during 2025
It will be ported to STO2RRD during 2025
Data is obtained from IBM Storage Defender Data Protect via REST API.
Configure it as a Cohesity DataProtect as it is a rebrand
Configure it as a Cohesity DataProtect as it is a rebrand
In case of usage of Virtual Appliance
- Use local account lpar2rrd for hosting of STOR2RRD on the virtual appliance
- Use /home/stor2rrd/stor2rrd as the product home
Install the DS8000 storage API (DSCLI)
- Under root user
- Download it from here: ftp://ftp.software.ibm.com/storage/ds8000/updates/DS8K_Customer_Download_Files/CLI/
- Follow IBM doc for installation: DSCLI installation
- Installation:
- AIX
loopmount -i DSCLI-7.9.41.59.iso -o "-V cdrfs -o ro" -m /mnt
umask 022
/mnt/IMAGES/HMC/Disk1/InstData/AIX/NoVM/dsclisetup.bin -i console
  Preparing to install...
  Extracting the installation resources from the installer archive...
  Configuring the installer for this system's environment...
  Congratulations. IBM System Storage DS Command Line Interface has been
  .......
  successfully installed to: /opt/ibm/dscli
- Linux
mount DSCLI-7.9.41.59.iso /mnt -o loop,ro
umask 022
/mnt/IMAGES/HMC/Disk1/InstData/Linux/NoVM/dsclisetup.bin -i console
  Preparing to install...
  Extracting the installation resources from the installer archive...
  Configuring the installer for this system's environment...
  Congratulations. IBM System Storage DS Command Line Interface has been
  .......
  successfully installed to: /opt/ibm/dscli
If you get en error "Error: Could not find or load main class com.zerog.lax.LAX" during installation start, then set up this env variable and start it again:
export JAVA_TOOL_OPTIONS="-Djdk.util.zip.disableZip64ExtraFieldValidation=true"
- AIX
Create a user on the storage with restricted rights
-
If you prefere to non encrypted communication with the storage then edit /opt/ibm/dscli/profile/dscli.profile file adding the string "port:1750".
This way the DSCLI will be able to use the port on a non encrypted protocol.
-
Allow access from the STOR2RRD host to the storage on ports 1750 and 1751 (encrypted communication).
Test if ports are open:$ perl /home/stor2rrd/stor2rrd/bin/conntest.pl 192.168.1.1 1750 Connection to "192.168.1.1" on port "1750" is ok $ perl /home/stor2rrd/stor2rrd/bin/conntest.pl 192.168.1.1 1751 Connection to "192.168.1.1" on port "1751" is ok
- Under stor2rrd Unix user identification do following
- Assure you have execution rights on : /opt/ibm/dscli/dscli
- Log as administrator into DSCLI
(you might create stor2rrd user on the storage even from the other admin api like TPC ..)
If you get following error then it is probably a firewall issue:$ /opt/ibm/dscli/dscli -hmc1 192.168.1.1 -user admin CMUN00018E Unable to connect to the management console server
-
Log as storage administrator and create user stor2rrd under monitor role:
$ /opt/ibm/dscli/dscli  -hmc1 192.168.1.1 -user admin
dscli> mkuser -pw PASSWORD -group monitor stor2rrd
-
Store storage stor2rrd password in DSCLI (/home/stor2rrd/dscli/security.dat):
$ /opt/ibm/dscli/dscli managepwfile -action add -mc1 192.168.1.1 -name stor2rrd -pw PASSWORD
-
Connection check, it should not ask for a password:
$ /opt/ibm/dscli/dscli  -hmc1 <HMC1 ip addr> -user stor2rrd ver -l
  Date/Time: December 10, 2013 3:01:43 PM CET IBM DSCLI Version: 7.7.10.317
  DS: -
  DSCLI          7.7.10.317
  StorageManager 7.7.5.0.20121203.1
  ================Version=================
  Storage Image    LMC
  ===========================
  IBM.2107-75CXXXX 7.7.10.294
STOR2RRD storage configuration
- All actions below under stor2rrd user (lpar2rrd on Virtual Appliance)
-
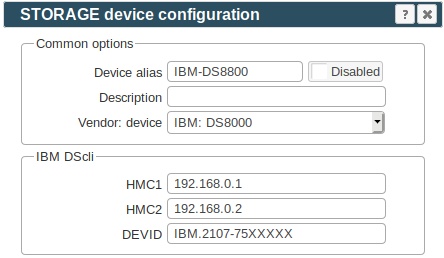
Add storage into configuration from the UI:
Settings icon ➡ Storage ➡ New ➡ Vendor:device ➡ IBM DS8000
-
You can get DEVID from DSCLI:
$ /opt/ibm/dscli/dscli  -hmc1  192.168.1.1 -user stor2rrd
  Date/Time: April 18, 2013 2:55:36 PM CEST IBM DSCLI Version: 7.6.31.165 DS: -
  dscli> lssi -s
   ID
   ================
   IBM.2107-75VG681
When you get this error:dscli> lssi -s Date/Time: April 18, 2013 3:04:25 PM CEST IBM DSCLI Version: 7.6.31.165 DS: - CMUC00201E lssi:: You are logged in with an expired password and limited authorization. Use the chuser command to changer password and restore normal authorization.Then change the password for stor2rrd userdscli>chuser -pw PASSWORD1 stor2rrd
and refresh stored password as well$ /opt/ibm/dscli/dscli managepwfile -action remove -mc1 192.168.1.1 -name stor2rrd $ /opt/ibm/dscli/dscli managepwfile -action add -mc1 192.168.1.1 -name stor2rrd -pw PASSWORD1
-
Make sure you have enough of disk space on the filesystem where is STOR2RRD installed
Roughly you might count 2 - 30 GB per a storage (it depends on number of volumes, 30GB for 5000 volumes)$ df -g /home # AIX $ df -h /home # Linux
-
Test storage connectivity, either from the UI or from the command line:
$ cd /home/stor2rrd/stor2rrd
$ ./bin/config_check.sh
  =========================
  STORAGE: DS8100: DS8K
  =========================
  /opt/ibm/dscli/dscli -hmc1 192.168.1.1 -hmc2 192.168.1.2 -user stor2rrd whoami
  connection ok
- Schedule to run storage agent from stor2rrd crontab (lpar2rrd on Virtual Appliance, it might already exist there)
Add if it does not exist as above
$ crontab -l | grep load_ds8perf.sh
$
Assure there is already an entry with the UI creation running once an hour in crontab$ crontab -e # IBM DS8000 storage agent 0,5,10,15,20,25,30,35,40,45,50,55 * * * * /home/stor2rrd/stor2rrd/load_ds8perf.sh > /home/stor2rrd/stor2rrd/load_ds8perf.out 2>&1
$ crontab -e

# STOR2RRD UI (just ONE entry of load.sh must be there)
5 * * * * /home/stor2rrd/stor2rrd/load.sh > /home/stor2rrd/stor2rrd/load.out 2>&1
-
Let run the storage agent for 15 - 20 minutes to get data, then:
$ cd /home/stor2rrd/stor2rrd
$ ./load.sh
- Go to the web UI: http://<your web server>/stor2rrd/
Use Ctrl-F5 to refresh the web browser cache.
In case of usage of Virtual Appliance
Note: Storage firmware 8.7+ is supported only via STOR2RRD v8.00+.
IBM Spectrum Control (TPC) and STOR2RRD coexistence
- Use local account lpar2rrd for hosting of STOR2RRD on the virtual appliance
- Use /home/stor2rrd/stor2rrd as the product home
Note: Storage firmware 8.7+ is supported only via STOR2RRD v8.00+.
IBM Spectrum Control (TPC) and STOR2RRD coexistence
Prerequisites
-
Allow access from the STOR2RRD host to the IBM SVC / Storwize / FlashSystem storage on port 22 (ssh).
Test if port is open:$ perl /home/stor2rrd/stor2rrd/bin/conntest.pl 192.168.1.1 22 Connection to "192.168.1.1" on port "22" is ok
Storage access
There are 2 possibilities how to connect the storage:- Use user/password
Create new user "stor2rrd" on the storage-
Storage firmware 8.3.1.2+: use "Monitor" role
$ ssh superuser@<storage control enclosure IP address> "svctask mkuser -name stor2rrd -usergrp "Monitor"
Using this user role requires setting statistics_frequency on attached storage to 5 minutes under superuserssh superuser@<storage control enclosure IP address> "svctask startstats -interval 5" # make sure it has been done by: ssh superuser@<storage control enclosure IP address> "lssystem" | grep statistics statistics_status on statistics_frequency 5
-
Storage firmware 8+ up to 8.3.1.2: use "Restricted Administrator"
$ ssh superuser@<storage control enclosure IP address> "svctask mkuser -name stor2rrd -usergrp RestrictedAdmin"
-
Older firmwares: use "Administrator" role.
It is the lowest role which allows retrieve of statistics data from the storage. Read this for explanation.
$ ssh superuser@<storage control enclosure IP address> "svctask mkuser -name stor2rrd -usergrp Administrator"
-
Storage firmware 8.3.1.2+: use "Monitor" role
- SSH-keys
-
Create SSH-keys on STOR2RRD host under stor2rrd user (lpar2rrd on the XoruX Virtual Appliance) if do not exist yet.
It should already exist on the Virtual Appliance, skip it there.
Type enter instead of passphrase# su - stor2rrd # (use lpar2rrd user on the Appliance) $ ls -l ~/.ssh/id_rsa.pub $ ssh-keygen -t rsa -N "" Generating public/private rsa key pair. Enter file in which to save the key (/home/stor2rrd/.ssh/id_rsa): ... $ ls -l ~/.ssh/id_rsa.pub -rw-r--r-- 1 stor2rrd stor2rrd 382 Jun 1 12:47 /home/stor2rrd/.ssh/id_rsa.pub
New storage devices might require stronger key, use this one instead of above 'RSA'$ ssh-keygen -t ecdsa -b 521 -N ""
- Copy ssh-key into the storage under storage superuser
In case of IBM Storwize V7000 Unified use one of "Control Enclosure" IPs (definitely not "File Module" IP).
Detailed description of IBM Storwize V7000 Unified.$ scp ~/.ssh/id_rsa.pub superuser@<storage control enclosure IP address>:/tmp/123tmp
-
Create new user "stor2rrd" on the storage
-
Storage firmware 8.3.1.2+: use "Monitor" role
$ ssh superuser@<storage control enclosure IP address> "svctask mkuser -name stor2rrd -usergrp Monitor -keyfile /tmp/123tmp"
Using this user role requires setting statistics_frequency on attached storage to 5 minutes under superuserssh superuser@<storage control enclosure IP address> "svctask startstats -interval 5" # make sure it has been done by: ssh superuser@<storage control enclosure IP address> "lssystem" | grep statistics statistics_status on statistics_frequency 5
-
Storage firmware 8+ up to 8.3.1.2: use "Restricted Administrator"
$ ssh superuser@<storage control enclosure IP address> "svctask mkuser -name stor2rrd -usergrp RestrictedAdmin -keyfile /tmp/123tmp"
-
Older firmwares: use "Administrator" role.
It is the lowest role which allows retrieve of statistics data from the storage. Read this for explanation.
$ ssh superuser@<storage control enclosure IP address> "svctask mkuser -name stor2rrd -usergrp Administrator -keyfile /tmp/123tmp"
-
Storage firmware 8.3.1.2+: use "Monitor" role
-
If stor2rrd user already exists on the storage then assign him new ssh-keys:
$ ssh superuser@<storage control enclosure IP address> "svctask chuser -keyfile /tmp/123tmp stor2rrd"
- Check if that works:
$ ssh -i ~/.ssh/id_rsa stor2rrd@<storage control enclosure IP address> "svcinfo lssystem"
  id 00000100C0906BAA
  name SVC
  location local
  partnership
  bandwidth
  ...
-
Create SSH-keys on STOR2RRD host under stor2rrd user (lpar2rrd on the XoruX Virtual Appliance) if do not exist yet.
STOR2RRD storage configuration
- All actions below under stor2rrd user (lpar2rrd on Virtual Appliance)
-
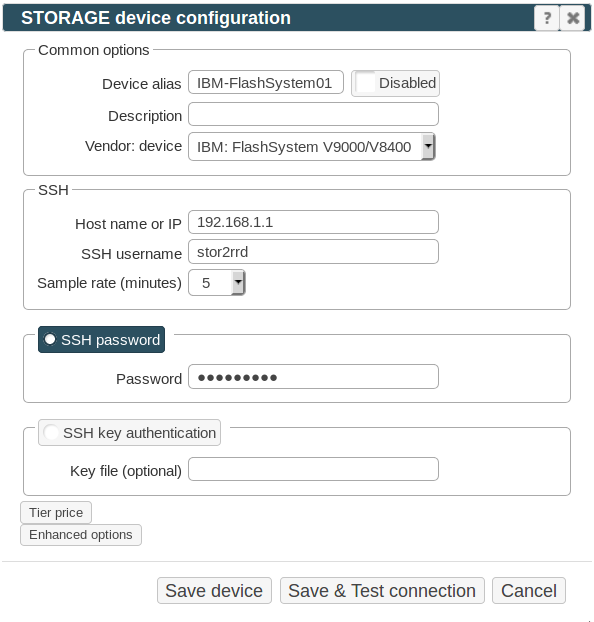
Add storage into configuration from the UI:
Settings icon ➡ Storage ➡ New ➡ Vendor:device ➡ IBM Storwize / SVC / FlashSystem
-
Make sure you have enough of disk space on the filesystem where is STOR2RRD installed
Roughly you might count 2 - 30 GB per a storage (it depends on number of volumes, 30GB for 5000 volumes)$ df -g /home # AIX $ df -h /home # Linux
-
Test storage connectivity, either from the UI or from the command line:
$ cd /home/stor2rrd/stor2rrd
$ ./bin/config_check.sh
  =========================
  STORAGE: storwize01: SWIZ
  =========================
  ssh -o ConnectTimeout=15 -i /home/stor2rrd/.ssh/id_rsa  stor2rrd@192.168.1.1 "lscurrentuser"
  connection ok
- Schedule to run storage agent from stor2rrd crontab (lpar2rrd on Virtual Appliance, it might already exist there)
Add if it does not exist as above
$ crontab -l | grep load_svcperf.sh
$
Assure there is already an entry with the UI creation running once an hour in crontab$ crontab -e # IBM Storwize/SVC storage agent 0,5,10,15,20,25,30,35,40,45,50,55 * * * * /home/stor2rrd/stor2rrd/load_svcperf.sh > /home/stor2rrd/stor2rrd/load_svcperf.out 2>&1
$ crontab -e

# STOR2RRD UI (just ONE entry of load.sh must be there)
5 * * * * /home/stor2rrd/stor2rrd/load.sh > /home/stor2rrd/stor2rrd/load.out 2>&1
-
Let run the storage agent for 15 - 20 minutes to get data, then:
$ cd /home/stor2rrd/stor2rrd
$ ./load.sh
- Go to the web UI: http://<your web server>/stor2rrd/
Use Ctrl-F5 to refresh the web browser cache.
Troubleshooting
- Storwize 8.5.0+ and support for multi-factor user authentication (REMOTE account usage)
There is a bug in Storwize code which does not allow to use REMOTE account for stor2rrd ssh access.
Upgrade to Storwize code versions 8.5.0.10 (Q3-Q4 2023) or use LOCAL account
- fix for this issue:
$ tail error.log-<storage name>
  "_state" is not defined in %Net::OpenSSH::Constants::EXPORT_TAGS at /home/lpar2rrd/stor2rrd/lib/Xorux/Net/OpenSSH.pm line 20.
  Can't continue after import errors at /home/lpar2rrd/stor2rrd/lib/Xorux/Net/OpenSSH.pm line 20.
  BEGIN failed--compilation aborted at /home/lpar2rrd/stor2rrd/lib/Xorux/Net/OpenSSH.pm line 20.
  Compilation failed in require at /home/lpar2rrd/stor2rrd/bin/ssh_test_svc.pl line 26.
This will resolve the issue:rpm -e perl-Net-OpenSSH-0.62-1.el7.noarch
More information: forum.xorux.com/discussion/comment/5679#Comment_5679
- fix for this issue:
$ tail error.log-<storage name>
  Max. recursion depth with nested structures exceeded at /usr/lib64/perl5/vendor_perl/Storable.pm line 278, at ...
Follow this forum thread: forum.xorux.com/discussion/comment/5214#Comment_5214
- fix for this issue on AIX:
$ tail -1 error.log-<storage name>
  OpenSSL version mismatch. Built against 1000105f, you have 100000cf
Solution is remove OpenSSL package which was installed as RRDTool prerequisite.
Note that system OpenSSL is untouched by this (lslpp -L| grep -i openssl).rpm -e --nodeps openssl-1.0.1g-1
-
In case you find below error during initial configuration then follow this page
$ cd /home/stor2rrd/stor2rrd/logs
$ tail -1 error.log-<storage name>
  Can't locate object method "new" via package "XML::LibXML::SAX" at /usr/opt/perl5/lib/site_perl/5.10.1/XML/SAX/ParserFactory.pm line 43.
- In case of a problem check our forum or contact us via support@stor2rrd.com
In case of usage of Virtual Appliance
- Use local account lpar2rrd for hosting of STOR2RRD on the virtual appliance
- Use /home/stor2rrd/stor2rrd as the product home
Create a user on the storage and check the storage connectivity
-
Assure that CIM service is running.
It should be running by default but especially on A9000 we have seen it has been stopped.
Use the storage UI or command line like this:cim_show cim_enable
-
Allow access from the STOR2RRD host to the storage on port 5989 (SMI-S).
Test if port is open:$ perl /home/stor2rrd/stor2rrd/bin/conntest.pl 192.168.1.1 5989 Connection to "192.168.1.1" on port "5989" is ok
- When you use the XIV UI then create stor2rrd use in category readonly
- XIV command line:
# export XIV_XCLIUSER=admin
# export XIV_XCLIPASSWORD=<admin password>
# /opt/ibm/XIVUI/xcli -m <xiv ip> user_define user=stor2rrd password=<password> password_verify=<password> category=readonly
Install prerequisites
Skip that in case of Virtual Appliance- Linux:
Install sblim-wbemcli package:If you prefere to use https on port 5989 then you must use wbemcli with this patch 0002742# yum list |grep sblim-wbemcli sblim-wbemcli.x86_64 1.6.2-9.el7 base # yum install sblim-wbemcli # RedHat # apt-get install sblim-wbemcli # Debian based (Ubuntu etc) # /usr/bin/wbemcli -noverify -nl ei https://<XIV_hostname>:5988/root/ibm:IBMTSDS_StorageSystem * * ./wbemcli: Http Exception: Username/password required. *
Download the package from:- wbemcli-1.6.3 x86_64 for Redhat 6
- wbemcli-1.6.3 x86_64 for Redhat 7
- wbemcli-1.6.3 for other Linuxes: ➡ Select your OS in the header ➡ "Grab binary packages directly"
- wbemcli_x86_64.gz as general Linux binary, gunzip and replace /usr/bin/wbemcli by this
Test the package:# rpm -q sblim-wbemcli sblim-wbemcli-1.6.3-31.1.x86_64 # /usr/bin/wbemcli -v * wbemcli Version 1.6.3 # /usr/bin/wbemcli -noverify -nl ei http://<XIV_hostname>:5988/root/ibm:IBMTSDS_StorageSystem * * ./wbemcli: Http Exception: Username/password required. *
- AIX:
Download and install- libffi-3.1-1
- libiconv-1.14-2
- libidn-1.29-1
- libssh2-1.4.3-2
- openssl-1.0.1j-1
- openldap-2.4.23-0.3
- curl-7.27.0-1
- sblim-wbemcli-1.6.3 with 0002742 patch
# rpm -Uvh libffi-3.1-1.aix5.1.ppc.rpm --nodeps
# rpm -Uvh libiconv-1.14-2.aix5.1.ppc.rpm --nodeps
# rpm -Uvh libidn-1.29-1.aix5.1.ppc.rpm --nodeps
# rpm -Uvh libssh2-1.4.3-2.aix5.1.ppc.rpm --nodeps
# rpm -Uvh openssl-1.0.1j-1.aix5.1.ppc.rpm
# rpm -Uvh openldap-2.4.23-0.3.aix5.1.ppc.rpm
# rpm -Uvh curl-7.27.0-1.aix5.1.ppc.rpm
# rpm -Uvh wbemcli-1.6.3-1.aix5.1.ppc.rpm

# LIBPATH=/opt/freeware/lib; export LIBPATH
# /opt/freeware/bin/wbemcli -noverify -nl ei http://<XIV_hostname>:5988/root/ibm:IBMTSDS_StorageSystem
  *
  * ./wbemcli: Http Exception: Username/password required.
  *
Test storage connection
- replace "stor2rrd password" and "__storage_IP__" by yours (use /usr/bin/wbemcli path on Linux)
Do not use shell special characters like #!?|$*[]\{}`"'& in the password, use ;:.+-% instead.$ LIBPATH=/opt/freeware/lib; export LIBPATH $ /opt/freeware/bin/wbemcli -noverify -nl ei https://stor2rrd:<stor2rrd_password>@<XIV_hostname>:5989/root/ibm:IBMTSDS_StorageSystem
STOR2RRD storage configuration
- All actions below under stor2rrd user (lpar2rrd on Virtual Appliance)
-
Add storage into configuration from the UI:
Settings icon ➡ Storage ➡ New ➡ Vendor:device ➡ IBM XIV / A9000

-
Do not use shell special characters like @#!?|$*[]\{}`"'& in the password, use rather ;:.+- instead.
-
Make sure you have enough of disk space on the filesystem where is STOR2RRD installed
Roughly you might count 2 - 30 GB per a storage (it depends on number of volumes, 30GB for 5000 volumes)$ df -g /home # AIX $ df -h /home # Linux
-
Test storage connectivity, either from the UI or from the command line:
$ cd /home/stor2rrd/stor2rrd
$ ./bin/config_check.sh XIV01
  =========================
  STORAGE: XIV01: XIV
  =========================
  /opt/freeware/bin/wbemcli -noverify -nl ei https://stor2rrd:passw0rd@192.168.1.1:5989/root/ibm:IBMTSDS_StorageSystem
  connection ok
- If you use Active Directory on your XIV then you will have a problem with wbemcli package.
Use this link to resolve it.
- Schedule to run storage agent from stor2rrd crontab (lpar2rrd on Virtual Appliance, it might already exist there)
Add if it does not exist as above
$ crontab -l | grep load_xivperf.sh
$
Assure there is already an entry with the UI creation running once an hour in crontab$ crontab -e # IBM XIV (use 10minutes run time, definitely not less) 0,10,20,30,40,50 * * * * /home/stor2rrd/stor2rrd/load_xivperf.sh > /home/stor2rrd/stor2rrd/load_xivperf.out 2>&1
$ crontab -e

# STOR2RRD UI (just ONE entry of load.sh must be there)
5 * * * * /home/stor2rrd/stor2rrd/load.sh > /home/stor2rrd/stor2rrd/load.out 2>&1
-
Let run the storage agent for 15 - 20 minutes to get data, then:
$ cd /home/stor2rrd/stor2rrd
$ ./load.sh
- Go to the web UI: http://<your web server>/stor2rrd/
Use Ctrl-F5 to refresh the web browser cache.
In case of usage of Virtual Appliance
- Use local account lpar2rrd for hosting of STOR2RRD on the virtual appliance
- Use /home/stor2rrd/stor2rrd as the product home
Supported devices
- IBM DS 3000
- IBM DS 4000
- IBM DS 5000
- IBM DCS 3700
- NetApp E-Series
- LSI / Engenio based storage
-
Download SMcli package from the IBM site (you need to know storage serial and have IBM ID free account)
Go to IBM fix central and follow this:
Product Group [System Storage] ➡
Select from System Storage [Disk systems] ➡
Select from Entry level disk systems [DS3000] ➡
Release [All] ➡
Platform [AIX/Linux ...]
Download only *SMIA* package like:
SM10.86_Linux_64bit_x86-64_SMIA-10.86.x5.43.tgz
SM10.86_AIX_SMIA-10.86.x5.43.tgz
- Note actual IBM page does not seem to contain SMIA package, use Storage manager which should contain SMCli: Disk-SM-AIX-Dec-2013-version-10.86.x5.43
-
AIX prerequisites:
Install X11 packages from your AIX install media:- X11.adt
- X11.base
- X11.motif
# lslpp -L |egrep "X11.adt|X11.base|X11.motif"
  X11.adt.bitmaps            6.1.0.0    C     F    AIXwindows Application
  X11.adt.ext                6.1.6.0    C     F    AIXwindows Application
  X11.adt.imake              6.1.6.0    C     F    AIXwindows Application
  X11.adt.include            6.1.4.0    C     F    AIXwindows Application
  X11.adt.lib                6.1.2.0    C     F    AIXwindows Application
  X11.adt.motif              6.1.6.0    C     F    AIXwindows Application
  X11.base.common            6.1.0.0    C     F    AIXwindows Runtime Common
  X11.base.lib               6.1.6.0    C     F    AIXwindows Runtime Libraries
  X11.base.rte               6.1.6.0    C     F    AIXwindows Runtime Environment
  X11.base.smt               6.1.6.0    C     F    AIXwindows Runtime Shared
  X11.base.xpconfig          6.1.0.0    C     F    Xprint Configuration Files
  X11.motif.lib              6.1.6.0    C     F    AIXwindows Motif Libraries
  X11.motif.mwm              6.1.6.0    C     F    AIXwindows Motif Window
-
Install SMcli under root user
Check install log below for errors if you do not see "Congratulations ..." message after the installation.# umask 022 # gunzip SM10.86_AIX_SMIA-10.86.x5.43.tgz # tar xvf SM10.86_AIX_SMIA-10.86.x5.43.tar # cd AIX10p86/AIX # sh SMIA-AIX-10.86.0605.0043.bin -i console (accept the license agreement, type "enter" many times ) Please choose the Install Set to be installed by this installer. 1- Typical (Full Installation) --> 2- Management Station 3- Host 4- Customize... ENTER THE NUMBER FOR THE INSTALL SET, OR PRESS <ENTER> TO ACCEPT THE DEFAULT : 2 ...... Congratulations. IBM System Storage DS Storage Manager 10 has been successfully installed to: /opt/IBM_DS # lslpp -L|grep SMclient SMclient.aix.rte 10.86.6543.0 C F IBM DS Storage Manager Client # ls -l /usr/SMclient/SMcli -r-x------ 1 root system 1008 Oct 10 2013 /usr/SMclient/SMcli
/opt/IBM_DS/IBM_System_Storage_DS_Storage_Manager_10_InstallLog.log
-
Note: you might hit into the IBM installer bug during rpm install of SMclient-10.86.0G05.0043-1.noarch. Below is the workaround.
Then try installation again.
# ln -s /opt/IBM_DS/ia/jre/ /opt/IBM_DS/jre
-
When you have Debian based Linux (Ubuntu etc) which does not support rpm packaging then you will find uninstalled packages in /opt/IBM_DS
Convert them in debian packages and install them as root:# cd /opt/IBM_DS # alien SMclient.rpm # alien SMesm.rpm # alien SMruntime.rpm # dpkg -i smclient_10.86.0G05.0043-2_all.deb # dpkg -i smesm_10.86.0G05.0007-2_all.deb # dpkg -i smruntime_10.86.0A05.0001-2_amd64.deb # ls -l /usr/SMclient/SMcli -r-x------ 1 root system 1008 Oct 10 2013 /usr/SMclient/SMcli
-
Stop SMmonitor service
AIX:Linux:# SMmonitor stop # rmitab smmonitor
Linux systemd:# /opt/SMgr/client/SMmonitor stop # chkconfig --list SMmonitor # chkconfig --level 2345 SMmonitor off alternatively: # rm -f /etc/rc2.d/S99SMmonitor /etc/rc.d/init.d/SMmonitor
# systemctl stop smmonitor.service
# systemctl disable smmonitor.service
- Allow user stor2rrd run SMcli API (lpar2rrd user on Virtual Appliance)
Under root execute following:If you do not do it then you get such error by running it under someone else than root:# rm -f /var/opt/SM/emwdata_v04_bin.lock /var/opt/SM/pref_01_bin.lock # chown stor2rrd /opt/IBM_DS/client/SMcli /var/opt/SM/prefbackup_01.bin # chown stor2rrd /var/opt/SM/emwback_v04.bin /var/opt/SM /var/opt/SM/emwdata_v04.bin # chown stor2rrd /var/opt/SM /var/opt/SM/pref_01.bin # chmod -f 644 /usr/SMruntime/jre/lib/security/java.security # chmod -f 755 /opt/IBM_DS/client/lib/*
(Do not forget to deactivate SMmonitor as above as it can change file rights back to root itself)# su - stor2rrd # (lpar2rrd user on the Virtual Appliance) $ SMcli -d An internal error, error code 12, has occurred. This is possibly due to initialization problems when loading the necessary internal files. Please check your installation of the storage management client. If problems continue to persist, re-install the storage management client.
Storage configuration
- All actions below under stor2rrd user (lpar2rrd on Virtual Appliance)
- Allow access from the STOR2RRD host to the storage on both controllers on port 2463.
Test if port is open:$ perl /home/stor2rrd/stor2rrd/bin/conntest.pl 192.168.1.1 2463 Connection to "192.168.1.1" on port "2463" is ok
- Connect new storage, you must connect both storage controllers
Use "DS5020_01" further for etc/storage-list.cfg configuration
$ SMcli -d
  There are currently no storage subsystems listed in the configuration file. Add
  storage subsystems using the Add Storage Subsystem option in the storage management
  software or by command line.
$ SMcli -A 192.168.1.1 192.168.1.2
  New storage subsystem was discovered at address 192.168.1.1
  New storage subsystem was discovered at address 192.168.1.2
  SMcli completed successfully
$ SMcli -d
  DS5020_01 ControlerA_hostname  ControlerB_hostname
-
Check if the storage needs user authorization (new firmwares allows to specify password for monitor user role):
When it fails then use "monitor" role credetials (password can be set in the storage UI):
$ SMcli -n DS5020_01 -e -c "show hostTopology;"
Use that credentials in future etc/storage-list.cfg configuration$ SMcli -n DS5020_01 -e -c "show hostTopology;" The operation needs either the 'Administrator' or 'Monitor' password to be set. $ SMcli -n DS5020_01 -p <password> -R monitor -e -c "show hostTopology;"
STOR2RRD storage configuration
- All actions below under stor2rrd user (lpar2rrd on Virtual Appliance)
-
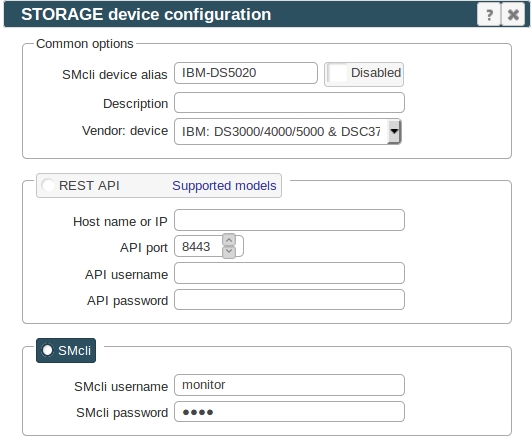
Add storage into configuration from the UI:
Settings icon ➡ Storage ➡ New ➡ Vendor:device ➡ IBM DS3000/4000/5000
-
Make sure you have enough of disk space on the filesystem where is STOR2RRD installed
Roughly you might count 2 - 30 GB per a storage (it depends on number of volumes, 30GB for 5000 volumes)$ df -g /home # AIX $ df -h /home # Linux
-
Test storage connectivity, either from the UI or from the command line:
When connection failed and direct command says this:
$ cd /home/stor2rrd/stor2rrd
$ ./bin/config_check.sh DS5020_01
  =========================
  STORAGE: DS5020_01: DS5K
  =========================
  /usr/SMclient/SMcli -n DS5020_01 -e -c "show hostTopology;"
  connection ok
Then it looks like that the latest firmwares require enabling of password authorization.$ SMcli -n DS5020_01 -e -c "show hostTopology;" Warning! No Monitor password is set for the storage subsystem.
Set password for monitor account in the storage UI and then place same password into etc/storage-list.cfg
Do not use shell special characters like #!?|$*[]\{}`"'& in the password, use ;:.+-%@ instead.Then verify connection via:DS5020_01:DS5K:monitor:password01:
$ ./bin/config_check.sh DS5020_01
...
- Schedule to run storage agent from stor2rrd crontab (lpar2rrd on Virtual Appliance, it might already exist there)
Add if it does not exist as above
$ crontab -l | grep load_ds5perf.sh
$
Assure there is already an entry with the UI creation running once an hour in crontab$ crontab -e # IBM DS3000/DS4000/DS5000 storage agent 0,5,10,15,20,25,30,35,40,45,50,55 * * * * /home/stor2rrd/stor2rrd/load_ds5perf.sh > /home/stor2rrd/stor2rrd/load_ds5perf.out 2>&1
$ crontab -e

# STOR2RRD UI (just ONE entry of load.sh must be there)
5 * * * * /home/stor2rrd/stor2rrd/load.sh > /home/stor2rrd/stor2rrd/load.out 2>&1
-
Let run the storage agent for 15 - 20 minutes to get data, then:
$ cd /home/stor2rrd/stor2rrd
$ ./load.sh
- Go to the web UI: http://<your web server>/stor2rrd/
Use Ctrl-F5 to refresh the web browser cache.
STOR2RRD collects data from Storage Scale GUI nodes using REST API.
At least one GUI node has to be installed in the cluster.
Storage Scale version 5.1.0 and newer are supported.
Note there is not supported monitoring of AIX based nodes as Storage Scale does not support installation of performance monitoring package on them, read this.
Check the connectivity:
At least one GUI node has to be installed in the cluster.
Storage Scale version 5.1.0 and newer are supported.
Note there is not supported monitoring of AIX based nodes as Storage Scale does not support installation of performance monitoring package on them, read this.
Network connectivity
Open HTTPS 443 REST API port from STOR2RRD to all Storage Scale GUI nodes' IP addresses on the firewall.Check the connectivity:
$ perl /home/stor2rrd/stor2rrd/bin/conntest.pl 192.168.1.1 443
  Connection to "192.168.1.1" on port "443" is ok
User configuration
Perform the following steps to create a GUI user and assign user role:- Log in to Storage Scale GUI
- Go to Services > GUI page in the IBM Storage Scale GUI
- Click Users
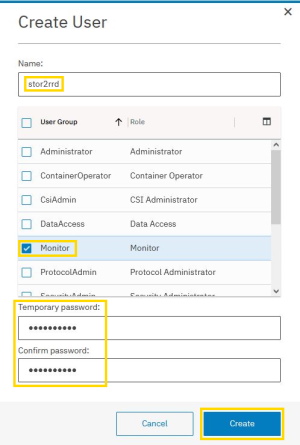
- Click Create User - the Create User window appears
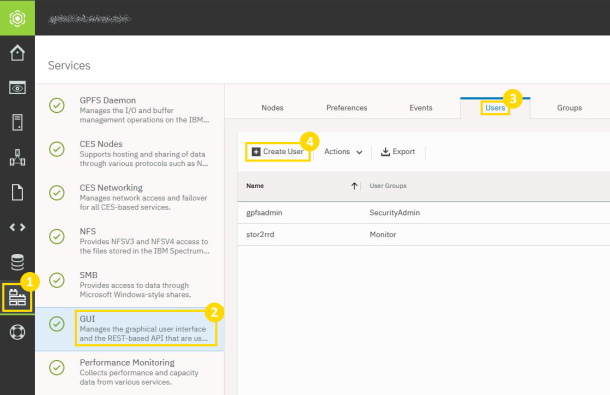
- Type the name of the new user in the Name field
- Select Monitor as User Group
- Type the password in the Temporary password and Confirm password fields
- Click Create
- Login to GUI with the new user and change Temporary password to a new one

STOR2RRD storage configuration
- All actions below under stor2rrd user (lpar2rrd on Virtual Appliance)
-
Add storage into configuration from the UI:
Settings icon ➡ Storage ➡ New ➡ Vendor:device ➡ IBM: Storage Scale
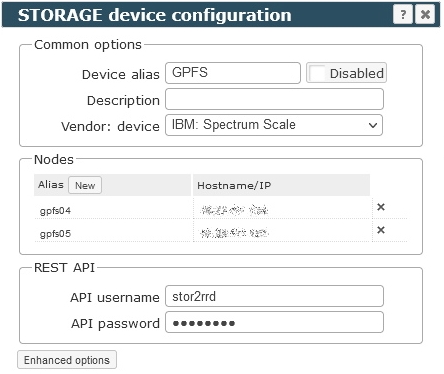
Configure GUI nodes' hostnames/IPs
Fill in the user from previous step
- Schedule to run storage agent from stor2rrd crontab (lpar2rrd on Virtual Appliance, it might already exist there)
Add if it does not exist as above
$ crontab -l | grep load_gpfsperf.sh
$
Assure there is already an entry with the UI creation running once an hour in crontab$ crontab -e # IBM Storage Scale 0,5,10,15,20,25,30,35,40,45,50,55 * * * * /home/stor2rrd/stor2rrd/load_gpfsperf.sh > /home/stor2rrd/stor2rrd/load_gpfsperf.out 2>&1
$ crontab -e

# STOR2RRD UI (just ONE entry of load.sh must be there)
5 * * * * /home/stor2rrd/stor2rrd/load.sh > /home/stor2rrd/stor2rrd/load.out 2>&1
-
Let run the storage agent for 15 - 20 minutes to get data, then:
$ cd /home/stor2rrd/stor2rrd
$ ./load.sh
- Go to the web UI: http://<your web server>/stor2rrd/
Use Ctrl-F5 to refresh the web browser cache.
STOR2RRD collects performance and configuration data from IBM Cloud Object Storage using REAST API provided by the Management node.
Storage connectivity
-
Allow access from the STOR2RRD host to the IBM COSS storage on port 443 (https).
$ perl /home/stor2rrd/stor2rrd/bin/conntest.pl 192.168.1.1 443
  Connection to "192.168.1.1" on port "443" is ok
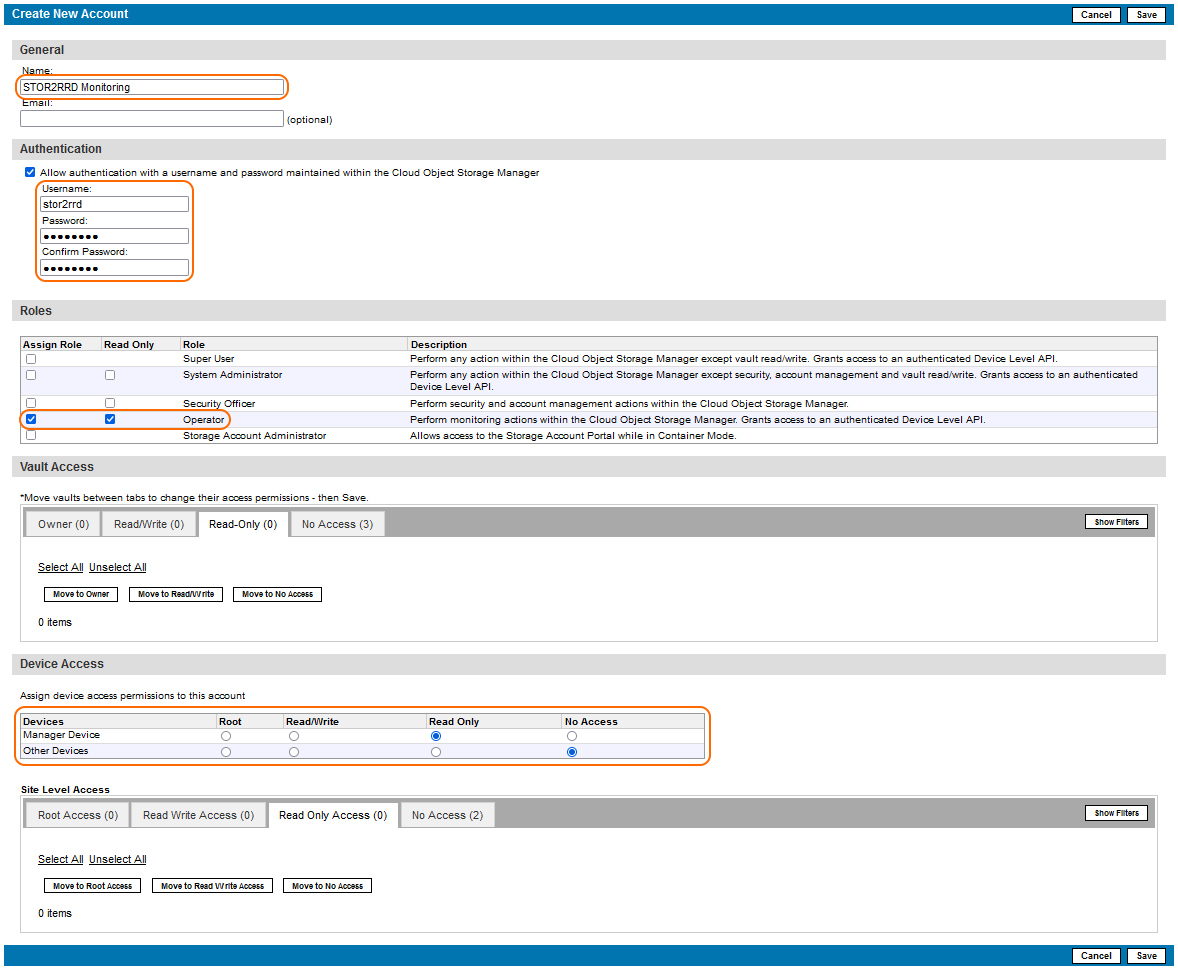
Create read-only user for STOR2RRD
- Login to IBM COSS Web UI
- Navigate to Security ➡ Accounts ➡ Create Account
- Assign read-only operator role
- Assign read-only access to Manager Device
Configure device in STOR2RRD
- Navigate to STOR2RRD Web UI
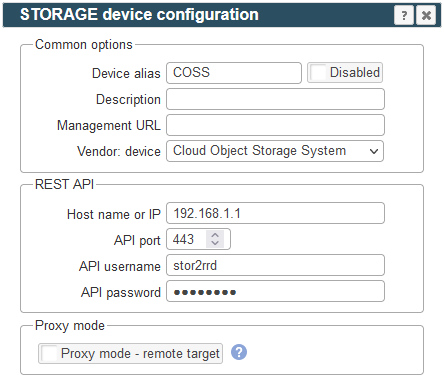
- Add new storage device
Settings icon ➡ Storage ➡ New ➡ Vendor:device ➡ IBM ➡ Cloud Object Storage
-
Make sure you have enough of disk space on the filesystem where is STOR2RRD installed
Roughly you might count 2 - 30 GB per a storage (it depends on number of volumes, 30GB for 5000 volumes)$ df -g /home # AIX $ df -h /home # Linux
-
Test storage connectivity, either from the UI or from the command line:
If you get an errors like "Missing LWP::Protocol::https", "Connection reset by peer" or "500 SSL negotiation failed" then follow this link.
$ cd /home/stor2rrd/stor2rrd
$ ./bin/config_check.sh COSSstorage-alias01
  =====================
  STORAGE: COSSstorage-alias01 : COSS
  =====================
  connection ok
- Schedule storage agent in stor2rrd crontab (lpar2rrd on Virtual Appliance)
Check there is no entry for IBM COS yet
Add an entry if it doesn't exist$ crontab -l | grep load_ibmcossperf.sh $
Ensure there is an entry to build STOR2RRD UI every hour in the ctontab$ crontab -e # IBM COS 0,5,10,15,20,25,30,35,40,45,50,55 * * * * /home/stor2rrd/stor2rrd/load_ibmcossperf.sh > /home/stor2rrd/stor2rrd/load_ibmcossperf.out 2>&1
$ crontab -e

# STOR2RRD UI (just ONE entry of load.sh must be there)
5 * * * * /home/stor2rrd/stor2rrd/load.sh > /home/stor2rrd/stor2rrd/load.out 2>&1
-
Let IBM COS agent run for 15 - 20 minutes to collect data, then:
$ cd /home/stor2rrd/stor2rrd
$ ./load.sh
- Go to the web UI: http://<your web server>/stor2rrd/
Use Ctrl-F5 to refresh the web browser cache.