EMC monitoring: PowerMax VMAX VPLEX Unity DataDomain XtremIO Isilon ME4/ME5 ECS PowerStore PowerFlex
- PowerMax / VMAX
- PowerStore
- XtremIO
- ECS / ObjectScale
- VPLEX
- Metro node
- DataDomain / PowerProtect DD
- PowerScale / Isilon
- Unity
- ME4/5 (WBI)
- ME4/5 (SMI-S)
- VNX / CLARiiON
- VNX file / Celerra
- VNXe
- PowerFlex / ScaleIO
In case of usage of Virtual Appliance
- Use local account lpar2rrd for hosting of STOR2RRD on the virtual appliance
- Use /home/stor2rrd/stor2rrd as the product home
Prerequisites
-
Allow access from the STOR2RRD host to the EMC storage service processors ports 6389,443 (TCP).
Test if ports are open:$ perl /home/stor2rrd/stor2rrd/bin/conntest.pl 192.168.1.1 6389 Connection to "192.168.1.1" on port "6389" is ok $ perl /home/stor2rrd/stor2rrd/bin/conntest.pl 192.168.1.1 443 Connection to "192.168.1.1" on port "443" is ok
-
Install EMC Navisphere Secure CLI. Download it from EMC support page:
(Note: use always the latest version to avoid compatibility issues)-
AIX download of Navisphere CLI (AIX) 7.33.9.1.84-1
Install it as a lpp source, it will be installed into /usr/bin/naviseccli
# smitty installp ➡ select actuall directory ➡ find package F4 ➡ install
- Linux download of Navisphere CLI (Linux x64) 7.33.9.1.84-1
It will be installed into /opt/Navisphere/bin/naviseccli)# rpm -i NaviCLI-Linux-64-x86-en_US-7.33.9.1.84-1.x86_64.rpm
- Debian, Ubuntu packages:
Use either Debian download or conver it via "alien" cmd# alien NaviCLI-Linux-64-x86-en_US-7.33.9.1.84-1.x86_64.rpm NaviCLI-Linux-64-x86-en_US-7.33.9.1.84-1.x86_64.deb generated
In case you select "medium" then accept and store certificate during first manuall connection to the storage.
-
AIX download of Navisphere CLI (AIX) 7.33.9.1.84-1
-
Create stor2rrd user on the storage (lpar2rrd on Virtual Appliance)
Open the storage UI and navigate to storage ➡ settings ➡ user management ➡ local users ➡ add.
Create user account stor2rrd with role operator.
Do not use shell special characters like #!?|.*[]\{} in the password
-
Allow statistics logging on the storage
UI ➡ Storage ➡ System properties ➡ Statistics logging ➡ yes
-
Configure naviseccli, on AIX use /usr/bin/naviseccli (lpar2rrd user on Virtual Appliance)
User your own scope <0 - global; 1 - local; 2 - LDAP># su - stor2rrd # (lpar2rrd user on the Virtual Appliance) $ /opt/Navisphere/bin/naviseccli -addusersecurity -scope 1 -password XXXXXXXXXXX -user stor2rrd $ /opt/Navisphere/bin/naviseccli -h <storage controller IP/hostname> getcontrol -all System Fault LED: OFF Statistics Logging: ON ...Statistics logging must be ON
If you get bellow error assure you use right user/password combination and scope (loca/global/LDAP)$ /opt/Navisphere/bin/naviseccli -h <storage controller IP/hostname> getcontrol -all Error returned from the Management Server on 192.168.1.1 Authentication failed. Possible reasons for failure are invalid security file, invalid username, password and/or scope.
Remove user and define it again with different scope (like below) or user credentials:$ /opt/Navisphere/bin/naviseccli -RemoveUserSecurity $ /opt/Navisphere/bin/naviseccli -addusersecurity -scope 0 -password XXXXXXXXXXX -user stor2rrd
If you have selected medium security level then accept and store certificate$ /opt/Navisphere/bin/naviseccli -h <storage controller IP/hostname> getsptime Unable to validate the identity of the server. There are issues with the certificate presented. Only import this certificate if you have reason to believe it was sent by a trusted source. Certificate details: Subject: CN=192.168.1.1,CN=VNX46EM_SPA,OU=CLARiiON Issuer: CN=192.168.1.1,CN=VNX46EM_SPA,OU=CLARiiON Serial#: 2c3c9999 Valid From: 20140724193051Z Valid To: 20190723193051Z Would you like to [1]Accept the certificate for this session, [2] Accept and store ,[3] Reject the certificate? Please input your selection(The default selection is [1]): --> select "2" Time on SP A: 04/04/17 09:53:54 Time on SP B: 04/04/17 09:49:00
If you get below error then you probably use older NaviCLI 7.30.
Upgrade to 7.33.8.1.19-1$ /opt/Navisphere/bin/naviseccli -h <storage controller IP/hostname> getcontrol -all Exception: End of data stream
STOR2RRD storage configuration
- All actions below under stor2rrd user (lpar2rrd on Virtual Appliance)
-
Add storage into configuration from the UI:
Settings icon ➡ Storage ➡ New ➡ Vendor:device ➡ Dell EMC VNX block

-
Make sure you have enough of disk space on the filesystem where is STOR2RRD installed
Roughly you might count 2 - 30 GB per a storage (it depends on number of volumes, 30GB for 5000 volumes)$ df -g /home # AIX $ df -h /home # Linux
-
Test the storage connectivity, either from the UI or from the command line:
$ cd /home/stor2rrd/stor2rrd $ ./bin/config_check.sh =============================== STORAGE: VNX-block_alias01: VNX =============================== first IP address : 192.168.1.2 /opt/Navisphere/bin/naviseccli -h 192.168.1.2 getsptime Time on SP A: 11/03/16 12:56:45 Time on SP B: 11/03/16 12:56:57 connection ok second IP address : 192.168.1.3 /opt/Navisphere/bin/naviseccli -h 192.168.1.3 getsptime Time on SP A: 11/03/16 12:56:47 Time on SP B: 11/03/16 12:56:58 connection ok - Schedule to run storage agent from stor2rrd crontab (lpar2rrd on Virtual Appliance, it might already exist there)
Add if it does not exist as above$ crontab -l | grep load_vnxperf.sh $
$ crontab -e

# EMC VNX storage agent
0,5,10,15,20,25,30,35,40,45,50,55 * * * * /home/stor2rrd/stor2rrd/load_vnxperf.sh > /home/stor2rrd/stor2rrd/load_vnxperf.out 2>&1
Make sure there is already an entry with the UI creation running once an hour in crontab$ crontab -e # STOR2RRD UI (just ONE entry of load.sh must be there) 5 * * * * /home/stor2rrd/stor2rrd/load.sh > /home/stor2rrd/stor2rrd/load.out 2>&1
-
Let run the storage agent for 15 - 20 minutes to get data, then:
$ cd /home/stor2rrd/stor2rrd $ ./load.sh
- Go to the web UI: http://<your web server>/stor2rrd/
Use Ctrl-F5 to refresh the web browser cache.
In case of usage of Virtual Appliance
- Use local account lpar2rrd for hosting of STOR2RRD on the virtual appliance
- Use /home/stor2rrd/stor2rrd as the product home
Prerequisites
-
Allow access from the STOR2RRD host to the EMC storage on port 22 (do not use data mover IP!).
Test if port is open:$ perl /home/stor2rrd/stor2rrd/bin/conntest.pl 192.168.1.1 22 Connection to "192.168.1.1" on port "22" is ok
- Create a user on the storage for download of perf data (lpar2rrd on Virtual Appliance)
- user name: stor2rrd
- expiration: 99999
- CLI access allowed
- roles: opadmin (operator)
- Create ssh-keys on STOR2RRD host under stor2rrd user if do not exist yet.
It should already exist on the Virtual Appliance, skip it there.
Type enter instead of passphrase# su - stor2rrd # (use lpar2rrd user on the Appliance) $ ls -l ~/.ssh/id_rsa.pub $ ssh-keygen -t rsa -N "" Generating public/private rsa key pair. Enter file in which to save the key (/home/stor2rrd/.ssh/id_rsa): ... $ ls -l ~/.ssh/id_rsa.pub -rw-r--r-- 1 stor2rrd stor2rrd 382 Jun 1 12:47 /home/stor2rrd/.ssh/id_rsa.pub
New storage devices might require stronger key, use this one instead of above 'RSA'$ ssh-keygen -t ecdsa -b 521 -N ""
- Copy ssh-key into the storage under storage stor2rrd
$ scp ~/.ssh/id_rsa.pub stor2rrd@<storage controller>:/tmp/id_rsa.pub $ ssh stor2rrd@<storage controller> cat /tmp/id_rsa.pub >> ~/.ssh/authorized_keys rm /tmp/id_rsa.pub exit
- test connectivity, you should no be prompted for password:
$ ssh -q stor2rrd@<storage controller> "export NAS_DB=/nas; nas_server -i server_2" EMC VNX Control Station Linux release 3.0 (NAS 7.1.79) id type acl slot groupID state name 1 1 0 2 0 server_2 2 4 0 3 0 server_3
STOR2RRD storage configuration
- All actions below under stor2rrd user (lpar2rrd on Virtual Appliance)
-
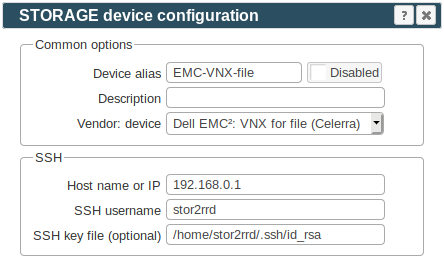
Add storage into configuration from the UI:
Settings icon ➡ Storage ➡ New ➡ Vendor:device ➡ Dell EMC VNX file
-
Make sure you have enough of disk space on the filesystem where is STOR2RRD installed
Roughly you might count 2 - 30 GB per a storage (it depends on number of volumes, 30GB for 5000 volumes)$ df -g /home # AIX $ df -h /home # Linux
-
Test storage connectivity, either from the UI or from the command line:
$ cd /home/stor2rrd/stor2rrd $ ./bin/config_check.sh ================================== STORAGE: VNX-file_alias01e01: VNXF ================================== connection ok
- Schedule to run storage agent from stor2rrd crontab (lpar2rrd on Virtual Appliance, it might already exist there)
Add if it does not exist as above
$ crontab -l | grep load_vnxfperf.sh $
$ crontab -e # EMC VNX for file storage agent 0,5,10,15,20,25,30,35,40,45,50,55 * * * * /home/stor2rrd/stor2rrd/load_vnxfperf.sh > /home/stor2rrd/stor2rrd/load_vnxfperf.out 2>&1
Make sure there is already an entry with the UI creation running once an hour in crontab$ crontab -e # STOR2RRD UI (just ONE entry of load.sh must be there) 5 * * * * /home/stor2rrd/stor2rrd/load.sh > /home/stor2rrd/stor2rrd/load.out 2>&1
-
Let run the storage agent for 15 - 20 minutes to get data, then:
$ cd /home/stor2rrd/stor2rrd $ ./load.sh
- Go to the web UI: http://<your web server>/stor2rrd/
Use Ctrl-F5 to refresh the web browser cache.
In case of usage of Virtual Appliance
- Use local account lpar2rrd for hosting of STOR2RRD on the virtual appliance
- Use /home/stor2rrd/stor2rrd as the product home
Prerequisites
-
Allow access from the STOR2RRD host to the EMC storage on port 443 (HTTPS).
Test if port is open:$ perl /home/stor2rrd/stor2rrd/bin/conntest.pl 192.168.1.1 443 Connection to "192.168.1.1" on port "443" is ok
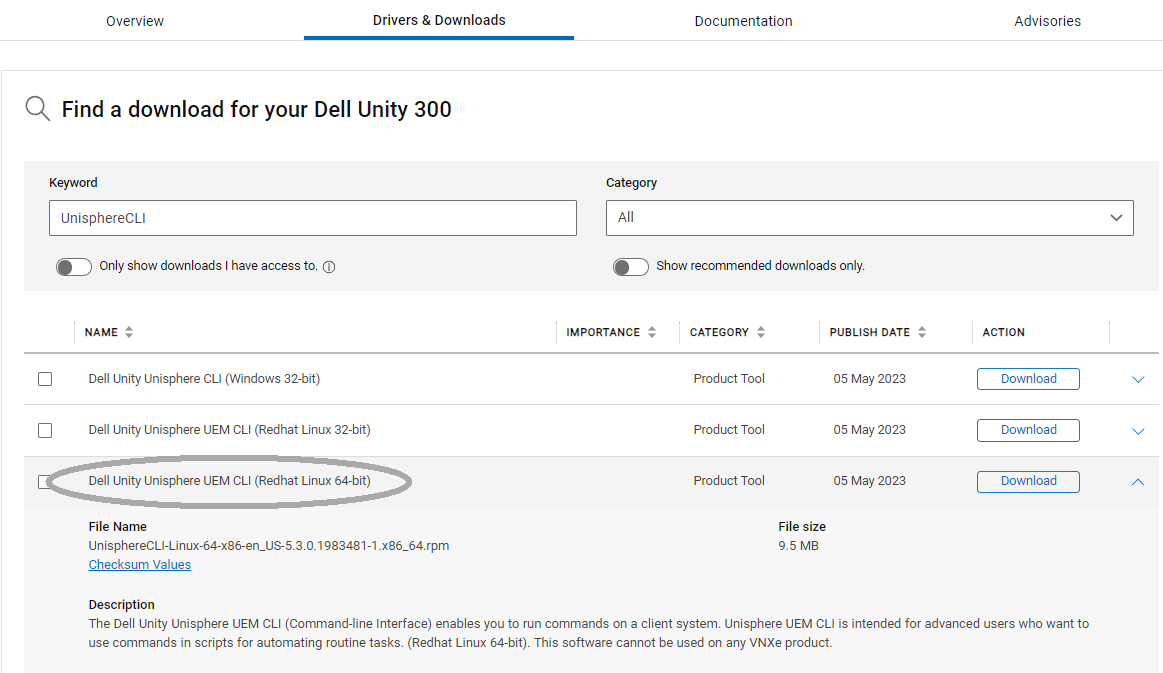
- EMC Unity Unisphere UEM CLI download
https://www.dell.com/support/home/
Download binaries is available for signed users ONLY. BTW no active support is needed.
Identifying your product is necessary to access documentation ➡ choose any Unity model ➡ fresh version www.dell.com/support/home/en-us/product-support/product/unity-300/docs#q=UnisphereCLI&sort=relevancy&f:lang=[en]
For signed-in accounts ➡ Choose any Unity model or enter SerialNumber ➡ Under “Drivers&Downloads” section www.dell.com/support/home/en-us/product-support/product/unity-300/drivers ➡ Filter with keyword “UnisphereCLI” ➡ Select Dell Unity Uninisphere UEM CLI (RedHat Linux 64-bit)
- Supported platforms (unfortunately there is no AIX support for UEM CLI as per November 2016 at least)
- Linux RedHat
- SuSE Linux
- Solaris (x86 & Sparc)
- Debian, Ubuntu package:
- Debian (you must convert it via alien as per bellow)
- EMC Unisphere CLI installation
-
Red Hat, Rocky Linux, CentOS:
# umask 022 # rpm -i UnisphereCLI-Linux-64-x86-en_US-4.0.1.1.3166-1.x86_64.rpm
- Debian, Ubuntu:
Install alien when it does not exist on your system
# apt-get install alien
Convert Red Hat rpm package via "alien" cmd
# alien UnisphereCLI-Linux-64-x86-en_US-4.0.1.1.3166-1.x86_64.rpm UnisphereCLI-Linux-64-x86-en_US-4.0.1.1.3166-1.i386.deb generated
Install it# umask 022 # dpkg -i UnisphereCLI-Linux-64-x86-en_US-4.0.1.1.3166-1.i386.deb
-
Link uemcli.sh to /usr/bin/uemcli if it has not been done during rpm installation
# ln -s /opt/dellemc/uemcli/bin/uemcli.sh /usr/bin/uemcli
-
Red Hat, Rocky Linux, CentOS:
- Setting security level under root user:
Note: The path has changed in recent UnisphereCLI, at least for UnisphereCLI-Linux-64-x86-en_US-5.2.1.1730628-1.x86_64.rpm:
The installation is now under "/opt/dellemc", change bellow cmds accordingly# /opt/emc/uemcli/bin/setlevel.sh low Setting low verifying level.....
You can even use "medium" level, then you have to accept and store certificate at the first connection.- under root:
# /opt/emc/uemcli/bin/setlevel.sh medium Setting medium verifying level.....
- under stor2rrd user (lpar2rrd on the Virtual appliance):
# su - stor2rrd # (lpar2rrd user on the Virtual Appliance) $ uemcli -d 192.168.1.1 -u Local/admin -p "XXXXXX" /user/account show Remote certificate: Issuer: CN=EMC-Unity Subject: CN=EMC-Unity Valid from: 2016-07-15 09:54:57 Z Valid to: 2019-07-15 09:54:57 Z Serial: 0094aea927526b466e Id: 2595584890 Would you like to: [1] Accept the certificate for this session [2] Reject the certificate [3] Accept and store Please input your selection (The default selection is [1]): 3 Storage system address: 192.168.1.1 Storage system port: 443 HTTPS connection 1: ID = user_admin Name = admin Role = administrator Type = local -
If the option "[3] Accept and store" is missing
$ uemcli -d 192.168.1.1 -u Local/admin -p "XXXXXX" /user/account show Remote certificate: Issuer: CN=EMC-Unity Subject: CN=EMC-Unity Valid from: 2016-07-15 09:54:57 Z Valid to: 2019-07-15 09:54:57 Z Serial: 0094aea927526b466e Id: 2595584890 Would you like to: [1] Accept the certificate for this session [2] Reject the certificate Please input your selection (The default selection is [1]):It's necessary to set SecurityLevel to low
There should be file /etc/uemcli_security.conf readable for root probably with "medium" security.SecurityLevel = medium
Changing to low level should resolve it.SecurityLevel = low
Then option "[3] Accept and store" should appear in the selection.
- under root:
- create user stor2rrd under operator role on the storage.
You might skip it and use already existing account with minimal rights.
Do not use shell special characters like #!?|$*[]\{}`"'& in the password, use ;:.+-%@ instead.
Cmd returns "Error code: 0x6000068" if you do not pass them.
Do not use directly /opt/emc/uemcli/bin/uemcli, use always /usr/bin/uemcli.
If the package was converted with "alien", and after installation "/usr/bin/uemcli" - which should be a softlink - could not be found, you should create it manuallyln -s /opt/dellemc/uemcli/bin/uemcli.sh /usr/bin/uemcli
$ uemcli -d 192.168.1.1 -u Local/admin -p "XXXXXX" /user/account show Storage system address: 192.168.1.1 Storage system port: 443 HTTPS connection 1: ID = user_admin Name = admin Role = administrator Type = local ... $ uemcli -d 192.168.1.1 -u Local/admin -p "XXXXXX" /user/account create -name stor2rrd -role operator -type local -passwd "Test2test_" Storage system address: 192.168.1.1 Storage system port: 443 HTTPS connection ID = user_stor2rrd Operation completed successfully. -
Test storage connection for stor2rrd account:
$ /usr/bin/uemcli -d 192.168.1.1 -u Local/stor2rrd -p "XXXXXX" /sys/general show -detail Storage system address: 192.168.1.1 Storage system port: 443 HTTPS connection 1: System name = EMC-Unity Model = UnityVSA Platform type = EMC Storage System System UUID = 420FFE1D-0234-FD02-976E-9217DC6135ED License activation key = ELMEUV0716HN0K Product serial number = VIRT162859DQXZ Health state = OK (5) Health details = "The system is operating normally."
STOR2RRD storage configuration
- All actions below under stor2rrd user (lpar2rrd on Virtual Appliance)
-
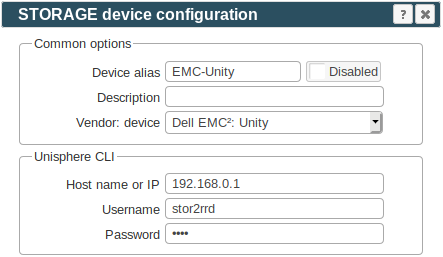
Add storage into configuration from the UI:
Settings icon ➡ Storage ➡ New ➡ Vendor:device ➡ Dell EMC Unity
-
Make sure you have enough of disk space on the filesystem where is STOR2RRD installed
Roughly you might count 2 - 30 GB per a storage (it depends on number of volumes, 30GB for 5000 volumes)$ df -g /home # AIX $ df -h /home # Linux
-
Test storage connectivity, either from the UI or from the command line:
$ cd /home/stor2rrd/stor2rrd $ ./bin/config_check.sh ===================================== STORAGE: EMC-Unity_alias01: UNITY ===================================== connection ok
- Schedule to run storage agent from stor2rrd crontab (lpar2rrd on Virtual Appliance, it might already exist there)
Add if it does not exist as above
$ crontab -l | grep load_unityperf.sh $
$ crontab -e # EMC Unity storage agent 0,5,10,15,20,25,30,35,40,45,50,55 * * * * /home/stor2rrd/stor2rrd/load_unityperf.sh > /home/stor2rrd/stor2rrd/load_unityperf.out 2>&1
Make sure there is already an entry with the UI creation running once an hour in crontab$ crontab -e # STOR2RRD UI (just ONE entry of load.sh must be there) 5 * * * * /home/stor2rrd/stor2rrd/load.sh > /home/stor2rrd/stor2rrd/load.out 2>&1
-
Let run the storage agent for 15 - 20 minutes to get data, then:
$ cd /home/stor2rrd/stor2rrd $ ./load.sh
- Go to the web UI: http://<your web server>/stor2rrd/
Use Ctrl-F5 to refresh the web browser cache.
Troubleshooting
- about 50% of performance counters are not working.
You have probably hit into a Unity bug (926416/944550/9013962), upgrade Unity firmware to 4.2.2.x.
In case of usage of Virtual Appliance
Dell EMC Unispheres 1.6.x, 8.x, 9.x and 10.x are supported.
Read why TDEVs are not monitored.
Dell EMC Unisphere 10.2+ requires XorMon 1.8.0+
- Use local account lpar2rrd for hosting of STOR2RRD on the virtual appliance
- Use /home/stor2rrd/stor2rrd as the product home
Dell EMC Unispheres 1.6.x, 8.x, 9.x and 10.x are supported.
Read why TDEVs are not monitored.
Dell EMC Unisphere 10.2+ requires XorMon 1.8.0+
Prerequisites
-
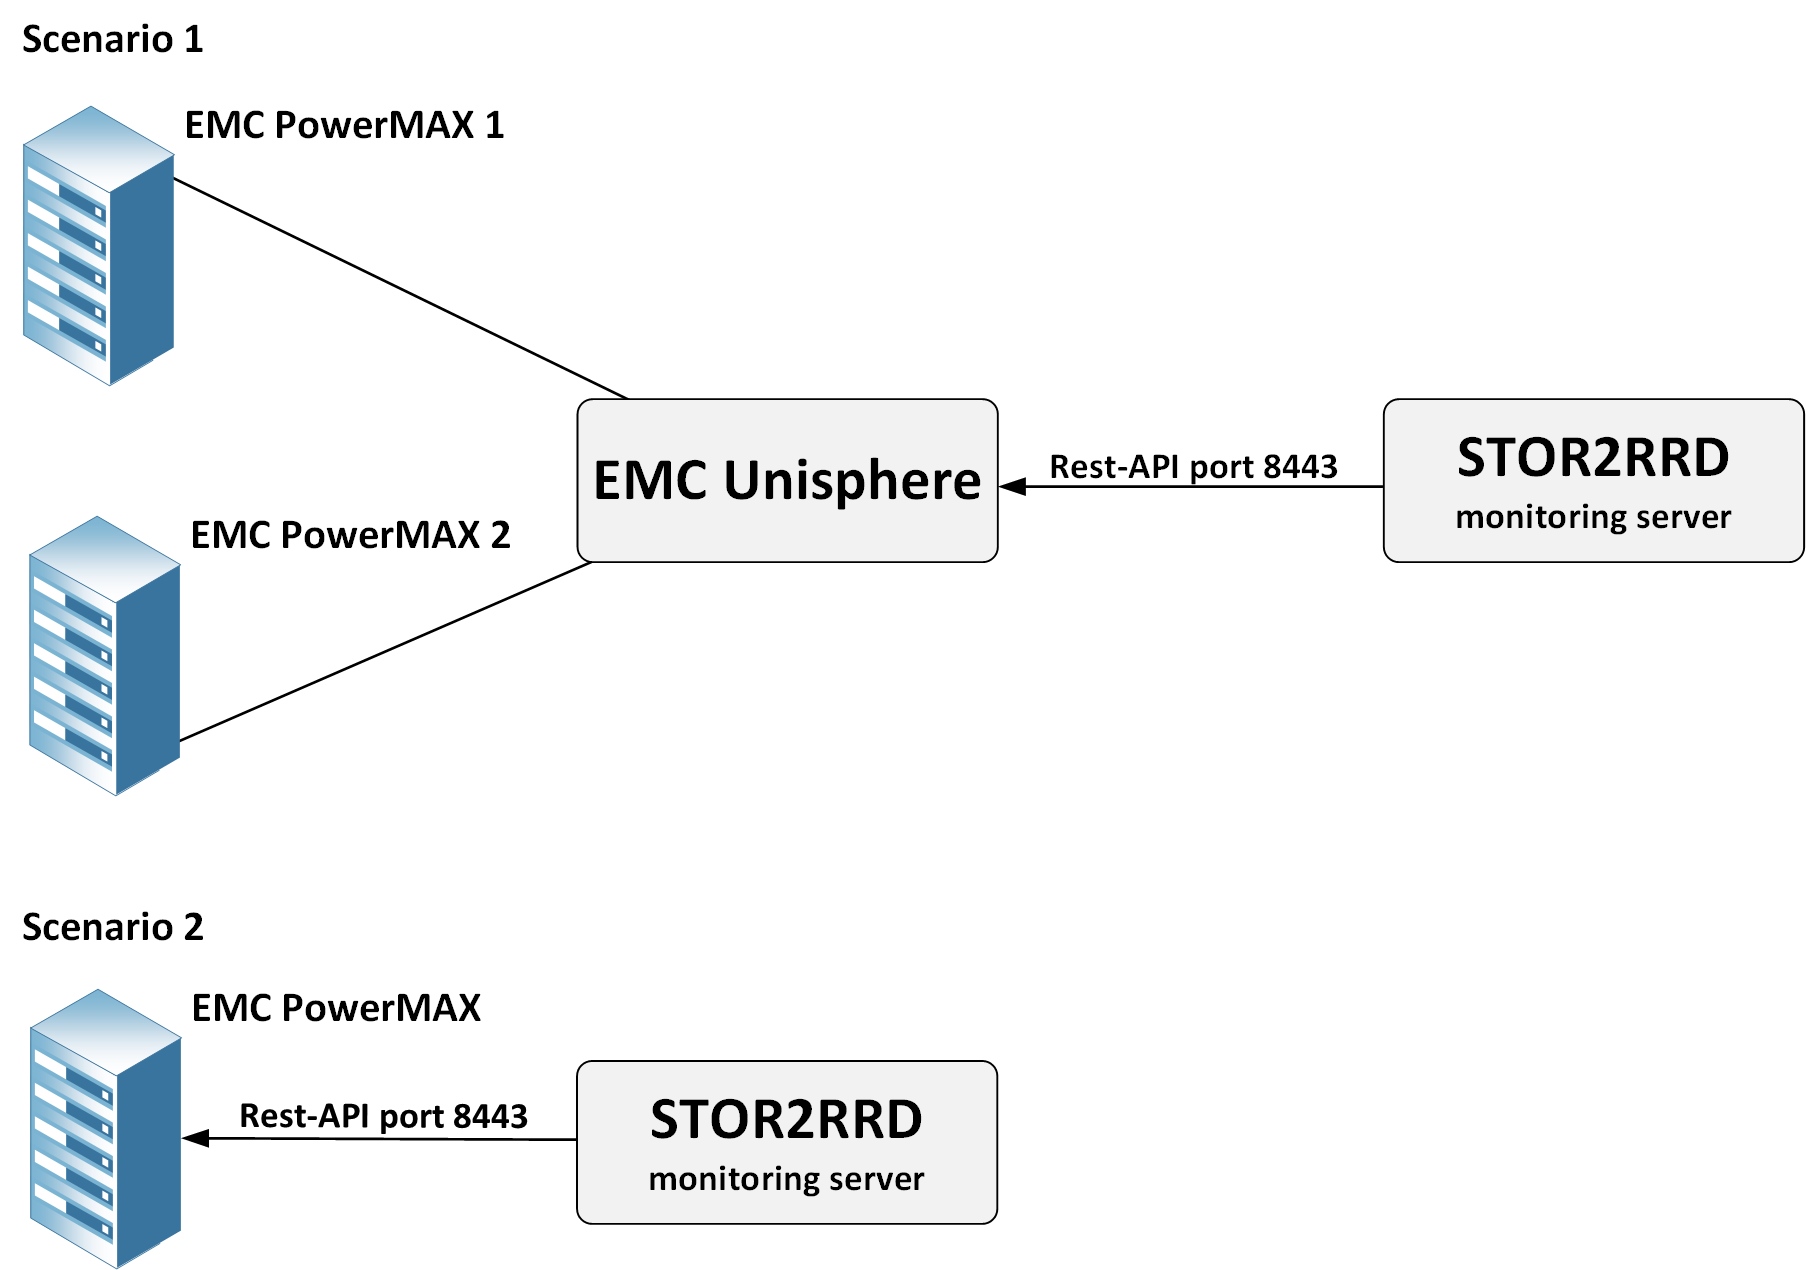
Allow access from the STOR2RRD host to the EMC Unisphere or to the storage itself depends on mode you use on port 8443 (TCP).
Test if port is open:$ perl /home/stor2rrd/stor2rrd/bin/conntest.pl 192.168.1.1 8443 Connection to "192.168.1.1" on port "8443" is ok
EMC Configuration
 |
-
Unisphere (scenario 1)
-
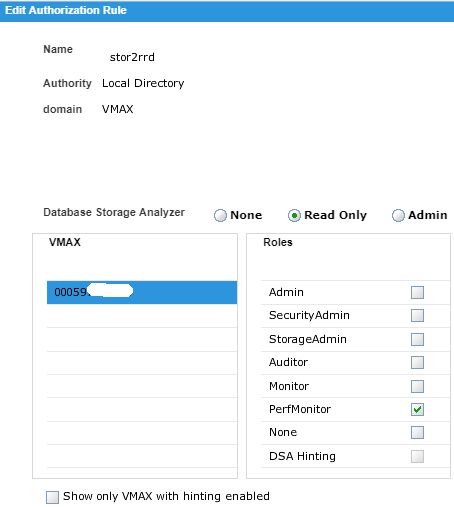
Create user stor2rrd under "PerfMonitor" role on Unisphere.
-
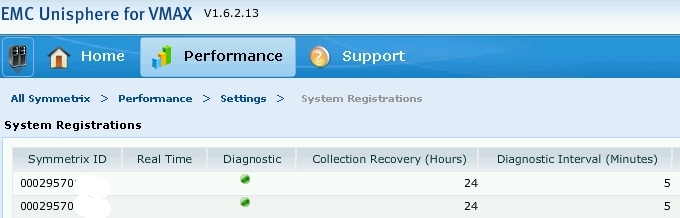
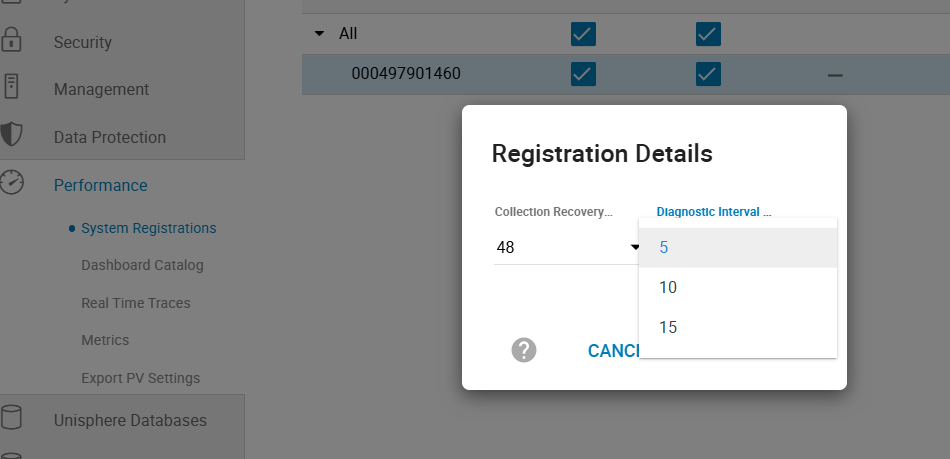
Allow statistics logging on the EMC Unisphere
UI ➡ Performance ➡ Settings ➡ System Registrations ➡ Diagnostics ➡ On (Diagnostics interval 5 minutes)
EMC Unisphere 1.6
EMC Unisphere 8+
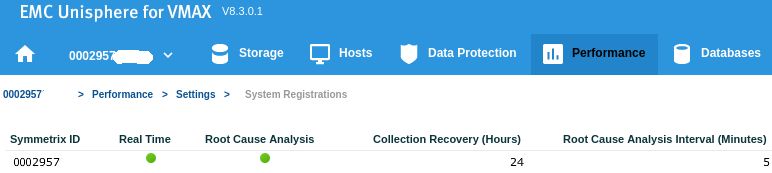
- Set sample rate to 5 minutes:
-
Create user stor2rrd under "PerfMonitor" role on Unisphere.
-
Direct storage attachment (scenario 2)
- Connect on one of both PMAX e-management port and on the wheel on the top right corner
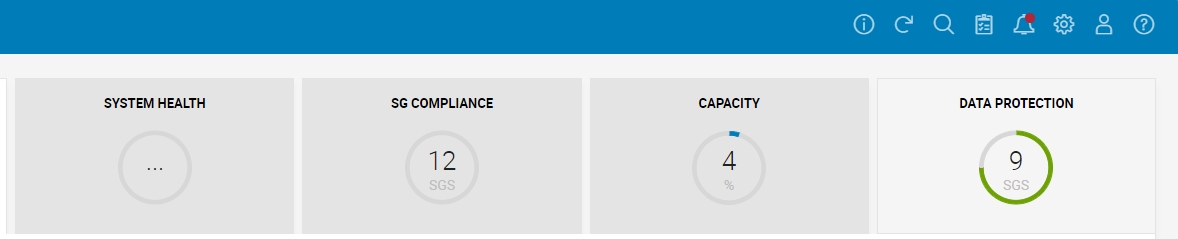
- Click “users and groups”, then “local users”, and then the “create” button
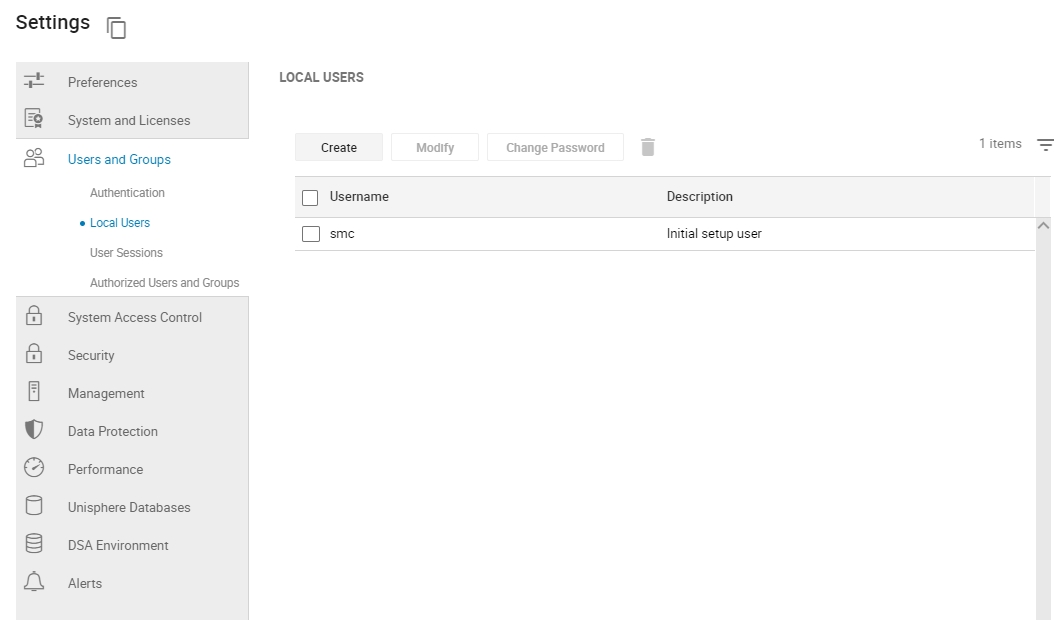
- Enter: The account name, description and Password 2 times (warning: both PMAX and stor2rrd have forbidden special characters and they are not the same)
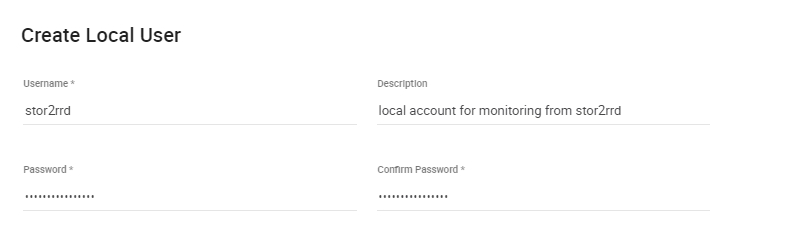
- Choose the “perfmonitor” role
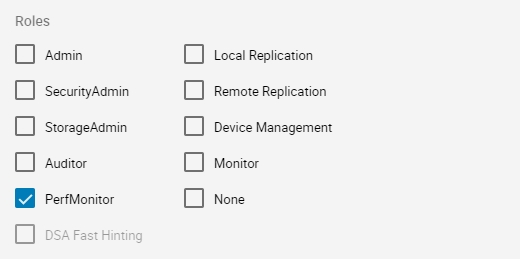
- Keep right access as “read only”

- Connect on one of both PMAX e-management port and on the wheel on the top right corner
STOR2RRD storage configuration
- All actions below under stor2rrd user (lpar2rrd on Virtual Appliance)
-
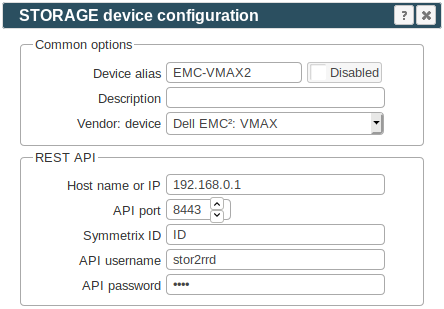
Add storage into configuration from the UI, fill in Symmetrix ID for both scenarios
Settings icon ➡ Storage ➡ New ➡ Vendor:device ➡ Dell EMC VMAX
-
Make sure you have enough of disk space on the filesystem where is STOR2RRD installed
Roughly you might count 2 - 30 GB per a storage (it depends on number of volumes, 30GB for 5000 volumes)$ df -g /home # AIX $ df -h /home # Linux
-
Test storage connectivity, either from the UI or from the command line:
$ cd /home/stor2rrd/stor2rrd $ ./bin/config_check.sh VMAX_alias01 =============================== STORAGE: VMAX_alias01: VMAX =============================== connection ok
Possible errors and solutions:- Error "Missing LWP::Protocol::https", "Connection reset by peer", "500 SSL negotiation failed": follow this.
- Error "Array keys not found!": attach this VMAX through its local Unisphere
- Schedule to run storage agent from stor2rrd crontab (lpar2rrd on Virtual Appliance, it might already exist there)
Add if it does not exist as above
$ crontab -l | grep load_vmaxperf.sh $
$ crontab -e # VMAX storage agent 0,5,10,15,20,25,30,35,40,45,50,55 * * * * /home/stor2rrd/stor2rrd/load_vmaxperf.sh > /home/stor2rrd/stor2rrd/load_vmaxperf.out 2>&1
Make sure there is already an entry with the UI creation running once an hour in crontab$ crontab -e # STOR2RRD UI (just ONE entry of load.sh must be there) 5 * * * * /home/stor2rrd/stor2rrd/load.sh > /home/stor2rrd/stor2rrd/load.out 2>&1
-
Let run the storage agent for 15 - 20 minutes to get data, then:
$ cd /home/stor2rrd/stor2rrd $ ./load.sh
- Go to the web UI: http://<your web server>/stor2rrd/
Use Ctrl-F5 to refresh the web browser cache.
In case of usage of Virtual Appliance
- Use local account lpar2rrd for hosting of STOR2RRD on the virtual appliance
- Use /home/stor2rrd/stor2rrd as the product home
- Performance data via ssh: default VPLEX data collectors available through ssh (port 22) : read only access
- Configuration data via REST API: VPLEX Element Manager API (port 443)
Storage access options
- VPLEX 5 full admin access
- VPLEX 5 non storage UI neither VPLEXcli access
This kind of access requires only ssh access to VPLEX management host to get files with perf data.
This will miss in data then:
- Host section
- Host mapping (HOST vrs Volume relationship)
- Host TOP
- Health status
- Capacity
- VPLEX 6 access under vplexuser role
Prerequisites
-
Allow access from the STOR2RRD host to the VPLEX on ports 22 & 443 (TCP).
$ perl /home/stor2rrd/stor2rrd/bin/conntest.pl 192.168.1.1 22 Connection to "192.168.1.1" on port "22" is ok $ perl /home/stor2rrd/stor2rrd/bin/conntest.pl 192.168.1.1 443 Connection to "192.168.1.1" on port "443" is ok
-
Create user stor2rrd on the VPLEX host under "users" group and exchange ssh-keys.
This will allow download perfromance data and some basic configuration.
Use vplexuser role on VPLEX 6.
You can also use user/password ssh credentials in STOR2RRD UI instead of ssh-keys.
-
Create ssh keys if it does not exist yet in /home/stor2rrd/.ssh/id_rsa (type enter instead of passphrase)
$ ssh-keygen -t rsa -N "" Generating public/private rsa key pair. Enter file in which to save the key (/home/stor2rrd/.ssh/id_rsa): ...
New storage devices might require stronger key, use this one instead of above 'RSA'$ ssh-keygen -t ecdsa -b 521 -N ""
-
Create stor2rrd user via VPlexcli under admin priviliges
# ssh service@VPLEX01 service@VPLEX01:~> vplexcli Trying ::1... Connected to localhost. Escape character is '^]'. Enter User Name: admin Password:- VPLEX5
VPlexcli:/> user add -u stor2rrd admin password: New password: Confirm password:
-
VPLEX6
User creation with role assigmentVPlexcli:/> user add -r vplexuser -u stor2rrd Enter admin password: Enter password for stor2rrd: Confirm password for stor2rrd:
Allow shell accessVPlexcli:/> cd /management-server/users/local/stor2rrd/ VPlexcli:/management-server/users/local/stor2rrd> set shell-access true Enter admin password:
user rightsVPlexcli:/> ll /management-server/users/local/stor2rrd/ Name Value ------------ -------- role-name vplexuser shell-access true user-name stor2rrd
- VPLEX 6.2
Connect as user "admin" to the VPLEX-V6.2 Box, because user "service" wasn't able to create the "stor2rrd" user under the vplexcli:user add -r vplexuser -u stor2rrd >> user add: Evaluation of <<user add ********>> failed. >> cause: Command execution failed. >> cause: com.emc.vplex.cli.CommandException: Unauthorized: Permission denied >> cause: Unauthorized: Permission denied
Under "admin" the creation was OK, but the next stop was here:set shell-access true >> Enter admin password: >> set: Evaluation of <<set shell-access true>> failed. >> cause: Failed to update value of 'shell-access'. >> cause: Error committing shell-access.
Exit the "vplexcli" shell and entered the following commands:grep stor2rrd /etc/passwd >> stor2rrd:x:1002:100::/home/stor2rrd:/bin/bash su - stor2rrd >> You are required to change your password immediately (administrator enforced)
It forces me to change my password NOW...
Afterwards, you are able to create your own .ssh directory, and add STOR2RRD PubKey:mkdir .ssh chmod 700 .ssh cd .ssh vi authorized_keys
- VPLEX5
- Exchange ssh keys
$ ssh-copy-id stor2rrd@vplex01
-
Test connection, you should login without typing of password:
$ ssh vplex01 -l stor2rrd stor2rrd@VPLEX01:~> exit
You have to end up in shell! If you end up in VPLEX CLI then it is wrong, use above "set shell-access true" cmd.
UI access to https://vplex01 as stor2rrd does not work
-
Allow access to the storage UI (via REST API) under admin priviliges on VPLEX 5
If you do want to allow it then it will work but without this data:- Host section
- Host mapping (HOST vrs Volume relationship)
- Host TOP
- Health status
- Capacity
-
VPLEX 6 apparently starts VPLEXcli automatically after log on.
This must be disabled to allow login only to operating system.
There is a way (perhaps commenting out starting VPLEXcli in .bash_profile or something like that), not sure here as for now.
-
Create ssh keys if it does not exist yet in /home/stor2rrd/.ssh/id_rsa (type enter instead of passphrase)
- Make sure that all monitors we use are running (collecting data), they are all default monitors and should run:
VPlexcli:/> ll /monitoring/directors/*/monitors/ /monitoring/directors/director-1-1-A/monitors: Name Ownership Collecting Period Average Idle Bucket Bucket Bucket Bucket -------------------------------------------------------------- --------- Data ------ Period For Min Max Width Count -------------------------------------------------------------- --------- ---------- ------ ------- ----- ------ ------ ------ ------ director-1-1-A_PERPETUAL_vplex_sys_perf_mon_v19 true true 5s 4.97s 2s - - - 64 director-1-1-A_VIRTUAL_VOLUMES_PERPETUAL_MONITOR true true 1min 1min 33s - - - 64 /monitoring/directors/director-1-1-B/monitors: Name Ownership Collecting Period Average Idle Bucket Bucket Bucket Bucket ------------------------------------------------ --------- Data ------ Period For Min Max Width Count ------------------------------------------------ --------- ---------- ------ ------- ---- ------ ------ ------ ------ director-1-1-B_PERPETUAL_vplex_sys_perf_mon_v19 true true 5s 5.05s 4s - - - 64 director-1-1-B_VIRTUAL_VOLUMES_PERPETUAL_MONITOR true true 1min 60s 33s - - - 64 ...
If some do not running then use this procedure to enable it.
STOR2RRD storage configuration
- All actions below under stor2rrd user (lpar2rrd on Virtual Appliance)
-
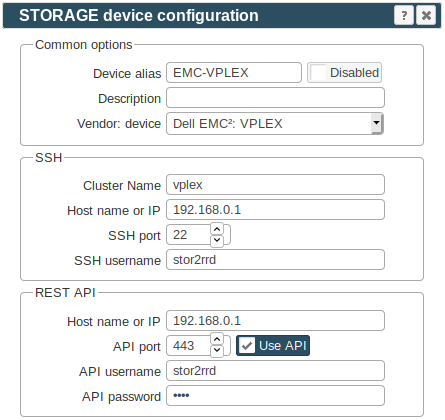
Add storage into configuration from the UI:
Settings icon ➡ Storage ➡ New ➡ Vendor:device ➡ Dell EMC VPLEX
-
Make sure you have enough of disk space on the filesystem where is STOR2RRD installed
Roughly you might count 2 - 30 GB per a storage (it depends on number of volumes, 30GB for 5000 volumes)$ df -g /home # AIX $ df -h /home # Linux
-
Test storage connectivity, either from the UI or from the command line:
$ cd /home/stor2rrd/stor2rrd $ ./bin/config_check.sh EMC-VPLEX-01 =============================== STORAGE: EMC-VPLEX-01: VPLEX =============================== connection ok
If you get an error about missing LWP::Protocol::https then install as per this manual
- Schedule to run storage agent from stor2rrd crontab (lpar2rrd on Virtual Appliance, it might already exist there)
Add if it does not exist as above
$ crontab -l | grep load_vplexperf.sh $
$ crontab -e # VPLEX storage agent 0,5,10,15,20,25,30,35,40,45,50,55 * * * * /home/stor2rrd/stor2rrd/load_vplexperf.sh > /home/stor2rrd/stor2rrd/load_vplexperf.out 2>&1
Make sure there is already an entry with the UI creation running once an hour in crontab$ crontab -e # STOR2RRD UI (just ONE entry of load.sh must be there) 5 * * * * /home/stor2rrd/stor2rrd/load.sh > /home/stor2rrd/stor2rrd/load.out 2>&1
-
Let run the storage agent for 15 - 20 minutes to get data, then:
$ cd /home/stor2rrd/stor2rrd $ ./load.sh
- Go to the web UI: http://<your web server>/stor2rrd/
Use Ctrl-F5 to refresh the web browser cache.
In case of usage of Virtual Appliance
- Use local account lpar2rrd for hosting of STOR2RRD on the virtual appliance
- Use /home/stor2rrd/stor2rrd as the product home
EMC VNXe support
STOR2RRD supports these EMC SAN/NAS VNXe storage:- EMC VNXe 1600
- EMC VNXe 3200
- EMC VNXe 3100
- EMC VNXe 3150
- EMC VNXe 3300
Prerequisites
-
Allow access from the STOR2RRD host to the EMC storage service processors on port 443 (TCP).
Test if port is open:$ perl /home/stor2rrd/stor2rrd/bin/conntest.pl 192.168.1.1 443 Connection to "192.168.1.1" on port "443" is ok
- EMC VNXe Unisphere UEM CLI download
If you have also EMC Unity in place then use EMC Unity UEM CLI which works also for VNXe.
EMC VNXe UEM CLI does not support Unity.
https://support.emc.com/downloads
VNX/VNXe family ➡ VNXe1/2 series ➡ ADD-ONS ➡ More ➡ VNXe Unisphere CLI ➡ Linux 64-bit
- Supported platforms (unfortunatelly there is no AIX support for UEM CLI as per November 2016 at least)
- Linux RedHat
- SuSE Linux
- Solaris (x86 & Sparc)
- Debian, Ubuntu package:
Convert RedHat rpm package via "alien" cmd# alien UnisphereCLI-Linux-64-x86-en_US-4.0.1.1.3166-1.i386.rpm UnisphereCLI-Linux-64-x86-en_US-4.0.1.1.3166-1.i386.deb generated
- EMC Unisphere API installation
# umask 022 # rpm -i UnisphereCLI-Linux-64-x86-en_US-4.0.1.1.3166-1.x86_64.rpm
- Setting security level under root user:
# /opt/emc/uemcli/bin/setlevel.sh low Setting low verifying level.....
You can even use "medium" level, then you have to accept and store certificate at the first connection.- under root:
# /opt/emc/uemcli/bin/setlevel.sh medium Setting medium verifying level.....
- under stor2rrd user:
$ uemcli -d 192.168.1.1 -u Local/admin -p "XXXXXX" /user/account show Remote certificate: Issuer: CN=EMC-Unity Subject: CN=EMC-Unity Valid from: 2016-07-15 09:54:57 Z Valid to: 2019-07-15 09:54:57 Z Serial: 0094aea927526b466e Id: 2595584890 Would you like to: [1] Accept the certificate for this session [2] Reject the certificate [3] Accept and store Please input your selection (The default selection is [1]): 3 Storage system address: 192.168.1.1 Storage system port: 443 HTTPS connection 1: ID = user_admin Name = admin Role = administrator Type = local
- under root:
- create user stor2rrd under operator role on the storage.
You might skip it and use already existing account with minimal rights.
Do not use shell special characters like #!?|.*[]\{} in the password.
Cmd returns "Error code: 0x6000068" if you do not pass them.
Do not use directly /opt/emc/uemcli/bin/uemcli, use always /usr/bin/uemcli.$ uemcli -d 192.168.1.1 -u Local/admin -p "XXXXXX" /user/account show Storage system address: 192.168.1.1 Storage system port: 443 HTTPS connection 1: ID = user_admin Name = admin Role = administrator Type = local ... $ uemcli -d 192.168.1.1 -u Local/admin -p "XXXXXX" /user/account create -name stor2rrd -role operator -type local -passwd "Test2test_" Storage system address: 192.168.1.1 Storage system port: 443 HTTPS connection ID = user_stor2rrd Operation completed successfully.
STOR2RRD storage configuration
- All actions below under stor2rrd user (lpar2rrd on Virtual Appliance)
-
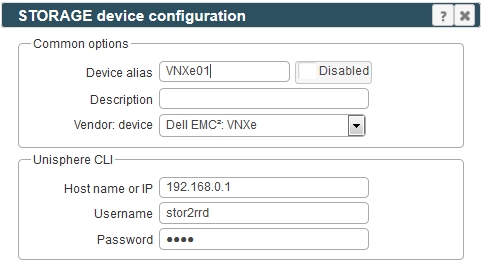
Add storage into configuration from the UI:
Settings icon ➡ Storage ➡ New ➡ Vendor:device ➡ Dell EMC VNXe
-
Make sure you have enough of disk space on the filesystem where is STOR2RRD installed
Roughly you might count 2 - 30 GB per a storage (it depends on number of volumes, 30GB for 5000 volumes)$ df -g /home # AIX $ df -h /home # Linux
-
Test storage connectivity, either from the UI or from the command line:
$ cd /home/stor2rrd/stor2rrd $ ./bin/config_check.sh ===================================== STORAGE: EMC-VNXe_alias01: VNXE ===================================== connection ok
- Schedule to run storage agent from stor2rrd crontab (lpar2rrd on Virtual Appliance, it might already exist there)
Add if it does not exist as above
$ crontab -l | grep load_vnxeperf.sh $
$ crontab -e # EMC VNXe storage agent 0,5,10,15,20,25,30,35,40,45,50,55 * * * * /home/stor2rrd/stor2rrd/load_vnxeperf.sh > /home/stor2rrd/stor2rrd/load_vnxeperf.out 2>&1
Make sure there is already an entry with the UI creation running once an hour in crontab$ crontab -e # STOR2RRD UI (just ONE entry of load.sh must be there) 5 * * * * /home/stor2rrd/stor2rrd/load.sh > /home/stor2rrd/stor2rrd/load.out 2>&1
-
Let run the storage agent for 15 - 20 minutes to get data, then:
$ cd /home/stor2rrd/stor2rrd $ ./load.sh
- Go to the web UI: http://<your web server>/stor2rrd/
Use Ctrl-F5 to refresh the web browser cache.
In case of usage of Virtual Appliance
EMC DataDomain firmware versions 5.5+ and 6.x are supported.
EMC DataDomain firmware versions 7.x+ is supported since STOR2RRD v2.70.
EMC DataDomain 6.0.2.50+ and 6.1.2.40+ (6.2 is not affected) do not provide disk stats community.emc.com/docs/DOC-78887
- Use local account lpar2rrd for hosting of STOR2RRD on the virtual appliance
- Use /home/stor2rrd/stor2rrd as the product home
EMC DataDomain firmware versions 5.5+ and 6.x are supported.
EMC DataDomain firmware versions 7.x+ is supported since STOR2RRD v2.70.
EMC DataDomain 6.0.2.50+ and 6.1.2.40+ (6.2 is not affected) do not provide disk stats community.emc.com/docs/DOC-78887
Prerequisites
-
Allow access from the STOR2RRD host to the EMC storage on port 22 (TCP).
Test if port is open:$ perl /home/stor2rrd/stor2rrd/bin/conntest.pl 192.168.1.1 22 Connection to "192.168.1.1" on port "22" is ok
- create user stor2rrd under user role on the storage.

- Exchange ssh keys
Print public key:$ cat .ssh/id_rsa.pub ssh-rsa AAAAB3NzaC1yc2EAAAADAQABAAABAQDPpQlm0Z/x1X4txd2GgZgvg1Fm7QHeusQ6LqBp/Sb1doAoiDmXErk+lNY27aJAqb4YiGnqejioqCJ9N93NiKpffxH+L3
Log on to the storage and add above key:$ ssh <data domain host> -l stor2rrd stor2rrd@data_domain_host> adminaccess add ssh-keys Enter the key and then press Control-D, or press Control-C to cancel. ssh-rsa AAAAB3NzaC1yc2EAAAADAQABAAABAQDPpQlm0Z/x1X4txd2GgZgvg1Fm7QHeusQ6LqBp/Sb1doAoiDmXErk+lNY27aJAqb4YiGnqejioqCJ9N93NiKpffxH+L3Test connection:$ ssh <data domain host> -l stor2rrd EMC Data Domain Virtual Edition Welcome to Data Domain OS 6.1.0.11-571028
STOR2RRD storage configuration
- All actions below under stor2rrd user (lpar2rrd on Virtual Appliance)
-
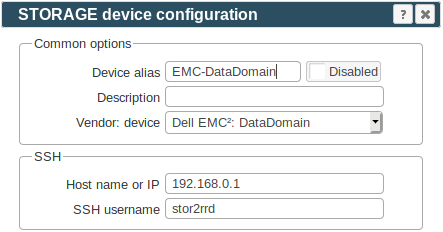
Add storage into configuration from the UI:
Settings icon ➡ Storage ➡ New ➡ Vendor:device ➡ Dell EMC DataDomain
-
Make sure you have enough of disk space on the filesystem where is STOR2RRD installed
Roughly you might count 2 - 30 GB per a storage (it depends on number of volumes, 30GB for 5000 volumes)$ df -g /home # AIX $ df -h /home # Linux
-
Test storage connectivity, either from the UI or from the command line:
$ cd /home/stor2rrd/stor2rrd $ ./bin/config_check.sh EMC-DataDomain01_alias01 ===================================== STORAGE: EMC-DataDomain01_alias01: DATADOMAIN ===================================== connection ok
- Schedule to run storage agent from stor2rrd crontab (lpar2rrd on Virtual Appliance, it might already exist there)
Add if it does not exist as above
$ crontab -l | grep load_datadomainperf.sh $
$ crontab -e # EMC DataDomain storage agent 0,5,10,15,20,25,30,35,40,45,50,55 * * * * /home/stor2rrd/stor2rrd/load_datadomainperf.sh > /home/stor2rrd/stor2rrd/load_datadomainperf.out 2>&1
Make sure there is already an entry with the UI creation running once an hour in crontab$ crontab -e # STOR2RRD UI (just ONE entry of load.sh must be there) 5 * * * * /home/stor2rrd/stor2rrd/load.sh > /home/stor2rrd/stor2rrd/load.out 2>&1
-
Let run the storage agent for 15 - 20 minutes to get data, then:
$ cd /home/stor2rrd/stor2rrd $ ./load.sh
- Go to the web UI: http://<your web server>/stor2rrd/
Use Ctrl-F5 to refresh the web browser cache.
Troubleshooting
- data collection stuck, no performance data, this can be found in log
$ tail logs/error.log-<DD alias> Tue Mar 21 19:57:07 2023 command: filesys show compression '/data/xxxx/xxxx' timed out after: 600 seconds /home/stor2rrd/stor2rrd/bin/datadomainconf.pl:1669 : Interrupted system call
It is a known issue when on some DD firmwares hang this cmd:mtree show compression
workaround: disable that cmd via this setting, you will not have mtree stats, but rest will worksu - stor2rrd cd /home/stor2rrd/stor2rrd umask 022 echo "export MTREE_COMPRESSION_STATISTICS_EXCLUDE=\"storage1 storage2 storage3\"" >> etc/.magic
- DD refuses some ssh sessions, you can find in STOR2RRD log (logs/error.log-<storage alias>) this:
Error: Unable to connect to remote machine (dd01) : No such file or directory Error: Error command: ssh login failed unable to load Perl module IO::Pty: Can't locate IO/Pty.pm ...
Increase DataDomain parameter login-max-active, stor2rrd ssh sessions are in conjuction with normal backup sessions.sysadmin@dd(active:0)# adminaccess option show login-max-active. Adminaccess option "login-max-active" set to "150". sysadmin@dd(active:0)# adminaccess option set login-max-active 500 Adminaccess option "login-max-active" set to "500".
In case of usage of Virtual Appliance
When you use Isilon v9.x then just use one Management IP Address from the Cluster (do not use direct Node's IPs).
The product uses EMC Isilon REST API interface natively provided by the storage to get all necessary data.
- Use local account lpar2rrd for hosting of STOR2RRD on the virtual appliance
- Use /home/stor2rrd/stor2rrd as the product home
When you use Isilon v9.x then just use one Management IP Address from the Cluster (do not use direct Node's IPs).
The product uses EMC Isilon REST API interface natively provided by the storage to get all necessary data.
Storage connectivity
-
Allow access from the STOR2RRD host to the EMC storage on port 8080.
$ perl /home/stor2rrd/stor2rrd/bin/conntest.pl 192.168.1.1 8080 Connection to "192.168.1.1" on port "8080" is ok
-
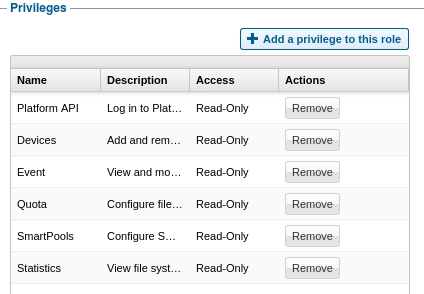
Create user stor2rrd on the storage with new read-only role called stor2rrd.
$ ssh -l admin 192.168.1.1 isilon01-1% isi auth users create stor2rrd --enabled yes --password-expires no --password XXXXXXX isilon01-1% isi auth roles create --name stor2rrd --description "Read-only role for STOR2RRD" isi auth roles modify stor2rrd --add-user=stor2rrd --add-priv-ro=ISI_PRIV_EVENT --add-priv-ro=ISI_PRIV_LOGIN_PAPI --add-priv-ro=ISI_PRIV_STATISTICS --add-priv-ro=ISI_PRIV_SMARTPOOLS --add-priv-ro=ISI_PRIV_DEVICES --add-priv-ro=ISI_PRIV_QUOTA
STOR2RRD storage configuration
- All actions below under stor2rrd user (lpar2rrd on Virtual Appliance)
-
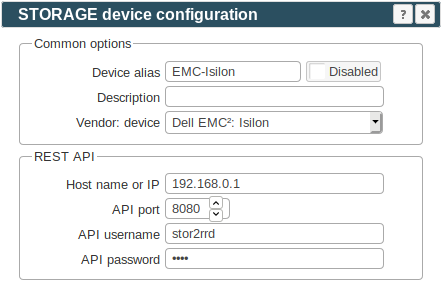
Add storage into configuration from the UI:
Settings icon ➡ Storage ➡ New ➡ Vendor:device ➡ Dell EMC Isilon
-
Make sure you have enough of disk space on the filesystem where is STOR2RRD installed
Roughly you might count 2 - 30 GB per a storage (it depends on number of volumes, 30GB for 5000 volumes)$ df -g /home # AIX $ df -h /home # Linux
-
Test storage connectivity, either from the UI or from the command line:
If you get an errors like "Missing LWP::Protocol::https", "Connection reset by peer" or "500 SSL negotiation failed" then follow this.
$ cd /home/stor2rrd/stor2rrd $ ./bin/config_check.sh isilon-alias01 ===================== STORAGE: isilon-alias01 : ISILON ===================== connection ok
- Schedule to run storage agent from stor2rrd crontab (lpar2rrd on Virtual Appliance, it might already exist there)
Add if it does not exist as above
$ crontab -l | grep load_isilonperf.sh $
Make sure there is already an entry with the UI creation running once an hour in crontab$ crontab -e # Dell EMC Isilon 0,5,10,15,20,25,30,35,40,45,50,55 * * * * /home/stor2rrd/stor2rrd/load_isilonperf.sh > /home/stor2rrd/stor2rrd/load_isilonperf.out 2>&1
$ crontab -e

# STOR2RRD UI (just ONE entry of load.sh must be there)
5 * * * * /home/stor2rrd/stor2rrd/load.sh > /home/stor2rrd/stor2rrd/load.out 2>&1
-
Let run the storage agent for 15 - 20 minutes to get data, then:
$ cd /home/stor2rrd/stor2rrd
$ ./load.sh
- Go to the web UI: http://<your web server>/stor2rrd/
Use Ctrl-F5 to refresh the web browser cache.
In case of usage of Virtual Appliance
- Use local account lpar2rrd for hosting of STOR2RRD on the virtual appliance
- Use /home/stor2rrd/stor2rrd as the product home
Storage connectivity
-
Allow access from the STOR2RRD host to the EMC storage on port 443 (https)
$ perl /home/stor2rrd/stor2rrd/bin/conntest.pl 192.168.1.1 443 Connection to "192.168.1.1" on port "443" is ok
-
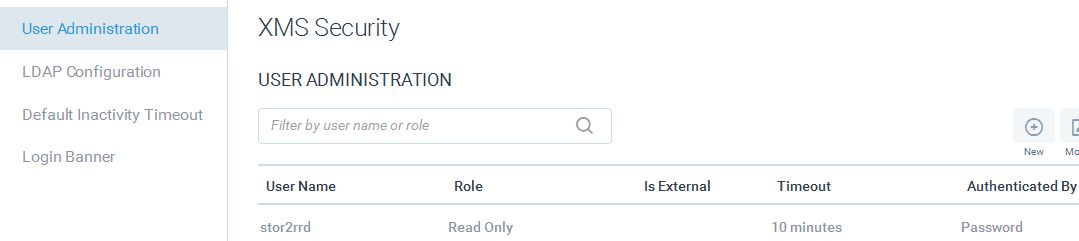
Create user stor2rrd in storage XMS with role Read-Only
STOR2RRD storage configuration
- All actions below under stor2rrd user (lpar2rrd on Virtual Appliance)
-
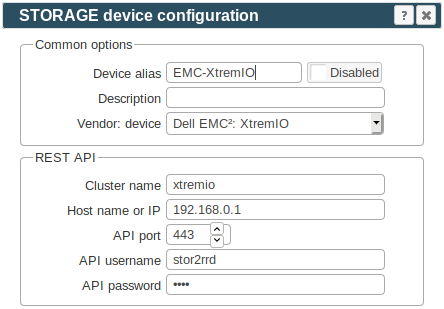
Add storage into configuration from the UI:
Settings icon ➡ Storage ➡ New ➡ Vendor:device ➡ XtremIO
-
You have to define each monitored cluster separately.
-
Make sure you have enough of disk space on the filesystem where is STOR2RRD installed
Roughly you might count 2 - 30 GB per a storage (it depends on number of volumes, 30GB for 5000 volumes)$ df -g /home # AIX $ df -h /home # Linux
-
Test storage connectivity, either from the UI or from the command line:
If you get an errors like "Missing LWP::Protocol::https", "Connection reset by peer" or "500 SSL negotiation failed" then follow this.
$ cd /home/stor2rrd/stor2rrd $ ./bin/config_check.sh xtremio-XIO-01-alias01 ===================== STORAGE: xtremio-XIO-01-alias01 : XTREMIO ===================== connection ok
- Schedule to run storage agent from stor2rrd crontab (lpar2rrd on Virtual Appliance, it might already exist there)
Add if it does not exist as above
$ crontab -l | grep load_xtremioperf.sh $
Make sure there is already an entry with the UI creation running once an hour in crontab$ crontab -e # Dell EMC XtremIO 0,5,10,15,20,25,30,35,40,45,50,55 * * * * /home/stor2rrd/stor2rrd/load_xtremioperf.sh > /home/stor2rrd/stor2rrd/load_xtremioperf.out 2>&1
$ crontab -e # STOR2RRD UI (just ONE entry of load.sh must be there) 5 * * * * /home/stor2rrd/stor2rrd/load.sh > /home/stor2rrd/stor2rrd/load.out 2>&1
-
Let run the storage agent for 15 - 20 minutes to get data, then:
$ cd /home/stor2rrd/stor2rrd $ ./load.sh
- Go to the web UI: http://<your web server>/stor2rrd/
Use Ctrl-F5 to refresh the web browser cache.
Troubleshooting
- No performance data in STOR2RRD UI:
Check storage XMS console if it has performance data in its graphs.
if not then contact Dell EMC support.
As soon as data appears in XMS console then STOR2RRD starts working as well
In case of usage of Virtual Appliance
Note: storage firmware GT280R010-01 does not provide data via SMI-S (up to GT280R009-02 it is fine), it is a confirmed issue in the storage firmware (SR #14853424). Upgrade to GT280R011-01 or use WBI access method.
- Use local account lpar2rrd for hosting of STOR2RRD on the virtual appliance
- Use /home/stor2rrd/stor2rrd as the product home
Note: storage firmware GT280R010-01 does not provide data via SMI-S (up to GT280R009-02 it is fine), it is a confirmed issue in the storage firmware (SR #14853424). Upgrade to GT280R011-01 or use WBI access method.
Storage connectivity
-
Allow access from the STOR2RRD host to the storage on ports 80 (WBI) and 5988 (SMI-S).
If you use https and secure SMI-S then test ports 443 and 5989 instead.
If you use storage cmd line configuration like in examples below (you can use the storage UI instead) then port 22 (ssh) must be open.
$ perl /home/stor2rrd/stor2rrd/bin/conntest.pl 192.168.1.1 443 Connection to "192.168.1.1" on port "443" is ok $ perl /home/stor2rrd/stor2rrd/bin/conntest.pl 192.168.1.1 5989 Connection to "192.168.1.1" on port "5989" is ok
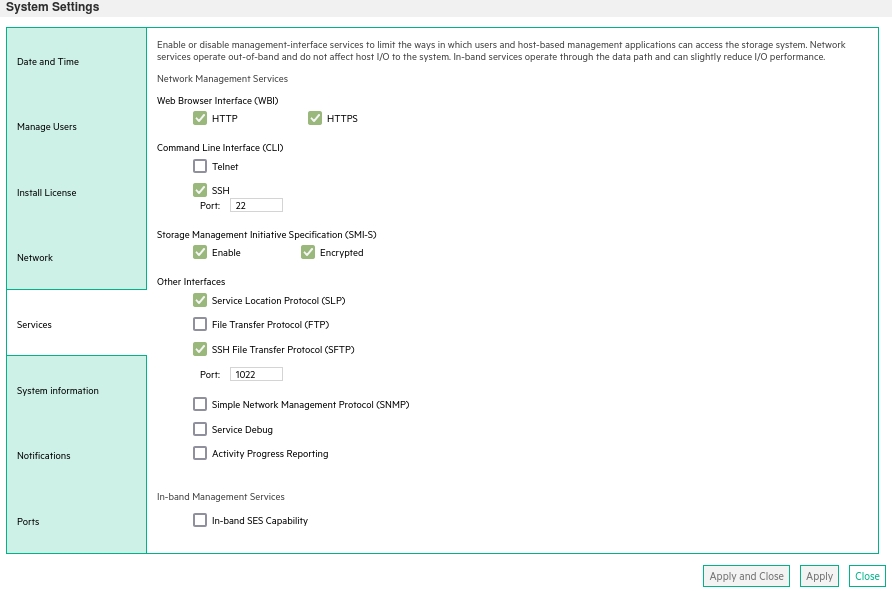
- Make sure that secure SMI-S (port 5989) and WBI HTTPS (port 443) protocols are enabled on the storage
- CMD line:
If secure SMI-S or WBI HTTPS are not enabled:
$ ssh -l manage <storage_hostname> # show protocols Service and Security Protocols ------------------------------ Web Browser Interface (HTTP): Enabled Secure Web Browser Interface (HTTPS): Enabled Command Line Interface (Telnet): Disabled Secure Command Line Interface (SSH): Enabled Storage Management Initiative Specification (SMI-S): Enabled Unsecure Storage Management Initiative Specification (SMI-S 5988): Disabled ...
# set protocols smis enabled # set protocols https enabled
- UI:
- CMD line:
-
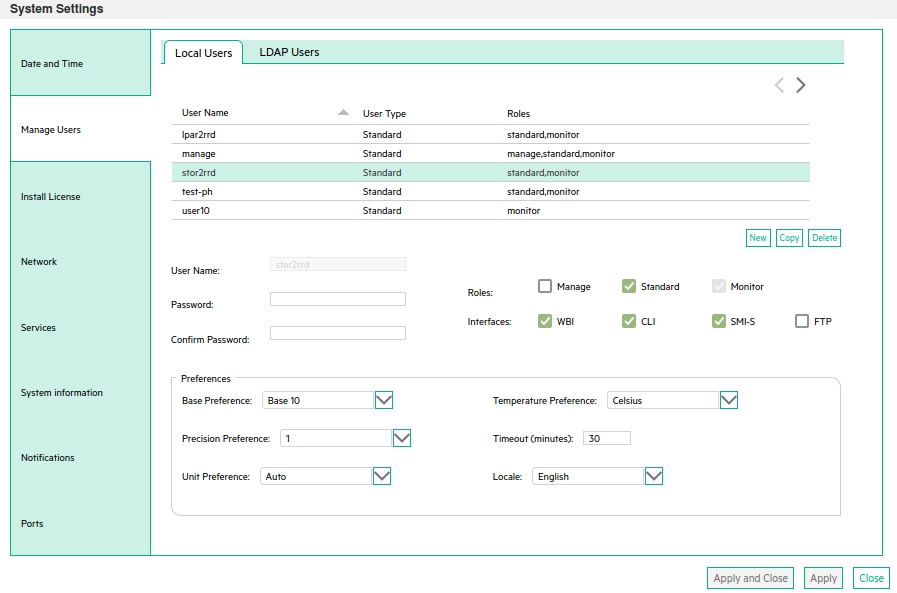
Create user stor2rrd on the storage with monitor and standard roles, allow SMI-S and WBI.
- CMD line method:
Adjust password to your preferred one from used Test1234.$ ssh -l manage <storage_hostname> # create user interfaces smis,wbi locale English password Test1234 roles monitor,standard stor2rrd
-
UI:
- CMD line method:
Install prerequisites
Skip that in case of Virtual Appliance- Linux:
Install sblim-wbemcli package:If you prefere to use https on port 5989 then you must use wbemcli with this patch 0002742# yum list |grep sblim-wbemcli sblim-wbemcli.x86_64 1.6.2-9.el7 base # yum install sblim-wbemcli # RedHat # apt-get install sblim-wbemcli # Debian based (Ubuntu etc) # /usr/bin/wbemcli -noverify -nl ei https://<storage_hostname>:5988/root/dsh:cim_computersystem * * ./wbemcli: Http Exception: Username/password required. *
Download the package from:- wbemcli-1.6.3 x86_64 for Redhat 6
- wbemcli-1.6.3 x86_64 for Redhat 7
- wbemcli-1.6.3 for other Linuxes: ➡ Select your OS in the header ➡ "Grab binary packages directly"
- wbemcli_x86_64.gz as general Linux binary, gunzip and replace /usr/bin/wbemcli by this
Test the package:# rpm -q sblim-wbemcli sblim-wbemcli-1.6.3-31.1.x86_64 # /usr/bin/wbemcli -v * wbemcli Version 1.6.3 # /usr/bin/wbemcli -noverify -nl ei http://<storage_hostname>:5988/root/dsh:cim_computersystem * * ./wbemcli: Http Exception: Username/password required. *
- AIX:
Download and install- libffi-3.1-1
- libiconv-1.14-2
- libidn-1.29-1
- libssh2-1.4.3-2
- openssl-1.0.1j-1
- openldap-2.4.23-0.3
- curl-7.27.0-1
- sblim-wbemcli-1.6.3 with 0002742 patch
# rpm -Uvh libffi-3.1-1.aix5.1.ppc.rpm --nodeps # rpm -Uvh libiconv-1.14-2.aix5.1.ppc.rpm --nodeps # rpm -Uvh libidn-1.29-1.aix5.1.ppc.rpm --nodeps # rpm -Uvh libssh2-1.4.3-2.aix5.1.ppc.rpm --nodeps # rpm -Uvh openssl-1.0.1j-1.aix5.1.ppc.rpm # rpm -Uvh openldap-2.4.23-0.3.aix5.1.ppc.rpm # rpm -Uvh curl-7.27.0-1.aix5.1.ppc.rpm # rpm -Uvh wbemcli-1.6.3-1.aix5.1.ppc.rpm # LIBPATH=/opt/freeware/lib; export LIBPATH # /opt/freeware/bin/wbemcli -noverify -nl ei http://<storage_hostname>:5988/root/dsh:cim_computersystem * * ./wbemcli: Http Exception: Username/password required. *
STOR2RRD storage configuration
- All actions below under stor2rrd user (lpar2rrd on Virtual Appliance)
-
Add storage into configuration from the UI:
Settings icon ➡ Storage ➡ New ➡ Vendor:device ➡ Dell EMC ➡ PowerVault ME4 ➡ SMI-S
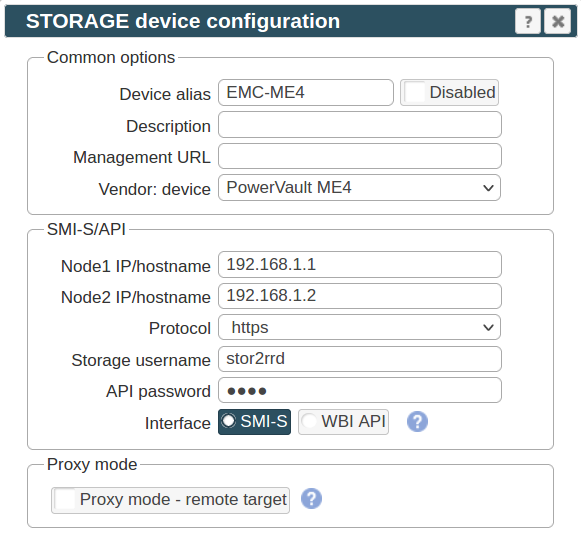
If you set https in above storage properties then this must be enabled on the storage:$ ssh -l manage <storage_hostname> # show protocols ... Secure Web Browser Interface (HTTPS): Enabled Storage Management Initiative Specification (SMI-S): Enabled ...
If you use http then this:Web Browser Interface (HTTP): Enabled Unsecure Storage Management Initiative Specification (SMI-S 5988): Enabled
-
Do not use shell special characters like @:;#!?|$*[]\{}`"'& in the password, use rather .+-=_% instead.
-
Make sure you have enough of disk space on the filesystem where is STOR2RRD installed
Roughly you might count 2 - 30 GB per a storage (it depends on number of volumes, 30GB for 5000 volumes)$ df -g /home # AIX $ df -h /home # Linux
-
Test storage connectivity, either from the UI or from the command line:
If you use HTTPS and do not have installed Perl SSL support then you get an error:
$ cd /home/stor2rrd/stor2rrd $ ./bin/config_check.sh ===================== STORAGE: EMC-ME4 : DOTHILL ===================== connection ok
"Missing LWP::Protocol::https", "Connection reset by peer" or "500 SSL negotiation failed"
Follow this or switch to HTTP on the storage line in etc/storage-list.cfg.
- Schedule to run storage agent from stor2rrd crontab (lpar2rrd on Virtual Appliance, it might already exist there)
Add if it does not exist as above
$ crontab -l | grep load_dothillperf.sh $
Make sure there is already an entry with the UI creation running once an hour in crontab$ crontab -e # DotHill Make suredSAN and its rebrands like Lenovo S2200 or HPE MSA2000/P2000, Dell EMC PowerVault ME4 Series, Quantum StorNex 0,5,10,15,20,25,30,35,40,45,50,55 * * * * /home/stor2rrd/stor2rrd/load_dothillperf.sh > /home/stor2rrd/stor2rrd/load_dothillperf.out 2>&1
$ crontab -e # STOR2RRD UI (just ONE entry of load.sh must be there) 5 * * * * /home/stor2rrd/stor2rrd/load.sh > /home/stor2rrd/stor2rrd/load.out 2>&1
-
Let run the storage agent for 15 - 20 minutes to get data, then:
$ cd /home/stor2rrd/stor2rrd $ ./load.sh
- Go to the web UI: http://<your web server>/stor2rrd/
Use Ctrl-F5 to refresh the web browser cache.
Troubleshooting
- Make sure SMI-S is working for user stor2rrd. Adjust password and storage_hostname in example below:
$ /usr/bin/wbemcli -nl -t -noverify ein 'http://stor2rrd:<password>@<storage_hostnamew>:5988/root/dsh:SMI_Controller' 192.168.1.1:5988/root/smis:SMI_Controller.Name="208000c0ff261f53:A",CreationClassName="SMI_Controller" 192.168.1.2:5988/root/smis:SMI_Controller.Name="208000c0ff261f53:B",CreationClassName="SMI_Controller"
When it does not work then check user rights of stor2rrd user (must have "smis"), network visibility (firewall), user/password combination.
In case of usage of Virtual Appliance
All data is downloaded from VDC nodes.
- Use local account lpar2rrd for hosting of STOR2RRD on the virtual appliance
- Use /home/stor2rrd/stor2rrd as the product home
All data is downloaded from VDC nodes.
Storage connectivity
-
Allow access from the STOR2RRD host to each EMC ECS VDC node on port 4443
$ perl /home/stor2rrd/stor2rrd/bin/conntest.pl 192.168.1.1 4443 Connection to "192.168.1.1" on port "4443" is ok
- Create Storage Management user "stor2rrd" with System Monitor role on each monitored VDC.
STOR2RRD storage configuration
-
Add storage into configuration from the UI:
Settings icon ➡ Storage ➡ New ➡ Vendor:device ➡ Dell EMC : Elastic Cloud Storage
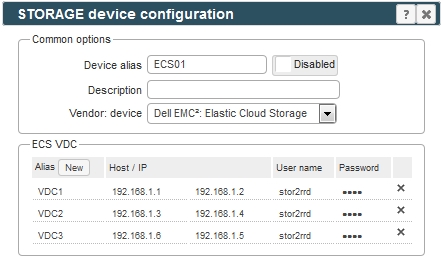
The addition of a VDC to ECS configuration is intended as choosing specific VDC you want to display in Stor2rrd GUI.
To monitor your chosen VDC, just set one or two nodes which are management EndPoint for a given VDC.
No need to add every node in VDC
-
Make sure you have enough of disk space on the filesystem where is STOR2RRD installed
Roughly you might count 2 - 30 GB per a storage (it depends on number of volumes, 30GB for 5000 volumes)$ df -g /home # AIX $ df -h /home # Linux
- Schedule to run storage agent from stor2rrd crontab (lpar2rrd on Virtual Appliance, it might already exist there)
Add if it does not exist as above
$ crontab -l | grep load_ecsperf.sh $
Make sure there is already an entry with the UI creation running once an hour in crontab$ crontab -e # Dell EMC ECS 0,5,10,15,20,25,30,35,40,45,50,55 * * * * /home/stor2rrd/stor2rrd/load_ecsperf.sh > /home/stor2rrd/stor2rrd/load_ecsperf.out 2>&1
$ crontab -e # STOR2RRD UI (just ONE entry of load.sh must be there) 5 * * * * /home/stor2rrd/stor2rrd/load.sh > /home/stor2rrd/stor2rrd/load.out 2>&1
-
Let run the storage agent for 15 - 20 minutes to get data, then:
$ cd /home/stor2rrd/stor2rrd $ ./load.sh
- Go to the web UI: http://<your web server>/stor2rrd/
Use Ctrl-F5 to refresh the web browser cache.
In case of usage of Virtual Appliance
Note the issue with PowerStore firmware 3.0.0.1, upgrade to 3.2.1.0.
- Use local account lpar2rrd for hosting of STOR2RRD on the virtual appliance
- Use /home/stor2rrd/stor2rrd as the product home
Note the issue with PowerStore firmware 3.0.0.1, upgrade to 3.2.1.0.
Storage connectivity
-
Allow access from the STOR2RRD host to the EMC storage on port 443 (https)
$ perl /home/stor2rrd/stor2rrd/bin/conntest.pl 192.168.1.1 443 Connection to "192.168.1.1" on port "443" is ok
-
Create a new user in PowerStore Manager UI with Operator role
See this: www.delltechnologies.com/en-us/collaterals/unauth/white-papers/products/storage/h18150-dell-emc-powerstore-manager-overview.pdf
(page 40: it is sufficient to give only Operator privileges to an account which is only responsible for monitoring instead of giving full privileges with the Administrator role)
STOR2RRD storage configuration
- All actions below under stor2rrd user (lpar2rrd on Virtual Appliance)
-
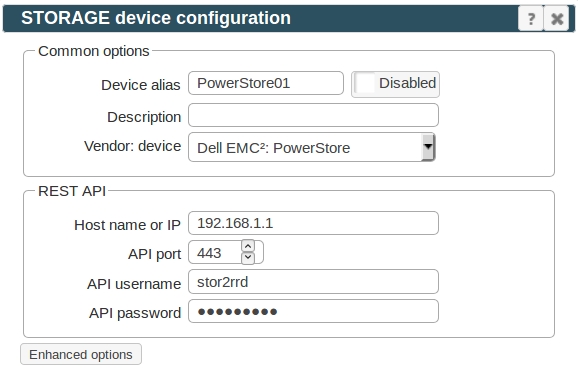
Add storage into configuration from the UI:
Settings icon ➡ Storage ➡ New ➡ Vendor:device ➡ EMC:PowerStore
-
Make sure you have enough of disk space on the filesystem where is STOR2RRD installed
Roughly you might count 2 - 30 GB per a storage (it depends on number of volumes, 30GB for 5000 volumes)$ df -g /home # AIX $ df -h /home # Linux
-
Test storage connectivity, either from the UI or from the command line:
If you get an errors like "Missing LWP::Protocol::https", "Connection reset by peer" or "500 SSL negotiation failed" then follow this.
$ cd /home/stor2rrd/stor2rrd $ ./bin/config_check.sh PowerStore01 ===================== STORAGE: PowerStore01 ===================== connection ok
- Schedule to run storage agent from stor2rrd crontab (lpar2rrd on Virtual Appliance, it might already exist there)
Add if it does not exist as above
$ crontab -l | grep load_powerstoreperf.sh $
Make sure there is already an entry with the UI creation running once an hour in crontab$ crontab -e # Dell EMC PowerStore 0,5,10,15,20,25,30,35,40,45,50,55 * * * * /home/stor2rrd/stor2rrd/load_powerstoreperf.sh > /home/stor2rrd/stor2rrd/load_powerstoreperf.out 2>&1
$ crontab -e # STOR2RRD UI (just ONE entry of load.sh must be there) 5 * * * * /home/stor2rrd/stor2rrd/load.sh > /home/stor2rrd/stor2rrd/load.out 2>&1
-
Let run the storage agent for 15 - 20 minutes to get data, then:
$ cd /home/stor2rrd/stor2rrd $ ./load.sh
- Go to the web UI: http://<your web server>/stor2rrd/
Use Ctrl-F5 to refresh the web browser cache.
In case of usage of Virtual Appliance
- Use local account lpar2rrd for hosting of STOR2RRD on the virtual appliance
- Use /home/stor2rrd/stor2rrd as the product home
Storage connectivity
-
Allow access from the STOR2RRD host to the PowerFlex Gateway on port 443
$ perl /home/stor2rrd/stor2rrd/bin/conntest.pl 192.168.1.1 443 TCP connection to "192.168.1.1" on port "443" is ok - Create a new user for STOR2RRD with the 'Monitor' role
- Login to the primary MDM server as 'root'
-
Login to PowerFlex SCLI as administrator
scli --login --username admin -
Create new user for STOR2RRD
User will be created with a temporary password which needs to be changed during the first login
scli --add_user --username stor2rrd --user_role Monitor -
Login to PowerFlex SCLI with the new user credentials and set new password
scli --login --username stor2rrd scli --set_password
STOR2RRD storage configuration
-
Add storage to STOR2RRD configuration:
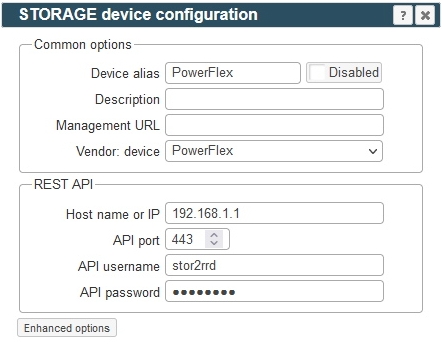
Settings icon ➡ Storage ➡ New ➡ Vendor:device ➡ Dell EMC : PowerFlex
-
Add PowerFlex storage agent to crontab if it does not exist.
- Login to STOR2RRD appliance as 'stor2rrd' or 'lpar2rrd' if you are on our Virtual Appliance
-
Check crontab for PowerFlex agent entry:
$ crontab -l | grep load_powerflexperf.sh $ -
Add the entry if it does not exist
$ crontab -e # PowerFlex 0,5,10,15,20,25,30,35,40,45,50,55 * * * * /home/stor2rrd/stor2rrd/load_powerflexperf.sh > /home/stor2rrd/stor2rrd/load_powerflexperf.out 2>&1
-
Let the storage agent run for 15 - 20 minutes to collect some data
Then run the load script to populate STOR2RRD UI with data:$ cd /home/stor2rrd/stor2rrd $ ./load.sh -
Login to STOR2RRD web UI: http://<your web server>/stor2rrd/
Use Ctrl-F5 to refresh the web browser cache.
In case of usage of Virtual Appliance
WBI access must be used on new storage models which do not support SMI-S protocol.
Note: WBI API access method is supported since STOR2RRD v7.70.
- Use local account lpar2rrd for hosting of STOR2RRD on the virtual appliance
- Use /home/stor2rrd/stor2rrd as the product home
WBI access must be used on new storage models which do not support SMI-S protocol.
Note: WBI API access method is supported since STOR2RRD v7.70.
Storage connectivity
-
Allow access from the STOR2RRD host to the storage on ports 443.
$ perl /home/stor2rrd/stor2rrd/bin/conntest.pl 192.168.1.1 443 Connection to "192.168.1.1" on port "443" is ok
- Make sure that secure and WBI HTTPS (port 443) protocol is enabled on the storage
- CMD line:
If secure WBI HTTPS is not enabled:
$ ssh -l manage <storage_hostname> # show protocols Service and Security Protocols ------------------------------ ... Secure Web Browser Interface (HTTPS): Enabled ...
# set protocols https enabled
- UI:
- CMD line:
-
Create user stor2rrd on the storage with monitor and standard roles, allow WBI.
- CMD line method:
Adjust password to your preferred one from used Test1234.$ ssh -l manage <storage_hostname> # create user interfaces wbi locale English password Test1234 roles monitor,standard stor2rrd
-
UI:
- CMD line method:
STOR2RRD storage configuration
- All actions below under stor2rrd user (lpar2rrd on Virtual Appliance)
-
Add storage into configuration from the UI:
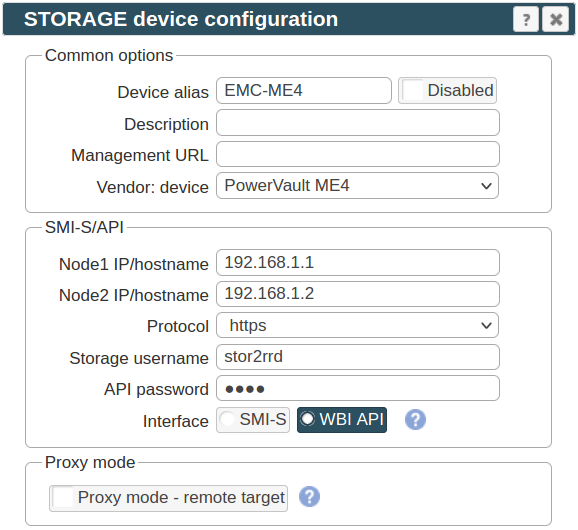
Settings icon ➡ Storage ➡ New ➡ Vendor:device ➡ Dell EMC ➡ PowerVault ME4 ➡ WBI
If you set https in above storage properties then this must be enabled on the storage:$ ssh -l manage <storage_hostname> # show protocols ... Secure Web Browser Interface (HTTPS): Enabled ...
If you use http then this:Web Browser Interface (HTTP): Enabled
-
Make sure you have enough of disk space on the filesystem where is STOR2RRD installed
Roughly you might count 2 - 30 GB per a storage (it depends on number of volumes, 30GB for 5000 volumes)$ df -g /home # AIX $ df -h /home # Linux
-
Test storage connectivity, either from the UI or from the command line:
If you use HTTPS and do not have installed Perl SSL support then you get an error:
$ cd /home/stor2rrd/stor2rrd $ ./bin/config_check.sh ===================== STORAGE: DotHill ===================== connection ok
"Missing LWP::Protocol::https", "Connection reset by peer" or "500 SSL negotiation failed"
Follow this or switch to HTTP on the storage line in etc/storage-list.cfg.
- Schedule to run storage agent from stor2rrd crontab (lpar2rrd on Virtual Appliance, it might already exist there)
Add if it does not exist as above
$ crontab -l | grep load_dothillperf.sh $
Ensure there is already an entry with the UI creation running once an hour in crontab$ crontab -e # DotHill Make suredSAN and its rebrands like Lenovo S series or HPE MSA2000/P2000, Dell EMC PowerVault ME4 Series, Quantum StorNex 0,5,10,15,20,25,30,35,40,45,50,55 * * * * /home/stor2rrd/stor2rrd/load_dothillperf.sh > /home/stor2rrd/stor2rrd/load_dothillperf.out 2>&1
$ crontab -e # STOR2RRD UI (just ONE entry of load.sh must be there) 5 * * * * /home/stor2rrd/stor2rrd/load.sh > /home/stor2rrd/stor2rrd/load.out 2>&1
-
Let run the storage agent for 15 - 20 minutes to get data, then:
$ cd /home/stor2rrd/stor2rrd $ ./load.sh
- Go to the web UI: http://<your web server>/stor2rrd/
Use Ctrl-F5 to refresh the web browser cache.
In case of usage of Virtual Appliance
STOR2RRD storage agent uses these EMC Metro node APIs:
- Use local account lpar2rrd for hosting of STOR2RRD on the virtual appliance
- Use /home/stor2rrd/stor2rrd as the product home
STOR2RRD storage agent uses these EMC Metro node APIs:
- Performance data via SSH: default Metro node data collectors available through SSH (port 22) : read only access
- Configuration data via REST API: Metro node Element Manager API (port 443)
Prerequisites
-
Enable access from the STOR2RRD host to the EMC Metro node on ports 22 & 443 (TCP).
$ perl /home/stor2rrd/stor2rrd/bin/conntest.pl 192.168.1.1 22 Connection to "192.168.1.1" on port "22" is ok $ perl /home/stor2rrd/stor2rrd/bin/conntest.pl 192.168.1.1 443 Connection to "192.168.1.1" on port "443" is ok
-
Create the stor2rrd account to the first node of your MN cluster:
Switch to the root context with with this special command:sudo /usr/sbin/service-maintenance-window -f
Create the sto2rrd account with the useradd command:useradd -m -d /home/stor2rrd -g users -G shadow,groupSvc,groupAllUsr,groupShellAccess -c 'stor2rrd' stor2rrd
Make sure the created account will not expire.
-
SSH user access (select one of below methods during storage configuration in STOR2RRD UI)
- User/Password
- SSH keys
-
Create SSH keys if it does not exist yet in /home/stor2rrd/.ssh/id_rsa (type enter instead of passphrase)
$ ssh-keygen -t rsa -N "" Generating public/private rsa key pair. Enter file in which to save the key (/home/stor2rrd/.ssh/id_rsa): ...
New storage devices might require stronger key, use this one instead of above 'RSA'$ ssh-keygen -t ecdsa -b 521 -N ""
- Assign password to the user
admin@MN01:~> su - stor2rrd Password: Password change requested. Choose a new password. Old Password: New Password: Reenter New Password:
- Exchange ssh keys
$ ssh-copy-id stor2rrd@mn01
- Test connection, you should login without typing of password:
$ ssh mn01 -l stor2rrd stor2rrd@MN01:~> exit
You have to end up in shell!
If you end up in Metro node CLI then it is wrong, use above "set shell-access true" cmd.
UI access to https://mn01 as stor2rrd does not work
-
Create SSH keys if it does not exist yet in /home/stor2rrd/.ssh/id_rsa (type enter instead of passphrase)
-
Metro node apparently starts VPLEXcli automatically after log on.
This must be disabled to allow login only to operating system.
There is a way (perhaps commenting out starting VPLEXcli in .bash_profile or something like that), not sure here as for now.
- Make sure that all monitors we use are running (collecting data), they are all default monitors and should run:
VPlexcli:/> ll /monitoring/directors/*/monitors/ /monitoring/directors/director-1-1-A/monitors: Name Ownership Collecting Period Average Idle Bucket Bucket Bucket Bucket -------------------------------------------------------------- --------- Data ------ Period For Min Max Width Count -------------------------------------------------------------- --------- ---------- ------ ------- ----- ------ ------ ------ ------ director-1-1-A_PERPETUAL_vplex_sys_perf_mon_v19 true true 5s 4.97s 2s - - - 64 director-1-1-A_VIRTUAL_VOLUMES_PERPETUAL_MONITOR true true 1min 1min 33s - - - 64 /monitoring/directors/director-1-1-B/monitors: Name Ownership Collecting Period Average Idle Bucket Bucket Bucket Bucket ------------------------------------------------ --------- Data ------ Period For Min Max Width Count ------------------------------------------------ --------- ---------- ------ ------- ---- ------ ------ ------ ------ director-1-1-B_PERPETUAL_vplex_sys_perf_mon_v19 true true 5s 5.05s 4s - - - 64 director-1-1-B_VIRTUAL_VOLUMES_PERPETUAL_MONITOR true true 1min 60s 33s - - - 64 ...
If some do not running then use this procedure to enable it.
STOR2RRD storage configuration
- All actions below under stor2rrd user (lpar2rrd on Virtual Appliance)
-
Add storage into configuration from the UI:
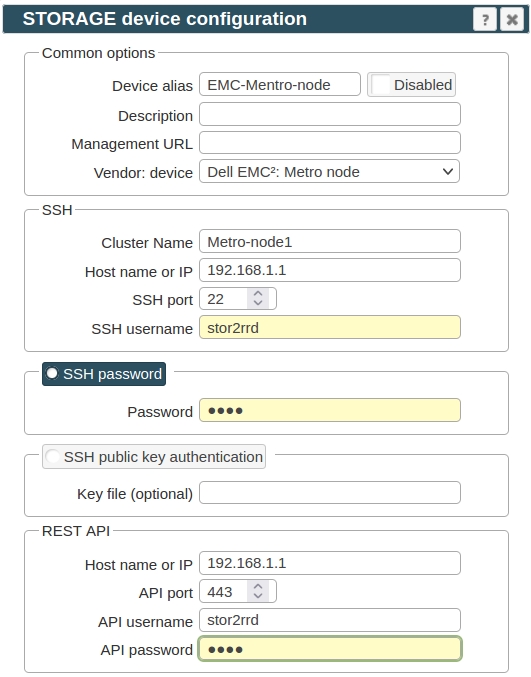
Settings icon ➡ Storage ➡ New ➡ Vendor:device ➡ Dell EMC Metro node
-
Make sure you have enough of disk space on the filesystem where is STOR2RRD installed
Roughly you might count 2 - 30 GB per a storage (it depends on number of volumes, 30GB for 5000 volumes)$ df -g /home # AIX $ df -h /home # Linux
-
Test storage connectivity, either from the UI or from the command line:
$ cd /home/stor2rrd/stor2rrd $ ./bin/config_check.sh EMC-Metro-node =============================== STORAGE: EMC-Metro-node: Metro-node =============================== connection ok
If you get an error about missing LWP::Protocol::https then install as per this manual
- Schedule to run storage agent from stor2rrd crontab (lpar2rrd on Virtual Appliance, it might already exist there)
Add if it does not exist as above
$ crontab -l | grep load_metronodeperf.sh $
$ crontab -e # Dell EMC Metro node storage agent 0,5,10,15,20,25,30,35,40,45,50,55 * * * * /home/stor2rrd/stor2rrd/load_metronodeperf.sh > /home/stor2rrd/stor2rrd/load_metronodeperf.out 2>&1
Make sure there is already an entry with the UI creation running once an hour in crontab$ crontab -e # STOR2RRD UI (just ONE entry of load.sh must be there) 5 * * * * /home/stor2rrd/stor2rrd/load.sh > /home/stor2rrd/stor2rrd/load.out 2>&1
-
Let run the storage agent for 15 - 20 minutes to get data, then:
$ cd /home/stor2rrd/stor2rrd
$ ./load.sh
- Go to the web UI: http://<your web server>/stor2rrd/
Use Ctrl-F5 to refresh the web browser cache.