HPE monitoring: 3PAR Primera Nimble Alletra MSA StoreOnce XP7 XP8 StoreVirtual LeftHand
- 3PAR / Primera
Alletra 9000 - Nimble
Alletra 6k/5k - XP8
XP7 - MSA 2000/1000
(WBI) - MSA 2000/1000
(SMI-S) - StoreOnce
- StoreVirtual
LeftHand
In case of usage of Virtual Appliance
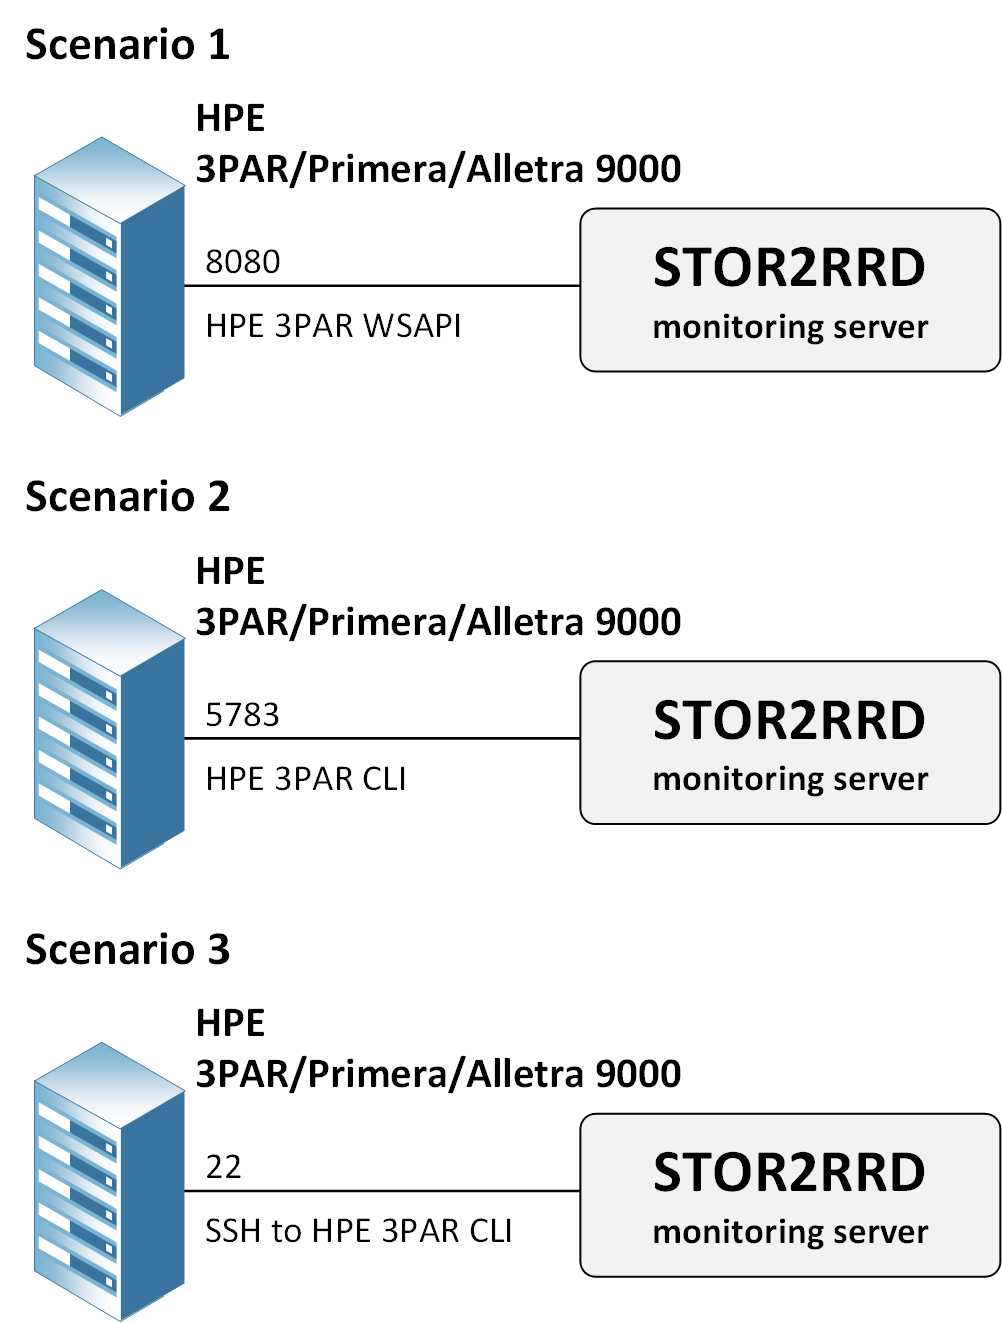
Choose one of the options to access 3PAR:
- Use local account lpar2rrd for hosting of STOR2RRD on the virtual appliance
- Use /home/stor2rrd/stor2rrd as the product home
Choose one of the options to access 3PAR:
- HPE 3PAR WSAPI (REST API) - supported with WSAPI 1.6.5+ (3PAR 3.3.1 MU5 and newer), preferred method, you get detailed capacity stuff
- HPE 3PAR CLI - should be used with 3PAR firmware 3.2.2 MU4 and higher (more detail) instead of SSH one (3rd one)
- SSH to HPE 3PAR CLI access to 3PAR using SSH keys or password
 |
Configuration
- Perform following steps under stor2rrd account (lpar2rrd on the Virtual Appliance) unless explicitly instructed to use root account in the procedure.
- Create user stor2rrd on the storage with browse role and enable it for all domains:
$ ssh 3paradm@3par_storage
  3paradm's password: ******
cli% createuser -c testpw stor2rrd all browse
cli% exit

$ ssh stor2rrd@3par_storage
cli% showuser
     Username Domain    Role   Default
     stor2rrd    all    browse N
Connection methods
- HPE 3PAR WSAPI (REST API)
This is prefered method. Use it for HPE 3PAR WSAPI version 1.6.3+ (Sep 2018).
No need to install additional software.
This method does not support VVOL monitoring as the storage API does not provide such data
File Persona alert: Performance metrics for File Persona Volumes are not collected and displayed when using REST API.
NOTE: Health Status for individual disk drives has been added in WSAPI 1.6.15 (HPE 3PAR 3.3.2), older provide just limited set of health status data
- Enable WSAPI in HPE 3PAR CLI
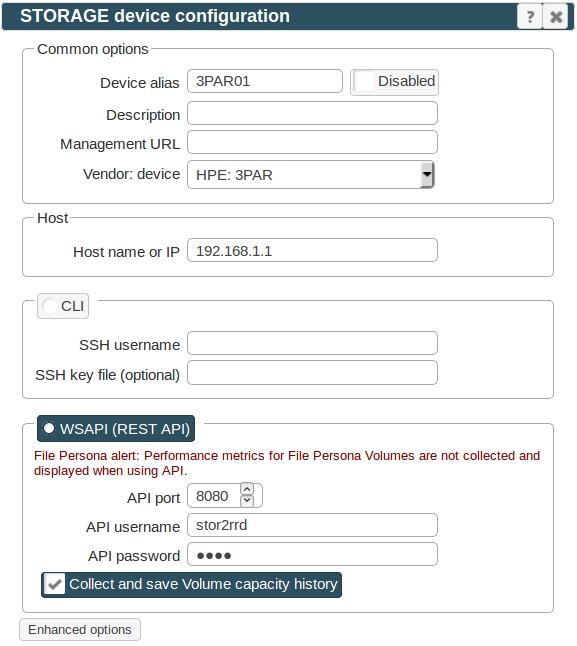
Make note of API URL IP address and port number: 192.168.1.1 and 8080 in the above example
cli% setwsapi -https enable
cli% showwsapi
  -Service- -State- -HTTP_State- HTTP_Port -HTTPS_State- HTTPS_Port -Version- ------------API_URL------------
  Enabled   Active  Enabled           8008 Enabled             8080 1.6.3     https://192.168.1.1:8080/api/v1
3PAR uses SSL port 8080, Primera and Alletra MP 443
- Open WSAPI port from STOR2RRD to HPE 3PAR / Primera management IP address on the firewall and check the connectivity (check even 443 in case you attaching Primera or Alletra MP):
$ perl /home/stor2rrd/stor2rrd/bin/conntest.pl 192.168.1.1 8080
  Connection to "192.168.1.1" on port "8080" is ok
- Enable WSAPI in HPE 3PAR CLI
- HPE 3PAR CLI
This method is required for HPE 3PAR 3.2.2 MU4 and higher although ssh CLI access (method 3) might work also
Check 3PAR CLI Operating System compatability matrix.- Open ports 5783 to the HPE 3PAR / Primera storage
Test if ports are open:$ perl /home/stor2rrd/stor2rrd/bin/conntest.pl 192.168.1.1 5783 Connection to "192.168.1.1" on port "5783" is ok
- Download HPE 3PAR CLI. You need software support contract (SAID) at HPE
Note: HPE 3PAR CLI is supported on Red Hat 8 since v3.3.2 (prerequisites: # dnf install zlib.i686 glibc.i686 nss-softokn-freebl.i686 unzip)
Install it under root:- Older HPE 3PARs (downloaded package must contain "_CLI_" string!)
Ensure that HPE3PAR_CLIDIR=/opt/hp_3par_cli/bin
# mount -o loop,ro ./3PAR_INFORMOS_3.2.2_MU4_CLI_SNMP_QR482-11192.iso /mnt
# cd /mnt/cli/linux/
# ./setup.bin
  Default Install Folder: /opt/hp_3par_cli
  Congratulations. HP 3PAR CLI 3.2.2 has been successfully installed to:
  /opt/hp_3par_cli
In file /home/stor2rrd/stor2rrd/etc/stor2rrd.cfg
- Newer HPE 3PARs (note default install dir is different /opt/hpe_3par_cli)
Ensure that HPE3PAR_CLIDIR=/opt/hpe_3par_cli/bin
# mount -o loop,ro ./TOOLS-3.3.1.269-MU1.iso /mnt
# cd /mnt/cli/linux/
# ./setup.bin
  Default Install Folder: /opt/hp_3par_cli
  Congratulations. HP 3PAR CLI 3.2.2 has been successfully installed to:
  /opt/hp_3par_cli
In file /home/stor2rrd/stor2rrd/etc/stor2rrd.cfg
- Older HPE 3PARs (downloaded package must contain "_CLI_" string!)
- Save user credentials, use same IP/hostname in below cmd what you use in storage configuration:
# su - stor2rrd # (use lpar2rrd user on the Appliance)
$ cd /home/stor2rrd/stor2rrd
$ export STORAGE_IP_HOSTNAME=192.168.1.1
$ /opt/hp_3par_cli/bin/cli setpassword -saveonly -file etc/.3par-${STORAGE_IP_HOSTNAME}.pwf -sys $STORAGE_IP_HOSTNAME

  user: stor2rrd
  password:
  The authenticity of the storage system cannot be established.
  CLI Server Certificate
    Issuer:           CN=HP 3PAR HP_3PAR 7400 1644035
    Subject:          CN=HP 3PAR HP_3PAR 7400 1644035
    SHA1 fingerprint: 1E381D334E07EAFC4A7CC43B3ACDCCD82C6B6BB1
    Validity:         Not before: Apr 21 12:02:53 2017 GMT
                      Not after:  Apr 20 12:02:53 2020 GMT
    Warning: self signed certificate
    Warning: subject CN ("HP 3PAR HP_3PAR 7400 1644035") does not match the system name ("192.168.1.1")
  Continue connecting (yes/no)? yes
  Permanently add this certificate as an exception (yes/no)? yes
- Open ports 5783 to the HPE 3PAR / Primera storage
- SSH to HPE 3PAR CLI
Available for all 3PAR firmwares, but we recomend to use it up to 3PAR version 3.2.2 MU4 (more detail)
Preferably use scenario 1 or 2
No need to install additional software.
- Open port 22 to the HPE 3PAR / Primera storage
$ perl /home/stor2rrd/stor2rrd/bin/conntest.pl 192.168.1.1 22
  Connection to "192.168.1.1" on port "22" is ok
- Create a key pair using the ssh-keygen utility in case you do not have a one in /home/stor2rrd/.ssh
Type enter instead of passphrase.New storage devices might require stronger key, use this one instead of above 'RSA'# su - stor2rrd # (use lpar2rrd user on the Appliance) $ ssh-keygen -t rsa -N "" Generating public/private rsa key pair. Enter file in which to save the key (/home/stor2rrd/.ssh/id_rsa): ... $ cat ~/.ssh/id_rsa.pub
$ ssh-keygen -t ecdsa -b 521 -N ""
- Exchange the public ssh key (import it on the storage under stor2rrd account)
Enter the SSH public key below. When finished, press enter twice. The key is usually long.
$ ssh stor2rrd@3par_storage
  stor2rrd@3par_storage password: testpw
cli% setsshkey
It's better to copy it from inside an editor and paste it here (make sure there are no extra blanks).sshrsa AF5afPdciUTJ0PYzB6msRxFrCuDSqDwPshqWS5tGCFSoSZdE= stor2rrd pubic key SSH public key successfully set!
- Check the storage connection, you should log in without password prompt
$ ssh stor2rrd@3par_storage
- Open port 22 to the HPE 3PAR / Primera storage
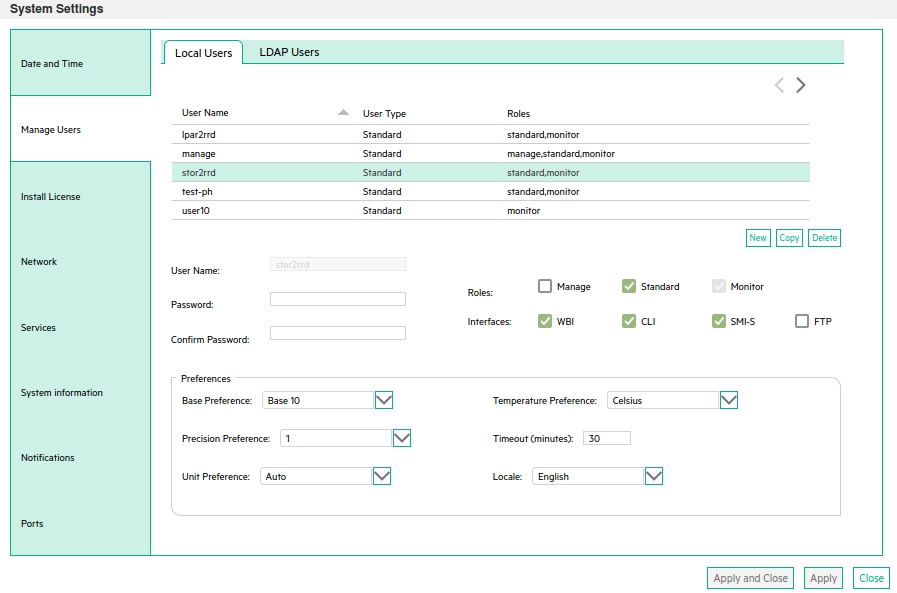
STOR2RRD storage configuration
-
Add storage into configuration from the UI:
Settings icon ➡ Storage ➡ New ➡ Vendor:device ➡ HPE 3PAR
-
Ensure you have enough of disk space on the filesystem where is STOR2RRD installed
Roughly you might count 2 - 30 GB per a storage (it depends on number of volumes, 30GB for 5000 volumes)$ df -g /home # AIX $ df -h /home # Linux
-
Test storage connectivity, either from the UI or from the command line:
$ cd /home/stor2rrd/stor2rrd
$ ./bin/config_check.sh
  =====================
  STORAGE: 3par01: 3PAR
  =====================
  ssh -o ConnectTimeout=15 -i /home/stor2rrd/.ssh/id_rsa  stor2rrd@192.168.1.1  "showuser"
  connection ok
- Schedule to run storage agent from stor2rrd crontab (lpar2rrd on Virtual Appliance, it might already exist there)
Add if it does not exist as above
$ crontab -l | grep load_3parperf.sh
$
Ensure there is already an entry with the UI creation running once an hour in crontab$ crontab -e # HPE 3PAR / Primera storage agent 0,5,10,15,20,25,30,35,40,45,50,55 * * * * /home/stor2rrd/stor2rrd/load_3parperf.sh > /home/stor2rrd/stor2rrd/load_3parperf.out 2>&1
$ crontab -e

# STOR2RRD UI (just ONE entry of load.sh must be there)
5 * * * * /home/stor2rrd/stor2rrd/load.sh > /home/stor2rrd/stor2rrd/load.out 2>&1
-
Let run the storage agent for 15 - 20 minutes to get data, then:
$ cd /home/stor2rrd/stor2rrd
$ ./load.sh
- Go to the web UI: http://<your web server>/stor2rrd/
Use Ctrl-F5 to refresh the web browser cache.
HPE XP7/XP8 is re-branded Hitachi VSP-G therefore install procedure is same as for it.
In case of usage of Virtual Appliance
Note that Virtual Storage Machines (VSM) feature is not supported by the tool.
The HPE Performance Monitor License must exist for each array and monitoring must be enabled.
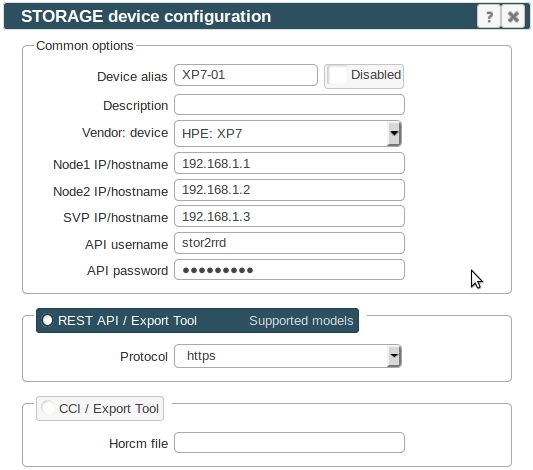
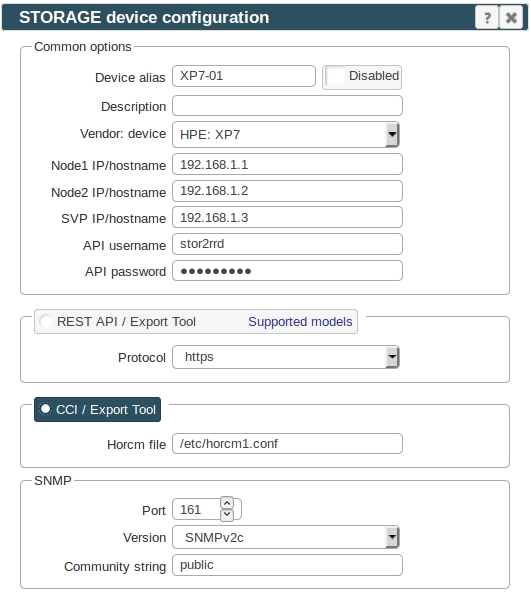
Storage configuration example
In case of usage of Virtual Appliance
- Use local account lpar2rrd for hosting of STOR2RRD on the virtual appliance
- Use /home/stor2rrd/stor2rrd as the product home
- REST API, Export Tool: use it on new models which support it, it has much easier setup
- CCI, SNMP, Export Tool: it works on all models
REST API, Export Tool
Prerequisites
-
Allow communication from STOR2RRD host to all HPE XP7 / XP8 storage SVP IP and nodes on TCP port 1099.
There mus be open even some other ports for Hitach Export Tool like: 51100, 51101 or 51099 depends on the version of the Export Tool.
Nodes IP: enable TCP port 443.
At least VSP 5500 has not available Nodes, then use SVP IP instead and allow also TCP port 443.
$ perl /home/stor2rrd/stor2rrd/bin/conntest.pl 192.168.1.1 1099
  Connection to "192.168.1.3" on port "1099" is ok
$ perl /home/stor2rrd/stor2rrd/bin/conntest.pl 192.168.1.1 443
  Connection to "192.168.1.3" on port "443" is ok
- Storage configuration:
Create user stor2rrd on the storage, read only access
Do not use shell special characters like #!?|$*[]\{}`"'& in the password, use ;:.+-%@ instead.
You can also follow this docu to fully prepare storage for monitoring
Installation of Hitachi Export Tool
-
It is typically located on a CD that comes packaged with the Service Processor on the HPE XP7/XP8 Array. The Export Tool can also be obtained by contacting HPE support.
(CD location: /ToolsPack/ExportTool)
There is a new Export Tool build for each release of the firmware. Unless you make sure all of the storage are running on the same firmware version then you will need to obtain the appropriate version of the Export Tool to meet the firmware version you are running at the site.
Find our firmware release of your storage (like 83-01-28/00).
Export Tool version must match the SVP firmware version.
Install each version of the Export Tool into separate directory named as firmware of your storage (just 6 numbers like in this example firmware 83-01-28) under root user:
# mkdir /opt/hds
# mkdir /opt/hds/83-01-28
# cd /opt/hds/83-01-28
# tar xvf export-tool.tar
# chmod 755 runUnix.sh runUnix.bat # note one of these files exists only
# chown -R stor2rrd /opt/hds
# chown -R lpar2rrd /opt/hds  # do this on the Virtual Appliance where is all under "lpar2rrd" user
In this case you do not need to install older Export Tool, just make a symlink.
# cd /opt/hds/
# ls
  83-01-28
# ln -s 83-01-28 73-03-57
Test Export Tool 2
$ cd /opt/hds/<firmware level> # example /opt/hds/88-03-23
$ bash ./runUnix.sh show interval -ip <ip controller> -login <user> <password>
  Interval : 5 min
  show interval command success
Directory /opt/hds is optional, it is configurable in /home/stor2rrd/stor2rrd/etc/stor2rrd.cfg : VSP_CLIDIR=/opt/hds
The HDS Performance Monitor License must exist for each array and monitoring must be enabled.
Storage configuration example
Allow monitoring of CU and WWN
-
Note this configuration option do not have to be in place on all modes or firmwares, you might ignore it if you do not find it on your storage.
- CU


- WWN
Note that monitoring apparently cannot be enabled when WWNs per Port exceeds the maximum of 32.
In this case you will not have direct per host data but host data will be aggregated from attached volumes (it might mislead when volumes have attached more hosts).
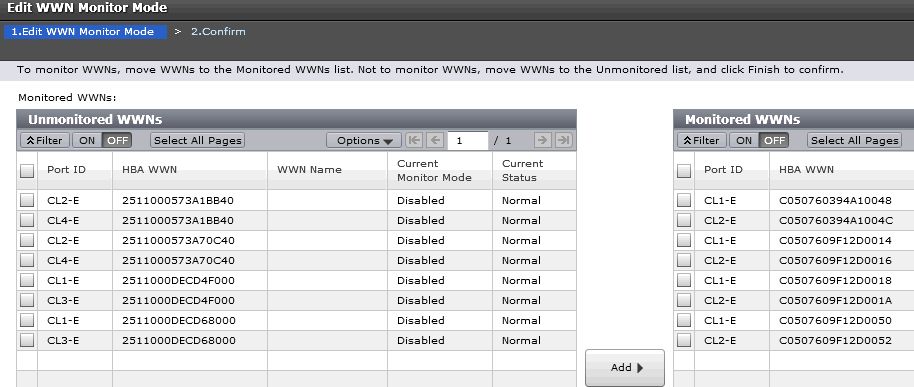
When you still do not have data then re-enable of monitoring might help.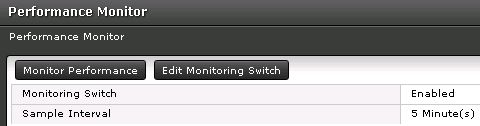
STOR2RRD storage configuration
-
Configure Export Tool installation directory in /home/stor2rrd/stor2rrd/etc/stor2rrd.cfg when is in different pathen then /opt/hds
VSP_CLIDIR=/opt/hds
- Add storage into configuration from the UI:
Settings icon ➡ Storage ➡ New ➡ Vendor:device ➡ Hitachi VSP-G ➡ REST API
When your storage model has only SVP, then use just SVP IP/hostname for SVP field and same for Node1
When your storage does not have SVP, then use for the SVP field Node1 IP/hostname
- All actions below under stor2rrd user on STOR2RRD server (lpar2rrd on Virtual Appliance)
-
Ensure you have enough of disk space on the filesystem where is STOR2RRD installed
Roughly you might count 2 - 30 GB per a storage (it depends on number of volumes, 30GB for 5000 volumes)$ df -g /home # AIX $ df -h /home # Linux
- Schedule to run storage agent from stor2rrd crontab (lpar2rrd on Virtual Appliance, it might already exist there)
Add if it does not exist as above
$ crontab -l | grep load_vspgperf.sh
$
Ensure there is already an entry with the UI creation running once an hour in crontab$ crontab -e # Hitachi VSP-G 0,5,10,15,20,25,30,35,40,45,50,55 * * * * /home/stor2rrd/stor2rrd/load_vspgperf.sh > /home/stor2rrd/stor2rrd/load_vspgperf.out 2>&1
$ crontab -e

# STOR2RRD UI (just ONE entry of load.sh must be there)
5 * * * * /home/stor2rrd/stor2rrd/load.sh > /home/stor2rrd/stor2rrd/load.out 2>&1
-
Let run the storage agent for 15 - 20 minutes to get data, then:
$ cd /home/stor2rrd/stor2rrd
$ ./load.sh
- Go to the web UI: http://<your web server>/stor2rrd/
Use Ctrl-F5 to refresh the web browser cache.
CCI, SNMP, Export Tool
The program uses 3 Hitachi (HPE) APIs. You have to install and configure all of them.- Command Control Interface (CCI)
- Hitachi (HPE) Export Tool
- SNMP API to get Health status
Note that Virtual Storage Machines (VSM) feature is not supported by the tool.
Storage configuration
-
Follow this docu to prepare your storage for monitoring.
Installation of CCI
-
Allow communication from STOR2RRD host to all storage SVC IP on TCP ports 1099, 51100
Note new firmwares might use 51101 or 51099 ports instead of 51100.
Test open ports for TCP protocols to SVP IP:Allow communication from STOR2RRD host to all storage node IP on UDP 31001$ perl /home/stor2rrd/stor2rrd/bin/conntest.pl 192.168.1.1 1099 Connection to "192.168.1.3" on port "1099" is ok $ perl /home/stor2rrd/stor2rrd/bin/conntest.pl 192.168.1.1 51100 Connection to "192.168.1.3" on port "51100" is ok
How to test UDP
-
Create user stor2rrd on the storage, read only access
- Obtain CCI installation package from your HPE representatives.
-
Install it from .iso image under root account
Mount ISO image:
- AIX command:
# loopmount -i /HS042_77.iso -o "-V cdrfs -o ro" -m /mnt
- Linux (Virtual Appliance) command:
Ensure you have installed 32 bits libraries, install them if do not# mount -o loop,ro HS042_77.iso /mnt
# yum -y install glibc.i686
- AIX command:
-
Create target directory:
# mkdir /etc/HORCM
# cd /mnt
# ./RMinstsh
-
Install from CD
# mkdir /opt
# cpio -idmu < /dev/XXXX    # where XXXX = I/O device with install media
# ln -s /opt/HORCM /HORCM
- Execute the CCI installation command:
# /HORCM/horcminstall.sh
-
Verify installation of the proper version using the raidqry command:
# raidqry -h
  Model: RAID-Manager/HP-UX
  Ver&Rev: 01-29-03/05
  Usage: raidqry [options]
-
Ensure that everything is executable and writeable by stor2rrd user
Use lpar2rrd user on the Virtual Appliance.
This is a must! Under root identification execute this:# touch /HORCM/etc/USE_OLD_IOCT # chown stor2rrd /HORCM # chown -R stor2rrd /HORCM/* /HORCM/.uds # chown -R lpar2rrd /HORCM/* /HORCM/.uds # do this on the Virtual Appliance where is all under "lpar2rrd" user # chmod 755 /HORCM /HORCM/usr/bin /HORCM/usr/bin/* /HORCM/log* /HORCM/etc/horcmgr /HORCM/etc/*conf /HORCM/.uds/
-
Install it from .iso image under root account
Configuration of CCI
- CCI communication with storage can be done either via LAN (it is something described below) or via command device (SAN attached volume from the storage).
When you have many storage in place 40+ then use rather command device as LAN communication might not be reliable enough. CCI command device configuration procedure
- Each storage must have its own config file /etc/horcmXX.conf
- Check if local ports 10001 and 10002 are not used (nothing is listening there)
# netstat -an|grep -i listen| egrep "11001|11002"
- storage with IP 192.168.1.1, conf file /etc/horcm1.conf will use local port 11001 (UDP)
Use storage node IP. SVP IP must be used in etc/storage-list.cfg further.# vi /etc/horcm1.conf HORCM_MON # ip_address service poll(10ms) timeout(10ms) localhost 11001 1000 3000 HORCM_CMD # dev_name dev_name dev_name \\.\IPCMD-192.168.1.1-31001
- storage with IP 192.168.1.10, conf file /etc/horcm2.conf
change localhost port to 11002 (from 11001 which is used above)# vi /etc/horcm2.conf HORCM_MON # ip_address service poll(10ms) timeout(10ms) localhost 11002 1000 3000 HORCM_CMD # dev_name dev_name dev_name \\.\IPCMD-192.168.1.10-31001
- Start it under stor2rrd account (definitely not under root!). Use lpar2rrd account on the Virtual Appliance
This starts HORM instance 1 (/etc/horcm1.conf)# su - stor2rrd # (use lpar2rrd user on the Appliance) $ /HORCM/usr/bin/horcmstart.sh 1
- Start HORM instance 1 & 2 (/etc/horcm1.conf & /etc/horcm2.conf)
# su - stor2rrd # (use lpar2rrd user on the Appliance) $ /HORCM/usr/bin/horcmstart.sh 1 2
- Check if they are running
$ ps -ef | grep horcm
  stor2rrd 19660912 1 0 Feb 26 - 0:03 horcmd_02
  stor2rrd 27590770 1 0 Feb 26 - 0:09 horcmd_01
- Place it into operating system start/stop scripts
# su - stor2rrd -c "/HORCM/usr/bin/horcmstart.sh 1 2"
# su - stor2rrd -c "/HORCM/usr/bin/horcmshutdown.sh 1 2"
-
When HORCM does not want to start then
- Ensure that filesystem permission are fine for /HORCM (owned by stor2rrd user)
-
Check if connection to storage IP nodes is allowed: how to test UDP
Installation of Export Tool
-
It is typically located on a CD that comes packaged with the Service Processor on the HPE XP7/XP8 Array. The Export Tool can also be obtained by contacting HPE support.
(CD location: /ToolsPack/ExportTool)
There is a new Export Tool build for each release of the firmware. Unless you make sure all of the storage are running on the same firmware version then you will need to obtain the appropriate version of the Export Tool to meet the firmware version you are running at the site.
Find our firmware release of your storage (83-01-28/00) identified by /etc/horcm1.conf (-I1):
Export Tool version must match the SVP firmware version.
Under stor2rrd account!
# su - stor2rrd # (use lpar2rrd user on the Appliance)
$ raidcom -login stor2rrd <password> -I1
$ raidqry -l -I1
  No  Group    Hostname     HORCM_ver   Uid   Serial#   Micro_ver     Cache(MB)
   1    ---   localhost   01-35-03-08     0   471234    83-01-28/00      320000
$ raidcom -logout -I1
# mkdir /opt/hds
# mkdir /opt/hds/83-01-28
# cd /opt/hds/83-01-28
# tar xvf export-tool.tar
# chmod 755 runUnix.sh runUnix.bat # note one of these files exists only
# chown -R stor2rrd /opt/hds
# chown -R lpar2rrd /opt/hds  # do this on the Virtual Appliance where is all under "lpar2rrd" user
In this case you do not need to install older Export Tool, just make a symlink.
# cd /opt/hds/
# ls
  83-01-28
# ln -s 83-01-28 73-03-57
$ cd /opt/hds/<firmware level> # example /opt/hds/88-03-23
$ bash ./runUnix.sh show interval -ip <ip controller> -login <user> <password>
  Interval : 5 min
  show interval command success
Directory /opt/hds is optional, it is configurable in /home/stor2rrd/stor2rrd/etc/stor2rrd.cfg : VSP_CLIDIR=/opt/hds
The HPE Performance Monitor License must exist for each array and monitoring must be enabled.
Storage configuration example
Allow monitoring of CU and WWN
- CU
- WWN
When you still do not have data then re-enable of monitoring might help.
Health status
-
Only the way to get health status from these storage is SNMP protocol.
- AIX
# rpm -Uvh net-snmp net-snmp-utils net-snmp-perl
- Linux
Follow this to get installed SNMP support in the tool on RHEL8 and CentOS8.
Note you might need to allow optional repositories on RHEL to yum can find it# umask 0022 # yum install net-snmp # yum install net-snmp-utils # yum install net-snmp-perl
Use rhel-7-for-power-le-optional-rpms for Linux on Power etc ...# subscription-manager repos --list ... # subscription-manager repos --enable rhel-7-server-optional-rpms
- Linux Debian/Ubuntu
Ensure that this line is commented out in /etc/snmp/snmp.conf% umask 0022 % apt-get install snmp libsnmp-perl snmp-mibs-downloader
#mibs :
If apt-get does not find snmp-mibs-downloader package then enable contrib and non-free repositories.
This feature is available since product version 2.50.
You have to install SNMP modules anyway if you use 2.50.
Install snmpwalk
Skip that in case you are on our Virtual ApplianceStorage configuration
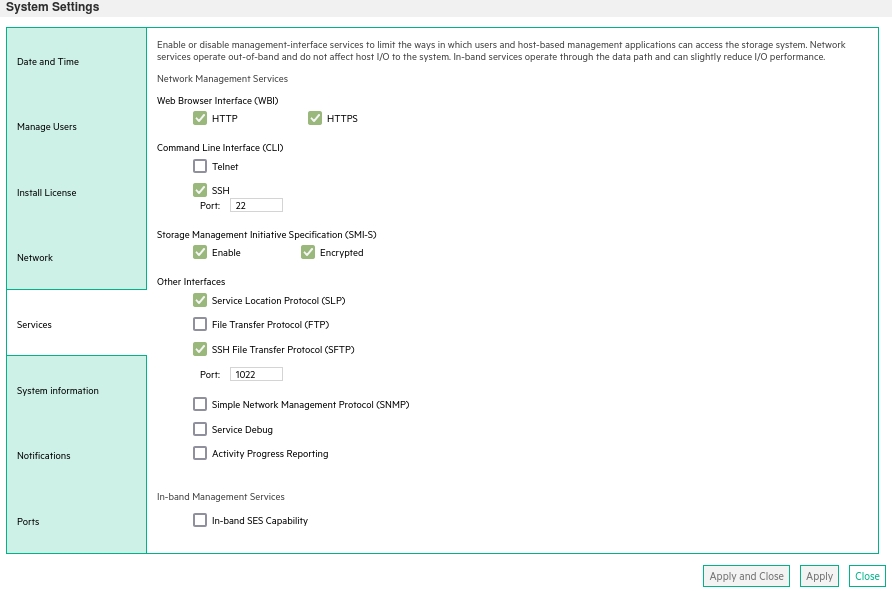
Allow SNMP on the storage, configure protocol (SNMP version), community string and permit STOR2RRD IP/hostname.  |
Network communication
Allow comunication between STOR2RRD server and the storage on CNTL IP and port 161 UDPYou can test network visibility through this test:
perl /home/stor2rrd/stor2rrd/bin/conntest_udp.pl vspg_CNTL_host.example.com 161
  UDP connection to "vspg_CNTL_host.example.com" on port "161" is ok
STOR2RRD storage configuration
- All actions below under stor2rrd user (lpar2rrd on Virtual Appliance)
-
Configure Export Tool installation directory in /home/stor2rrd/stor2rrd/etc/stor2rrd.cfg
VSP_CLIDIR=/opt/hds
-
Add storage into configuration from the UI:
Settings icon ➡ Storage ➡ New ➡ Vendor:device ➡ HPE XP7/XP8
-
Read this for setting up of health status monitoring via SNMP.
-
Make sure you have enough of disk space on the filesystem where is STOR2RRD installed
Roughly you might count 2 - 30 GB per a storage (it depends on number of volumes, 30GB for 5000 volumes)$ df -g /home # AIX $ df -h /home # Linux
-
Test storage connectivity, either from the UI or from the command line:
$ cd /home/stor2rrd/stor2rrd
$ ./bin/config_check.sh
  ======================
  STORAGE: XP7-01 : VSPG
  =======================
  connection ok
- Schedule to run storage agent from stor2rrd crontab (lpar2rrd on Virtual Appliance, it might already exist there)
Add if it does not exist as above
$ crontab -l | grep load_vspgperf.sh
$
Ensure there is already an entry with the UI creation running once an hour in crontab$ crontab -e # HPE XP7 (use Hitachi VSPG scipt load_vspgperf.sh) 0,5,10,15,20,25,30,35,40,45,50,55 * * * * /home/stor2rrd/stor2rrd/load_vspgperf.sh > /home/stor2rrd/stor2rrd/load_vspgperf.out 2>&1
$ crontab -e

# STOR2RRD UI (just ONE entry of load.sh must be there)
5 * * * * /home/stor2rrd/stor2rrd/load.sh > /home/stor2rrd/stor2rrd/load.out 2>&1
-
Let run the storage agent for 15 - 20 minutes to get data, then:
$ cd /home/stor2rrd/stor2rrd
$ ./load.sh
- Go to the web UI: http://<your web server>/stor2rrd/
Use Ctrl-F5 to refresh the web browser cache.
In case of usage of Virtual Appliance
We do not support G2 and older models which do not have SMI-S and WBI API interfaces.
- Use local account lpar2rrd for hosting of STOR2RRD on the virtual appliance
- Use /home/stor2rrd/stor2rrd as the product home
We do not support G2 and older models which do not have SMI-S and WBI API interfaces.
Storage connectivity
-
Allow access from the STOR2RRD host to the storage on ports 80 (WBI) and 5988 (SMI-S).
If you use https and secure SMI-S then test ports 443 and 5989 instead.
If you use storage cmd line configuration like in examples below (you can use the storage UI instead) then port 22 (ssh) must be open.
$ perl /home/stor2rrd/stor2rrd/bin/conntest.pl 192.168.1.1 443
  Connection to "192.168.1.1" on port "443" is ok
$ perl /home/stor2rrd/stor2rrd/bin/conntest.pl 192.168.1.1 5989
  Connection to "192.168.1.1" on port "5989" is ok
- Make sure that secure SMI-S (port 5989) and WBI HTTPS (port 443) protocols are enabled on the storage
- CMD line:
If secure SMI-S or WBI HTTPS are not enabled:
$ ssh -l manage <storage_hostname>
# show protocols
  Service and Security Protocols
  ------------------------------
  Web Browser Interface (HTTP): Enabled
  Secure Web Browser Interface (HTTPS): Enabled
  Command Line Interface (Telnet): Disabled
  Secure Command Line Interface (SSH): Enabled
  Storage Management Initiative Specification (SMI-S): Enabled
  Unsecure Storage Management Initiative Specification (SMI-S 5988): Disabled
  ...
# set protocols smis enabled
# set protocols https enabled
- UI:
- CMD line:
-
Create user stor2rrd on the storage with monitor and standard roles, allow SMI-S and WBI.
- CMD line method:
Adjust password to your preferred one from used Test1234.$ ssh -l manage <storage_hostname> # create user interfaces smis,wbi locale English password Test1234 roles monitor,standard stor2rrd
-
UI:
- CMD line method:
Install prerequisites
Skip that in case of Virtual Appliance- Linux:
Install sblim-wbemcli package:If you prefere to use https on port 5989 then you must use wbemcli with this patch 0002742# yum list |grep sblim-wbemcli sblim-wbemcli.x86_64 1.6.2-9.el7 base # yum install sblim-wbemcli # RedHat # apt-get install sblim-wbemcli # Debian based (Ubuntu etc) # /usr/bin/wbemcli -noverify -nl ei https://<storage_hostname>:5988/root/hpq:cim_computersystem * * ./wbemcli: Http Exception: Username/password required. *
Download the package from:- wbemcli-1.6.3 x86_64 for Redhat 6
- wbemcli-1.6.3 x86_64 for Redhat 7
- wbemcli-1.6.3 for other Linuxes: ➡ Select your OS in the header ➡ "Grab binary packages directly"
- wbemcli_x86_64.gz as general Linux binary, gunzip and replace /usr/bin/wbemcli by this
Test the package:# rpm -q sblim-wbemcli sblim-wbemcli-1.6.3-31.1.x86_64 # /usr/bin/wbemcli -v * wbemcli Version 1.6.3 # /usr/bin/wbemcli -noverify -nl ei http://<storage_hostname>:5988/root/hpq:cim_computersystem * * ./wbemcli: Http Exception: Username/password required. *
- AIX:
Download and install- libffi-3.1-1
- libiconv-1.14-2
- libidn-1.29-1
- libssh2-1.4.3-2
- openssl-1.0.1j-1
- openldap-2.4.23-0.3
- curl-7.27.0-1
- sblim-wbemcli-1.6.3 with 0002742 patch
# rpm -Uvh libffi-3.1-1.aix5.1.ppc.rpm --nodeps
# rpm -Uvh libiconv-1.14-2.aix5.1.ppc.rpm --nodeps
# rpm -Uvh libidn-1.29-1.aix5.1.ppc.rpm --nodeps
# rpm -Uvh libssh2-1.4.3-2.aix5.1.ppc.rpm --nodeps
# rpm -Uvh openssl-1.0.1j-1.aix5.1.ppc.rpm
# rpm -Uvh openldap-2.4.23-0.3.aix5.1.ppc.rpm
# rpm -Uvh curl-7.27.0-1.aix5.1.ppc.rpm
# rpm -Uvh wbemcli-1.6.3-1.aix5.1.ppc.rpm

# LIBPATH=/opt/freeware/lib; export LIBPATH
# /opt/freeware/bin/wbemcli -noverify -nl ei http://<storage_hostname>:5988/root/hpq:cim_computersystem
  *
  * ./wbemcli: Http Exception: Username/password required.
  *
STOR2RRD storage configuration
- All actions below under stor2rrd user (lpar2rrd on Virtual Appliance)
-
Add storage into configuration from the UI:
Settings icon ➡ Storage ➡ New ➡ Vendor:device ➡ HPE MSA 2000/1000
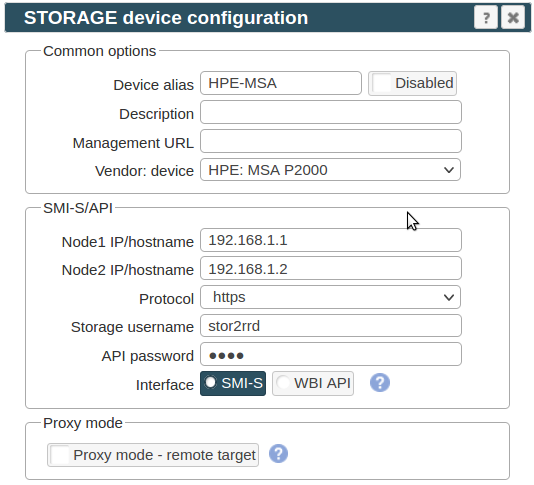
If you set https in above storage properties then this must be enabled on the storage:$ ssh -l manage <storage_hostname> # show protocols ... Secure Web Browser Interface (HTTPS): Enabled Storage Management Initiative Specification (SMI-S): Enabled ...
If you use http then this:Web Browser Interface (HTTP): Enabled Unsecure Storage Management Initiative Specification (SMI-S 5988): Enabled
-
Do not use shell special characters like @#!?|$*[]\{}`"'& in the password, use rather ;:.+- instead.
-
Make sure you have enough of disk space on the filesystem where is STOR2RRD installed
Roughly you might count 2 - 30 GB per a storage (it depends on number of volumes, 30GB for 5000 volumes)$ df -g /home # AIX $ df -h /home # Linux
-
Test storage connectivity, either from the UI or from the command line:
If you use HTTPS and do not have installed Perl SSL support then you get an error:
$ cd /home/stor2rrd/stor2rrd
$ ./bin/config_check.sh
  =====================
  STORAGE: HPE-MSA
  =====================
  connection ok
"Missing LWP::Protocol::https", "Connection reset by peer" or "500 SSL negotiation failed"
Follow this or switch to HTTP on the storage line in etc/storage-list.cfg.
Newer storage firmware releases (GL225R003) might require higher user role for SMI-S access.
Try to use "manage" role if you get this error:$ /usr/bin/wbemcli -noverify -nl ei https://stor2rrd@<IP/hostname>:5989/root/hpq:cim_computersystem $ /usr/bin/wbemcli -noverify -nl ei http://stor2rrd@<IP/hostname>:5988/root/hpq:cim_computersystem * * /usr/bin/wbemcli: Http Exception: Invalid username/password. *
- Schedule to run storage agent from stor2rrd crontab (lpar2rrd on Virtual Appliance, it might already exist there)
Add if it does not exist as above
$ crontab -l | grep load_dothillperf.sh
$
Ensure there is already an entry with the UI creation running once an hour in crontab$ crontab -e # DotHill AssuredSAN and its rebrands like Lenovo S2200 or HPE MSA 2000/1000 0,5,10,15,20,25,30,35,40,45,50,55 * * * * /home/stor2rrd/stor2rrd/load_dothillperf.sh > /home/stor2rrd/stor2rrd/load_dothillperf.out 2>&1
$ crontab -e

# STOR2RRD UI (just ONE entry of load.sh must be there)
5 * * * * /home/stor2rrd/stor2rrd/load.sh > /home/stor2rrd/stor2rrd/load.out 2>&1
-
Let run the storage agent for 15 - 20 minutes to get data, then:
$ cd /home/stor2rrd/stor2rrd
$ ./load.sh
- Go to the web UI: http://<your web server>/stor2rrd/
Use Ctrl-F5 to refresh the web browser cache.
Troubleshooting
- Ensure SMI-S is working for user stor2rrd. Adjust password and storage_hostname in example below:
$ /usr/bin/wbemcli -nl -t -noverify ein 'http://stor2rrd:<password>@<storage_hostnamew>:5988/root/hpq:SMI_Controller'
  192.168.1.1:5988/root/smis:SMI_Controller.Name="208000c0ff261f53:A",CreationClassName="SMI_Controller"
  192.168.1.2:5988/root/smis:SMI_Controller.Name="208000c0ff261f53:B",CreationClassName="SMI_Controller"
When it does not work then check user rights of stor2rrd user (must have "smis"), network visibility (firewall), user/password combination.
In case of usage of Virtual Appliance
- Use local account lpar2rrd for hosting of STOR2RRD on the virtual appliance
- Use /home/stor2rrd/stor2rrd as the product home
Storage connectivity
-
Allow access from the STOR2RRD host to the HPE Nimble storage on port 22 (ssh).
$ perl /home/stor2rrd/stor2rrd/bin/conntest.pl 192.168.1.1 22
  Connection to "192.168.1.1" on port "22" is ok
-
Create user stor2rrd on the storage with guest role.
- Create ssh-keys on STOR2RRD host under stor2rrd user if do not exist yet.
It should already exist on the Virtual Appliance, skip it there.
Type enter instead of passphrase# su - stor2rrd # (use lpar2rrd user on the Appliance) $ ls -l ~/.ssh/id_rsa.pub $ ssh-keygen -t rsa -N "" Generating public/private rsa key pair. Enter file in which to save the key (/home/stor2rrd/.ssh/id_rsa): ... $ ls -l ~/.ssh/id_rsa.pub -rw-r--r-- 1 stor2rrd stor2rrd 382 Jun 1 12:47 /home/stor2rrd/.ssh/id_rsa.pub
New storage devices might require stronger key, use this one instead of above 'RSA'$ ssh-keygen -t ecdsa -b 521 -N ""
- Add stor2rrd ssh rsa key, all is one line in sshkey command
Only Administrator role can add ssh keys. Therefore log as admin for adding of stor2rrd user ssh key.$ cat ~/.ssh/id_rsa.pub $ ssh -l admin 192.168.1.1 Nimble OS $ sshkey --add stor2rrdkey --user stor2rrd --type rsa --key "AAAAB3NzaC1...gOPqT stor2rrd@stor2rrd.com" Nimble OS $ sshkey --list --user stor2rrd --------------------+------------------------------+--------- User Name Type- --------------------+------------------------------+--------- stor2rrd stor2rrdkey rsa -
Try ssh connection:
$ ssh stor2rrd@192.168.1.1 "array --list"
  ---------------------+-----------------+-----------+----------------+-----------
  Name                  Serial            Model       Version          Status
  ---------------------+-----------------+-----------+----------------+-----------
  nimble01              VM-004531         Virtual     3.3.0.0-363982-opt reachable
STOR2RRD storage configuration
- All actions below under stor2rrd user (lpar2rrd on Virtual Appliance)
-
Add storage into configuration from the UI:
Settings icon ➡ Storage ➡ New ➡ Vendor:device ➡ HPE Nimble

In case of you are using more than one Nimble array on the same Nimble mgmt server then you have to configure each array separately in the stor2rrd UI.
Use the same SSH access for each array in the stor2rrd configuration (Host name or IP, SSH port, SSH user).
Only "Array name" will be different and should reflect array which you want to monitor.
-
Make sure you have enough of disk space on the filesystem where is STOR2RRD installed
Roughly you might count 2 - 30 GB per a storage (it depends on number of volumes, 30GB for 5000 volumes)$ df -g /home # AIX $ df -h /home # Linux
-
Test storage connectivity, either from the UI or from the command line:
$ cd /home/stor2rrd/stor2rrd
$ ./bin/config_check.sh nimble_alias01
  =====================
  STORAGE: nimble_alias01 : NIMBLE
  =====================
  connection ok
- Schedule to run storage agent from stor2rrd crontab (lpar2rrd on Virtual Appliance, it might already exist there)
Add if it does not exist as above
$ crontab -l | grep load_nimbleperf.sh
$
Ensure there is already an entry with the UI creation running once an hour in crontab$ crontab -e # Nimble storage agent 0,5,10,15,20,25,30,35,40,45,50,55 * * * * /home/stor2rrd/stor2rrd/load_nimbleperf.sh > /home/stor2rrd/stor2rrd/load_nimbleperf.out 2>&1
$ crontab -e

# STOR2RRD UI (just ONE entry of load.sh must be there)
5 * * * * /home/stor2rrd/stor2rrd/load.sh > /home/stor2rrd/stor2rrd/load.out 2>&1
-
Let run the storage agent for 15 - 20 minutes to get data, then:
$ cd /home/stor2rrd/stor2rrd
$ ./load.sh
- Go to the web UI: http://<your web server>/stor2rrd/
Use Ctrl-F5 to refresh the web browser cache.
In case of usage of Virtual Appliance
Supported is storage firmware version 3.x and 4.x.
- Use local account lpar2rrd for hosting of STOR2RRD on the virtual appliance
- Use /home/stor2rrd/stor2rrd as the product home
Supported is storage firmware version 3.x and 4.x.
Storage connectivity
-
Allow access from the STOR2RRD host to the storage on port 443 (https).
$ perl /home/stor2rrd/stor2rrd/bin/conntest.pl 192.168.1.1 443
  Connection to "192.168.1.1" on port "443" is ok
-
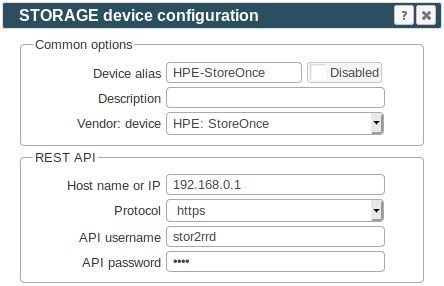
Create user stor2rrd on StoreOnce node with user role.

STOR2RRD storage configuration
- All actions below under stor2rrd user (lpar2rrd on Virtual Appliance)
-
Add storage into configuration from the UI:
Settings icon ➡ Storage ➡ New ➡ Vendor:device ➡ HPE StoreOnce
-
Make sure you have enough of disk space on the filesystem where is STOR2RRD installed
Roughly you might count 2 - 30 GB per a storage (it depends on number of volumes, 30GB for 5000 volumes)$ df -g /home # AIX $ df -h /home # Linux
-
Test storage connectivity, either from the UI or from the command line:
If you get an errors like "Missing LWP::Protocol::https", "Connection reset by peer" or "500 SSL negotiation failed" then follow this.
$ cd /home/stor2rrd/stor2rrd
$ ./bin/config_check.sh storeonce-alias01
  =====================
  STORAGE: storeonce-alias01 : STOREONCE
  =====================
  connection ok
- Schedule to run storage agent from stor2rrd crontab (lpar2rrd on Virtual Appliance, it might already exist there)
Add if it does not exist as above
$ crontab -l | grep load_storeonceperf.sh
$
Ensure there is already an entry with the UI creation running once an hour in crontab$ crontab -e # HPE StoreOnce 0,5,10,15,20,25,30,35,40,45,50,55 * * * * /home/stor2rrd/stor2rrd/load_storeonceperf.sh > /home/stor2rrd/stor2rrd/load_storeonceperf.out 2>&1
$ crontab -e

# STOR2RRD UI (just ONE entry of load.sh must be there)
5 * * * * /home/stor2rrd/stor2rrd/load.sh > /home/stor2rrd/stor2rrd/load.out 2>&1
-
Let run the storage agent for 15 - 20 minutes to get data, then:
$ cd /home/stor2rrd/stor2rrd
$ ./load.sh
- Go to the web UI: http://<your web server>/stor2rrd/
Use Ctrl-F5 to refresh the web browser cache.
In case of usage of Virtual Appliance
- Use local account lpar2rrd for hosting of STOR2RRD on the virtual appliance
- Use /home/stor2rrd/stor2rrd as the product home
Prerequisites
Install Perl module IO::Pty under root if it does not exist on your host yet:-
Linux
yum:# yum install perl-IO-Tty
CPAN:# umask 022 # cpan -f install IO::Pty
Debian:# apt-get install libio-pty-perl
-
AIX
Download it here: perl-IO-Tty-1.07-1.aix5.1.ppc.rpm
# rpm -Uvh perl-IO-Tty-1.07-1.aix5.1.ppc.rpm
Test its presence
$ su - stor2rrd
$ cd /home/stor2rrd/stor2rrd
$ . etc/stor2rrd.cfg
$ $PERL -MIO::Pty -e ';'
When it prints error like "Can't locate IO/Pty.pm in @INC" then something is wrong with installation.
Storage connectivity
-
Allow access from the STOR2RRD host to the storage on port 16022 (ssh protocol).
$ perl /home/stor2rrd/stor2rrd/bin/conntest.pl 192.168.1.1 16022
  Connection to "192.168.1.1" on port "16022" is ok
-
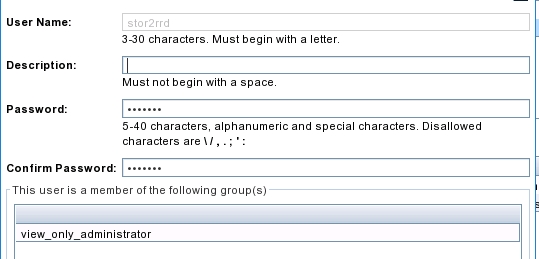
Create user stor2rrd on StoreVirtual in view_only_administrator role.
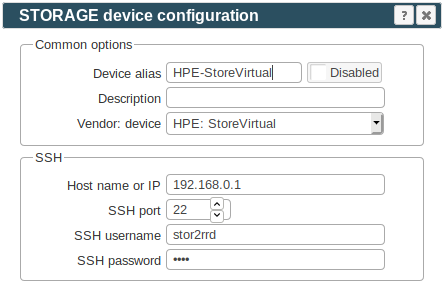
STOR2RRD storage configuration
- All actions below under stor2rrd user (lpar2rrd on Virtual Appliance)
-
Add storage into configuration from the UI:
Settings icon ➡ Storage ➡ New ➡ Vendor:device ➡ Hitachi HNAS
-
Make sure you have enough of disk space on the filesystem where is STOR2RRD installed
Roughly you might count 2 - 30 GB per a storage (it depends on number of volumes, 30GB for 5000 volumes)$ df -g /home # AIX $ df -h /home # Linux
-
Test storage connectivity, either from the UI or from the command line:
It requires Perl module IO:Pty, install it when ./bin/config_check.sh detects it.
$ cd /home/stor2rrd/stor2rrd
$ ./bin/config_check.sh storevirtual-alias01
  =====================
  STORAGE: storevirtual-alias01 : STOREVIRTUAL
  =====================
  connection ok
- Schedule to run storage agent from stor2rrd crontab (lpar2rrd on Virtual Appliance, it might already exist there)
Add if it does not exist as above
$ crontab -l | grep load_storevirtualperf.sh
$
Ensure there is already an entry with the UI creation running once an hour in crontab$ crontab -e # HPE StoreVirtual, LeftHand 0,5,10,15,20,25,30,35,40,45,50,55 * * * * /home/stor2rrd/stor2rrd/load_storevirtualperf.sh > /home/stor2rrd/stor2rrd/load_storevirtualperf.out 2>&1
$ crontab -e

# STOR2RRD UI (just ONE entry of load.sh must be there)
5 * * * * /home/stor2rrd/stor2rrd/load.sh > /home/stor2rrd/stor2rrd/load.out 2>&1
-
Let run the storage agent for 15 - 20 minutes to get data, then:
$ cd /home/stor2rrd/stor2rrd
$ ./load.sh
- Go to the web UI: http://<your web server>/stor2rrd/
Use Ctrl-F5 to refresh the web browser cache.
In case of usage of Virtual Appliance
WBI access must be used on new storage models which do not support SMI-S protocol.
- Use local account lpar2rrd for hosting of STOR2RRD on the virtual appliance
- Use /home/stor2rrd/stor2rrd as the product home
WBI access must be used on new storage models which do not support SMI-S protocol.
Storage connectivity
-
Allow access from the STOR2RRD host to the storage on ports 443.
$ perl /home/stor2rrd/stor2rrd/bin/conntest.pl 192.168.1.1 443
  Connection to "192.168.1.1" on port "443" is ok
- Make sure that secure and WBI HTTPS (port 443) protocol is enabled on the storage
- CMD line:
If secure WBI HTTPS is not enabled:
$ ssh -l manage <storage_hostname>
# show protocols
  Service and Security Protocols
  ------------------------------
  ...
  Secure Web Browser Interface (HTTPS): Enabled
  ...
# set protocols https enabled
- UI:
- CMD line:
-
Create user stor2rrd on the storage with monitor and standard roles, allow WBI.
- CMD line method:
Adjust password to your preferred one from used Test1234.$ ssh -l manage <storage_hostname> # create user interfaces wbi locale English password Test1234 roles monitor,standard stor2rrd
-
UI:
- CMD line method:
STOR2RRD storage configuration
- All actions below under stor2rrd user (lpar2rrd on Virtual Appliance)
-
Add storage into configuration from the UI:
Settings icon ➡ Storage ➡ New ➡ Vendor:device ➡ HPE MSA 2000/1000
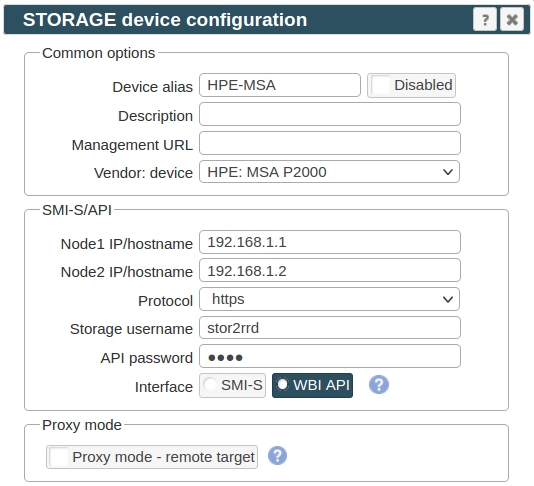
If you set https in above storage properties then this must be enabled on the storage:$ ssh -l manage <storage_hostname> # show protocols ... Secure Web Browser Interface (HTTPS): Enabled ...
If you use http then this:Web Browser Interface (HTTP): Enabled
-
Make sure you have enough of disk space on the filesystem where is STOR2RRD installed
Roughly you might count 2 - 30 GB per a storage (it depends on number of volumes, 30GB for 5000 volumes)$ df -g /home # AIX $ df -h /home # Linux
-
Test storage connectivity, either from the UI or from the command line:
If you use HTTPS and do not have installed Perl SSL support then you get an error:
$ cd /home/stor2rrd/stor2rrd
$ ./bin/config_check.sh
  =====================
  STORAGE: HPE MSA
  =====================
  connection ok
"Missing LWP::Protocol::https", "Connection reset by peer" or "500 SSL negotiation failed"
Follow this or switch to HTTP
- Schedule to run storage agent from stor2rrd crontab (lpar2rrd on Virtual Appliance, it might already exist there)
Add if it does not exist as above
$ crontab -l | grep load_dothillperf.sh
$
Ensure there is already an entry with the UI creation running once an hour in crontab$ crontab -e # DotHill AssuredSAN and its rebrands like Lenovo S2200 or HPE MSA 2000/1000 0,5,10,15,20,25,30,35,40,45,50,55 * * * * /home/stor2rrd/stor2rrd/load_dothillperf.sh > /home/stor2rrd/stor2rrd/load_dothillperf.out 2>&1
$ crontab -e

# STOR2RRD UI (just ONE entry of load.sh must be there)
5 * * * * /home/stor2rrd/stor2rrd/load.sh > /home/stor2rrd/stor2rrd/load.out 2>&1
-
Let run the storage agent for 15 - 20 minutes to get data, then:
$ cd /home/stor2rrd/stor2rrd
$ ./load.sh
- Go to the web UI: http://<your web server>/stor2rrd/
Use Ctrl-F5 to refresh the web browser cache.